crunch and hook

DIY Captain Hook and Cap’n Crunch Costumes

October is over, which means one more Halloween has come and gone for this costume-loving DIYer. In an effort to avoid overthinking, I decided to dress up as the first thing that really spoke to me: the villainous Captain Hook.

“Which Hook?” you ask? As in, the larger-than-life, murderous pirate from Disney’s Peter Pan, or the delightful Dustin Hoffman in Hook, one of my favorite childhood films? The answer is…Read More »

handmade chambray top

Chambray V-Neck Shirt

With each year that passes since I started sewing in 2013, I buy fewer clothes. It’s impossible to quell Inner Sewing Voice saying, “Meh, I could probably make that. Or something like it.” It’s annoying, because the truth is I absolutely cannot make every piece of clothing I see and like. Sometimes Inner Sewing Voice needs to be taken down a peg.

Read More »

strathcona men's tee twin needle neck binding

Twin Needlin’

Winter has been cramping my style lately. It gets dark at approximately 4 p.m. each day, making it impossible to snap blog-worthy pics without resorting to hideous artificial light. That said, I don’t want to jump ship from posting for the next four months, so this post marks the official lowering of my standards for photos. Sorry, y’alls, but it had to happen sometime. (I feel the need to confess here that 99% of my photos have been taken with my Samsung Galaxy S 3 camera phone…)

I haven’t had time to take proper photos of a couple items I’ve recently sewn (men’s Strathcona T-shirt and a super-easy knit skirt), so I wanted to share a few detail images of my favorite new finishing/hem technique: the twin-needle stitch!

strathcona men's tee twin needle neck binding

Here, a twin stitch is used on the neckband of a nearly finished Strathcona tee for Marc.

opposite side of the twin needle hem

Here’s the opposite side of the hem of a knit skirt.

Why was I so terrified of using twin needles for so long?! It turns out they’re just as easy to use as a regular needle (just takes an extra second the thread), and they provide knit garments with a hem that looks less homespun and more RTW professional. I’m excited to have this simple finish in my small but growing bag of tricks. How do you use twin needles? Any tips?

Stay tuned for sewn garment posts, and try to stay safe on the road this holiday weekend! We had a slight mishap on our way out of the Chicago:

ht and run
Hit-and-run drivers are THE WORST #Chicago

This year, I’m thankful for my friends, family, and that we got out of that little accident completely unscathed. Happy Thanksgiving!

Adventures in Making Apple Brandy

DIY apple brandy

Normally I stay away from super sweet liquors—one thought of my brief, but memorable college flirtation with UV Blue sends me into a panicked dry heave. But since it’s fall and everything’s being pumpkin-spiced and butternut-squashed out the wazoo, I’m making an exception for a decidedly autumnal drink: apple brandy. My boyfriend’s mom sent me a recipe for a cocktail called the Sir Isaac Newton, which calls for apple-cider cinnamon syrup, lemon juice, apple brandy, and bitters. It sounds like a great post-dinner treat for chilly nights, but I’ve never even bought brandy, let alone apple brandy.

I was poised to do some research on the subject when one of my go-to blogs, Design*Sponge, posted a recipe for a delicious-sounding drink called Stop! Apple Thyme. Not only does this cocktail contain apple brandy, the authors even went so far as to whip up their own batch. The recipe contains instructions for making your own, but I decided to do some Googling to compare theirs to the industry standard. And by “industry” I mean what the Interwebs tells me. Most recipes had similar ingredients but widely varying steeping times, from two hours to three weeks.

I settled for the recipe from Taste of Home, which calls for steeping the mixture for two weeks. It also calls for a ton of sugar. Like, a Sweet Tea ton of sugar, which is a lot for a Northerner to handle. Since my container’s only so big, I sacrificed extra apples and cut the sugar down by half. Fingers crossed that it turns out!

DIY apple brandy

Homemade Apple Brandy

Recipe slightly adapted from Taste of Home

  • Five large apples, sliced (I used a combo of Honeycrisp, Gala, and Granny Smith)
  • 750 mL of brandy
  • 2 cups sugar
  • 1 cup water
  • 2 cinnamon sticks
  • 3 whole cloves

I followed Taste of Home’s instructions pretty much to a T, meaning that I made 2:1 simple syrup with the sugar and water and then combined all the ingredients in a large plastic pitcher (with a sealed lid).

make your own apple brandy at home

And now, we wait. This recipe calls for the mixture to be stirred at the halfway point (one week), but I might give it a shake every few days depending on how it’s looking. It seems strange to leave a bunch of apples sitting at room temperature for half a month, but I am obviously a novice at this so maybe that’s standard protocol. I should also note that this was the only kind of brandy Mariano’s carries. It’s $11.99—should I be worried?

Check back in a couple weeks for an update! Have any ideas for apple-brandy cocktails?


PDF Sewing Pattern Roundup

PDF sewing patterns

I’ve never been much of a goal setter. That’s not to say I lack ambition, I just find it depressing to write down a list of goals, promptly forget about said list, and then stumble upon it months later to find that I’ve accomplished maaaybe one of them. Cynical, I know. But that’s where the blog comes in: If I state a goal in an online forum, I’m forced to hold myself accountable for its success or failure. Plus, you can’t lose the Internet like you might a list of goals written illegibly on a coffee-stained post-it.

So this summer, with this little blog as my witness, I made a tangible goal: sew at least one PDF pattern from an independent designer each month. Easy enough, right? I’m happy and slightly shocked to say that I exceeded that goal. I strayed from PDF patterns on a couple of occasions, but the majority of my summer sewing has come straight from the printer. Here’s the rundown:

Number of patterns used: 5
Items sewn: 9
Total money spent on patterns: $40.81

The Patterns

(Overall ratings are out of 5 bobbins)

Grainline Studio Scout woven tee sewing grainline studio knit madewell scout tee

Scout Tee by Grainline Studio

Price: $12 (up from $7.50 when I bought it)
Skill level: beginner
Number of pages: 24
Sewn garments: woven Scout; split-front knit Scout
Relevant tutorials used: Madewell variation
Cons: might be a little loose/shapeless if you like tighter fitting garments
Pros: highly customizable—Grainline’s blog offers a handful of step-by-step variations; very comfortable
Sew it again?: yes!
Overall rating: 5 bobbins

Colette Sorbetto top colette sorbetto crop top

Sorbetto by Colette Patterns

Price: Free
Skill level: beginner
Number of pages: 25
Sewn garments: chambray Sorbetto; crop top Sorbetto
Relevant tutorials used: continuous bias tape
Cons: short in the body; tight armholes
Pros: exposed bias binding allows for cool contrast fabric; cute front pleat; good pattern directions
Sew it again?: possibly, if I find a great print for a tank next summer
Overall rating: 3.5 bobbins

sewing portside dopp kit by grainline studio

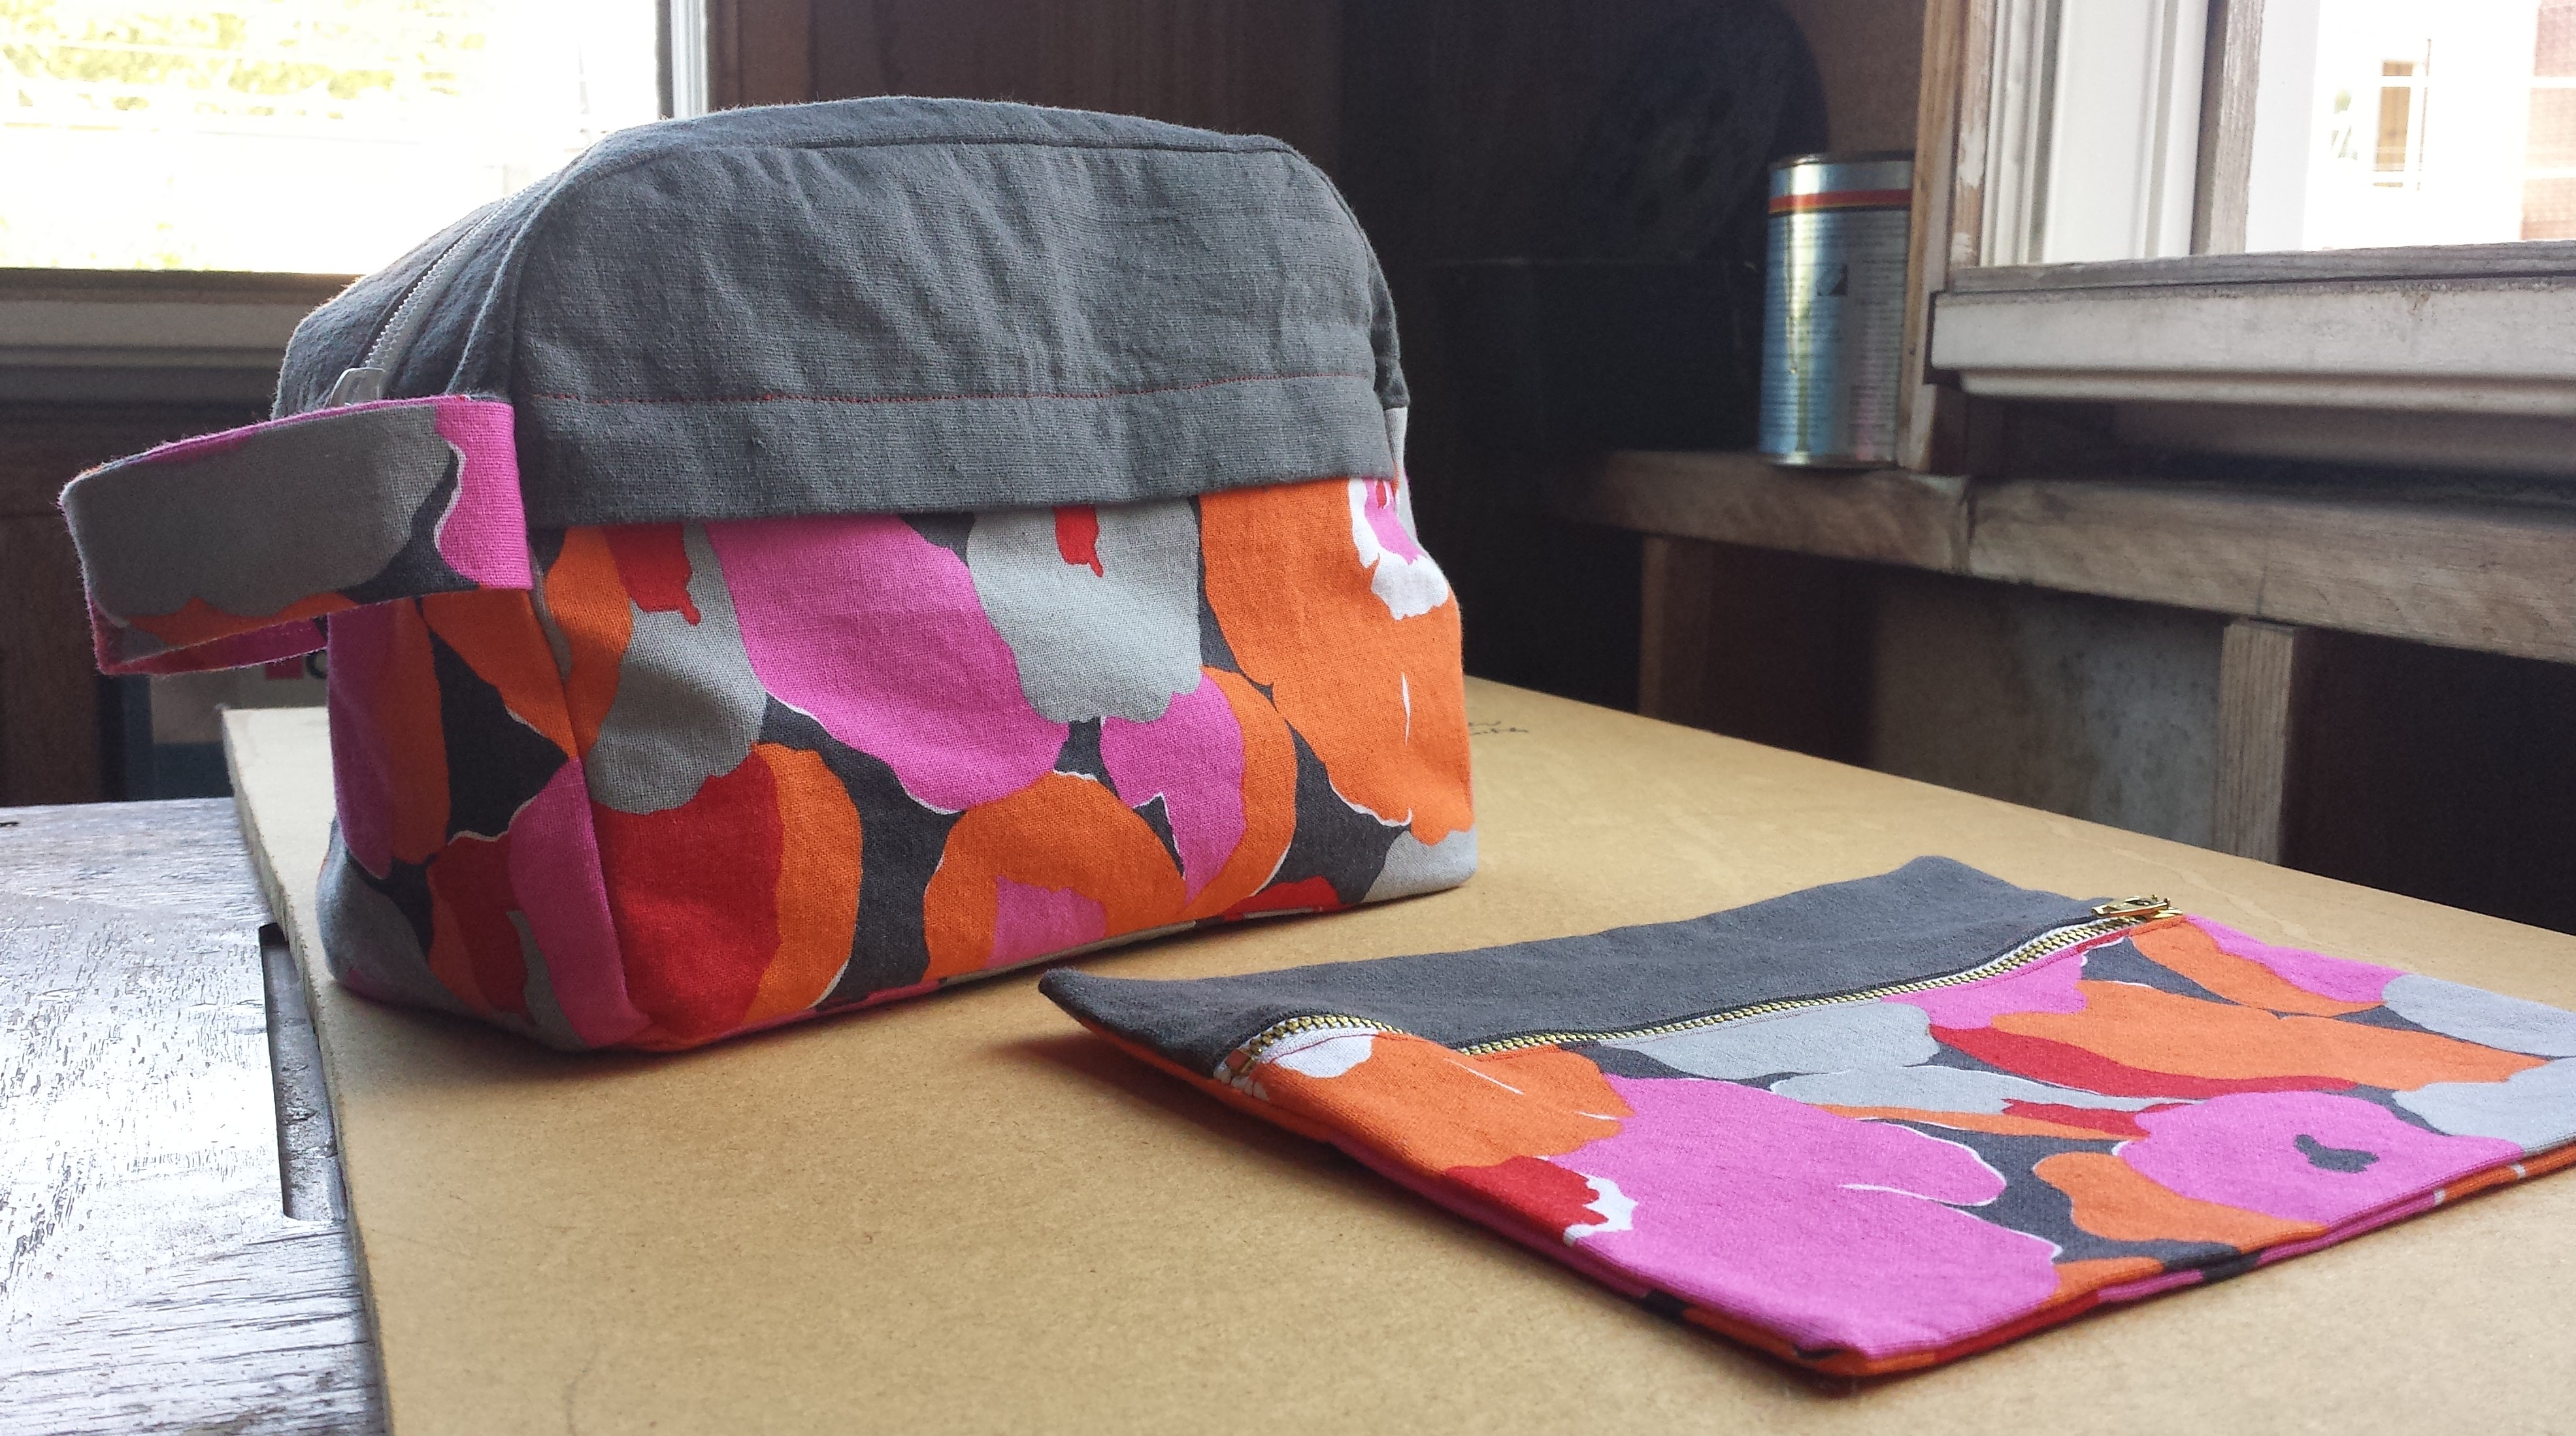
Portside Travel Set by Grainline Studio

Price: $14
Skill level: advanced beginner
Number of pages: 58
Sewn itemsdopp kit; small pouch
Cons: so many pages=tons of time taping and cutting
Pros: three patterns for one price; the dopp kit is a great size for a toiletry bag
Sew it again?: yes, to make the duffel bag or another dopp kit for a gift
Overall rating: 4 bobbins

sewing linen floral shirtdress

Buttonless Shirt Dress by Salme Patterns

Price: $8
Skill level: beginner/intermediate
Number of pages: 21
Sewn itemsfloral linen shirt dress
Cons: no seam allowance included on the pattern; shapeless until you belt it
Pros: you can showcase a cool print
Sew it again?: no
Overall rating: 2.5 bobbins

blue hudson pant floral pant back

Hudson Pant by True Bias

Price: $10
Number of pages: 35
Skill level: advanced beginner
Sewn itemsblue pants; abstract print pants
Relevant tutorials used: Hudson Pant sewalong
Cons: crotch doesn’t fit perfectly
Pros: option for contrasting cuffs and waistband; pockets; great pattern directions; easy-to-follow online sewalong
Sew it again?: yes
Overall rating: 4.5 bobbins

And the winner is… Grainline’s Scout Tee! True Bias’s Hudson Pant comes in at a close second. Both of these patterns feature great directions and, most importantly, a modern cut. Scout is great for a sewist of any skill level, whereas the Hudson Pants are good if you’ve already got several projects under your belt and some adeptness with knits.

I’m always looking for great patterns from independent labels, so let me know if you have any favorites! They don’t have to be strictly PDF patterns either. After printing, taping, and cutting so many pages, I might start mixing up my PDF downloads with printed patterns shipped to me in a neat little package.

And since I’m a glutton for stress, here’s my goal for fall: sew at least one garment/item for another person each month.

Fin.

(Do you end a goal like you do a black-and-white movie? I’m new to this. Please halp.)

Grainline Scout Tee: Knit Madewell Variation

madewell scout tee grainline studio sewing

This top was a no brainer. I had a little over a yard of black ponte knit fabric left after making this simple half-circle skirt, and I’ve been crushing on Jen’s Madewell Scout variation since she posted the pattern and sewing tutorials this spring.

madewell scout tee variation sewing

The tutorial was easy to follow and well photographed, making for a relatively quick project, albeit finished over a couple days because of weekday time constraints. Sidenote: Kudos to anyone with the patience to start and finish a project during the workweek. Try as I might, I always end up finishing on a Saturday or Sunday and then promptly celebrating with several cold beverages.

The Madewell variation calls for three changes to the original Scout pattern:

  1. Raised neckline with a split opening
  2. Slightly curved bottom hem
  3. Longer sleeves with a fold

I had every intention of incorporating each change, but I was just shy of having enough fabric for the lengthened sleeves so I sewed those up like normal. Since I used a knit, this knit Scout tutorial also came in handy when it came to cutting the fabric, hemming, and cutting neckband binding.

I’ve gotten lots of wear out of my first Scout tee, but I have noticed a tiny bit of tightness across my back from armpit to armpit. One of my goals this year is to achieve a more perfect fit with my garments, so I wanted to make sure that I addressed the tight-back issue on this Scout. A Google search turned up this gem from Threads, and it goes into lengthy detail about how to adjust a pattern piece if you have a broad back (or a narrow back, but I have no clue what that looks like since the breadth of my upper ribs rivals that of most NFL linebackers).

threads magazine adjust a pattern for a broad back

I slashed the pattern and added about a half inch between the mid-shoulder to hem, as the Threads image shows. After that adjustment, I simply altered the neckline and hemline per Jen’s instructions and got to work.

grainline studio scout knit madewell tee

Creating the split front was surprisingly easy, just make sure to leave enough binding on either side of the V (Grainline’s tutorial pic here). I left too small an amount on one side and struggled to get a clean finish on the wrong side of the garment. I also wasn’t entirely sure how to hem the curved edges where they met, so I just tapered the standard half inch hem at those spots. Other than that, this came together like a dream and is amazingly comfy. I’m glad to have some solid black staples in my wardrobe now, but my print-hungry brain is dying for an insanely bold pattern.

grainline studio madewell scout tee

The Hudson Pant is next up on my docket, so stay tuned for some possibly wacky-printed track pants. Let me know in the comments if you’ve sewn these up yet and have any tips!

Sew Quilted Coasters with Leftover Fabric

Sorry for the dinky length of this post—I’m headed to Minneapolis this evening to be reunited with a dear college friend and his cat Barbie (whom I am not plotting to steal), but I didn’t want to neglect the blog for a full week. So, coasters!

sew quilted coasters

I made these quilted coasters months ago following a simple Martha Stewart tutorial, and I use them nearly every day. Whether you make 1 or 20, they’re a great way to use up leftovers from your Island of Misfit Fabric Remnants.

sew quilted coasters

The best part about these coasters is that you can throw them in the wash when you inevitably spill coffee or red wine on them.

Obviously I had to make some gratuitous comically undersized coasters:

comically undersized quilted coasters

comically undersized coasters
coasters for all of your drinking needs!

If you have any clever ways to utilize leftover fabric, post in the comments below. Happy sewing!