Chambray Archer Button Up

grainline studio archer button up view B

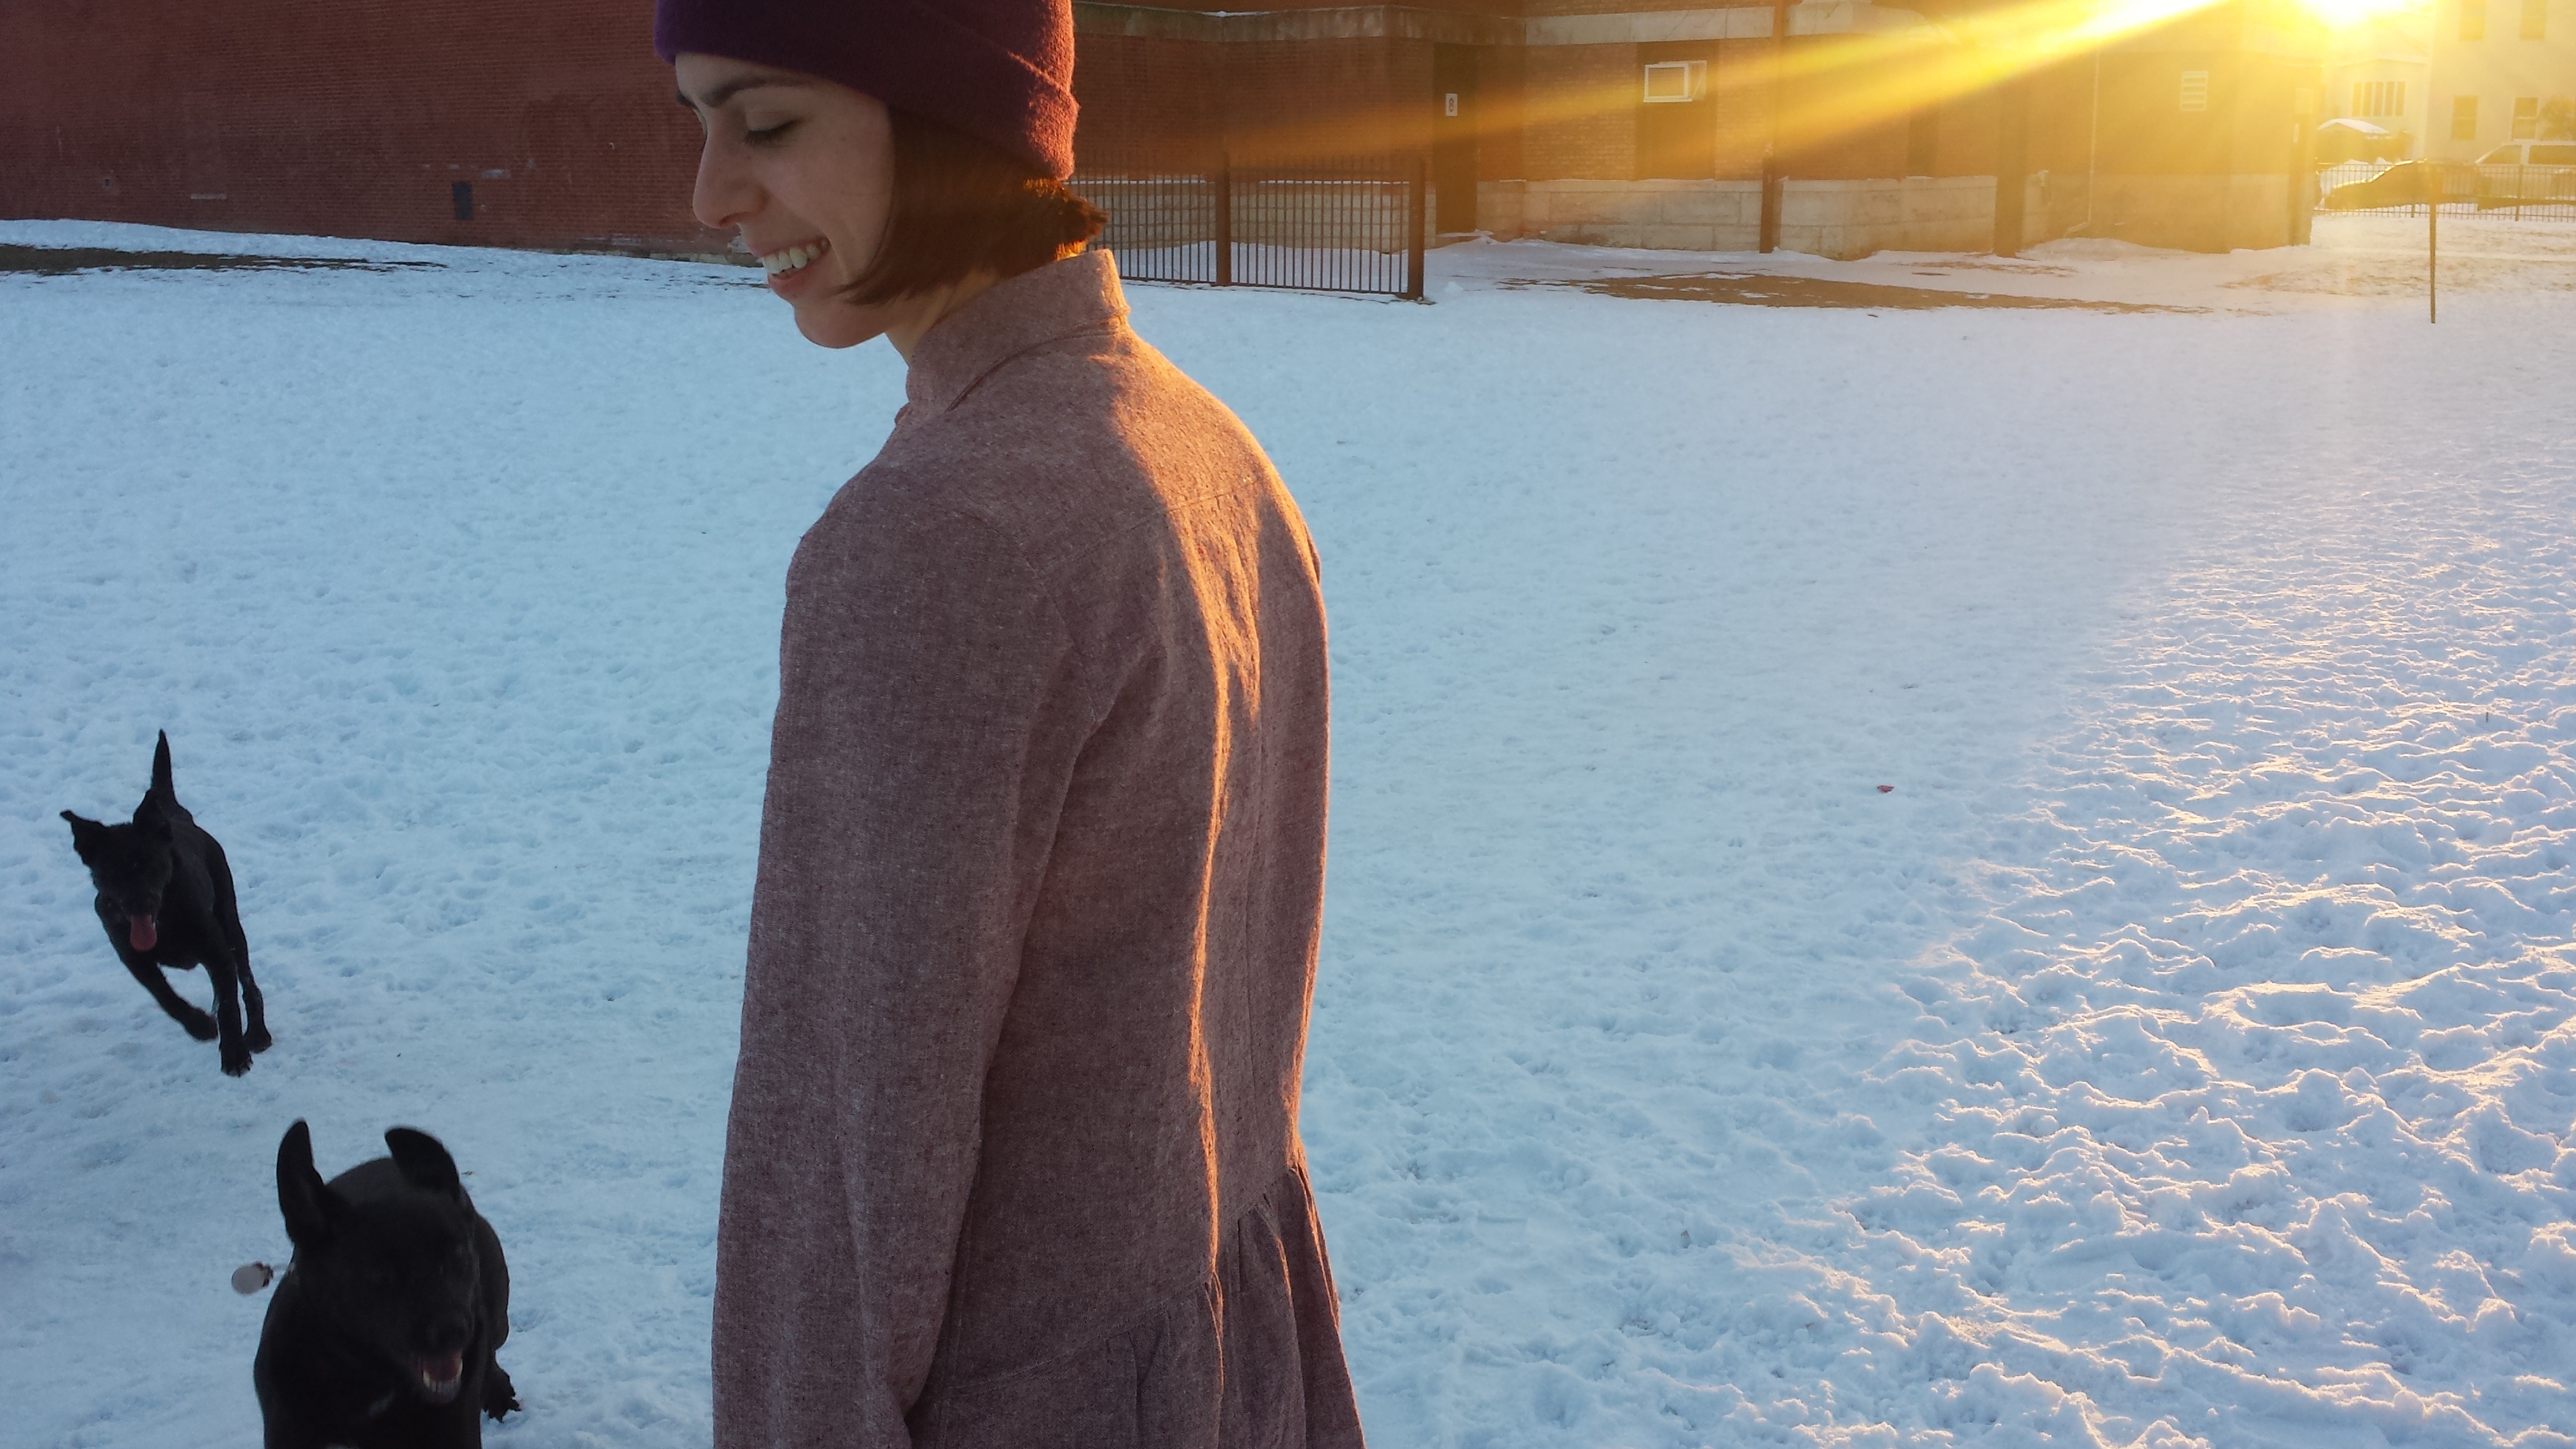
I don’t have a dog, but I loooove me some pups. By some karmic miracle, Marc and I moved to an apartment across the street from a dog park, meaning I can get my fill of doggie action without the responsibility of owning one. (Though I want to someday!) When the sun finally broke through the clouds this past chilly Sunday afternoon, Marc kindly agreed to snap some pictures of me outside, and we found ourselves chasing golden-hour light in the snowy field adjacent to the dog park. Within seconds, a couple of rambunctious ladies were barreling toward us, blissfully unaware that they were crashing my photo shoot. It was perfect.

archer button up view b grainline studio

Their owner must’ve asked me if I was freezing about 10 times. One of the pups obviously picked up on that and proceeded to nuzzle my legs before plopping down directly on my feet. Canine foot warmers are the best when it’s 22º F and you’re laughably underdressed.

grainline studio archer button up view B

I could muse about pups all day, but then I’d never get to the juicy stuff: this brand spankin’ new Archer Button Up, another slam-dunk pattern from Grainline Studio. I’ve been drumming up the courage to sew this for awhile now, especially after seeing so many lovely versions (here, here, and here, among many others). This turned out to be a refreshing departure from the walking foot and finicky fabrics of my recent knits binge.

grainline studio archer button up view B
(please excuse my red post-workout face)

The Details

Pattern: Archer Button Up, view B

Material: Robert Kaufman 5.6oz. linen-cotton chambray in Rust

Size cut: straight 8 (my measurements: 36-29-38; 6’0″ tall)

Alterations: lengthened the sleeves and body by 1.5″; cut the back pattern piece in a single layer since I was low on fabric (it’s supposed to be cut on the fold); used Jen’s alternate Archer pocket tutorial to create the envelope-look pockets

archer alternate pocket grainline studio

I truly took this project one day at a time, and it could not have been more rewarding. I followed with the Archer Sew Along instructions pretty religiously, sometimes sewing up a few days’ worth of steps at a time if I was in a particularly productive mood. I’ve read quite a few blog posts regarding construction and fit, and it seemed like the general consensus is that Andrea’s collar tutorial is fantastic when it comes to attaching the Archer collar. I haven’t had the best luck with collars in the past, but her instructions were incredibly clear and easy enough to follow. I got a little tripped up by being too eager to kill two birds with one stone: I should’ve slipstitched the inner collar in place rather than go straight for the edge stitching. I ended up not catching the seam allowance in two spots and had to rip some stitches and re-sew in order to ensure that I caught the seam allowance. Le sigh. I’m hoping that step that will become easier with more practice.

archer button up cuff grainline studio

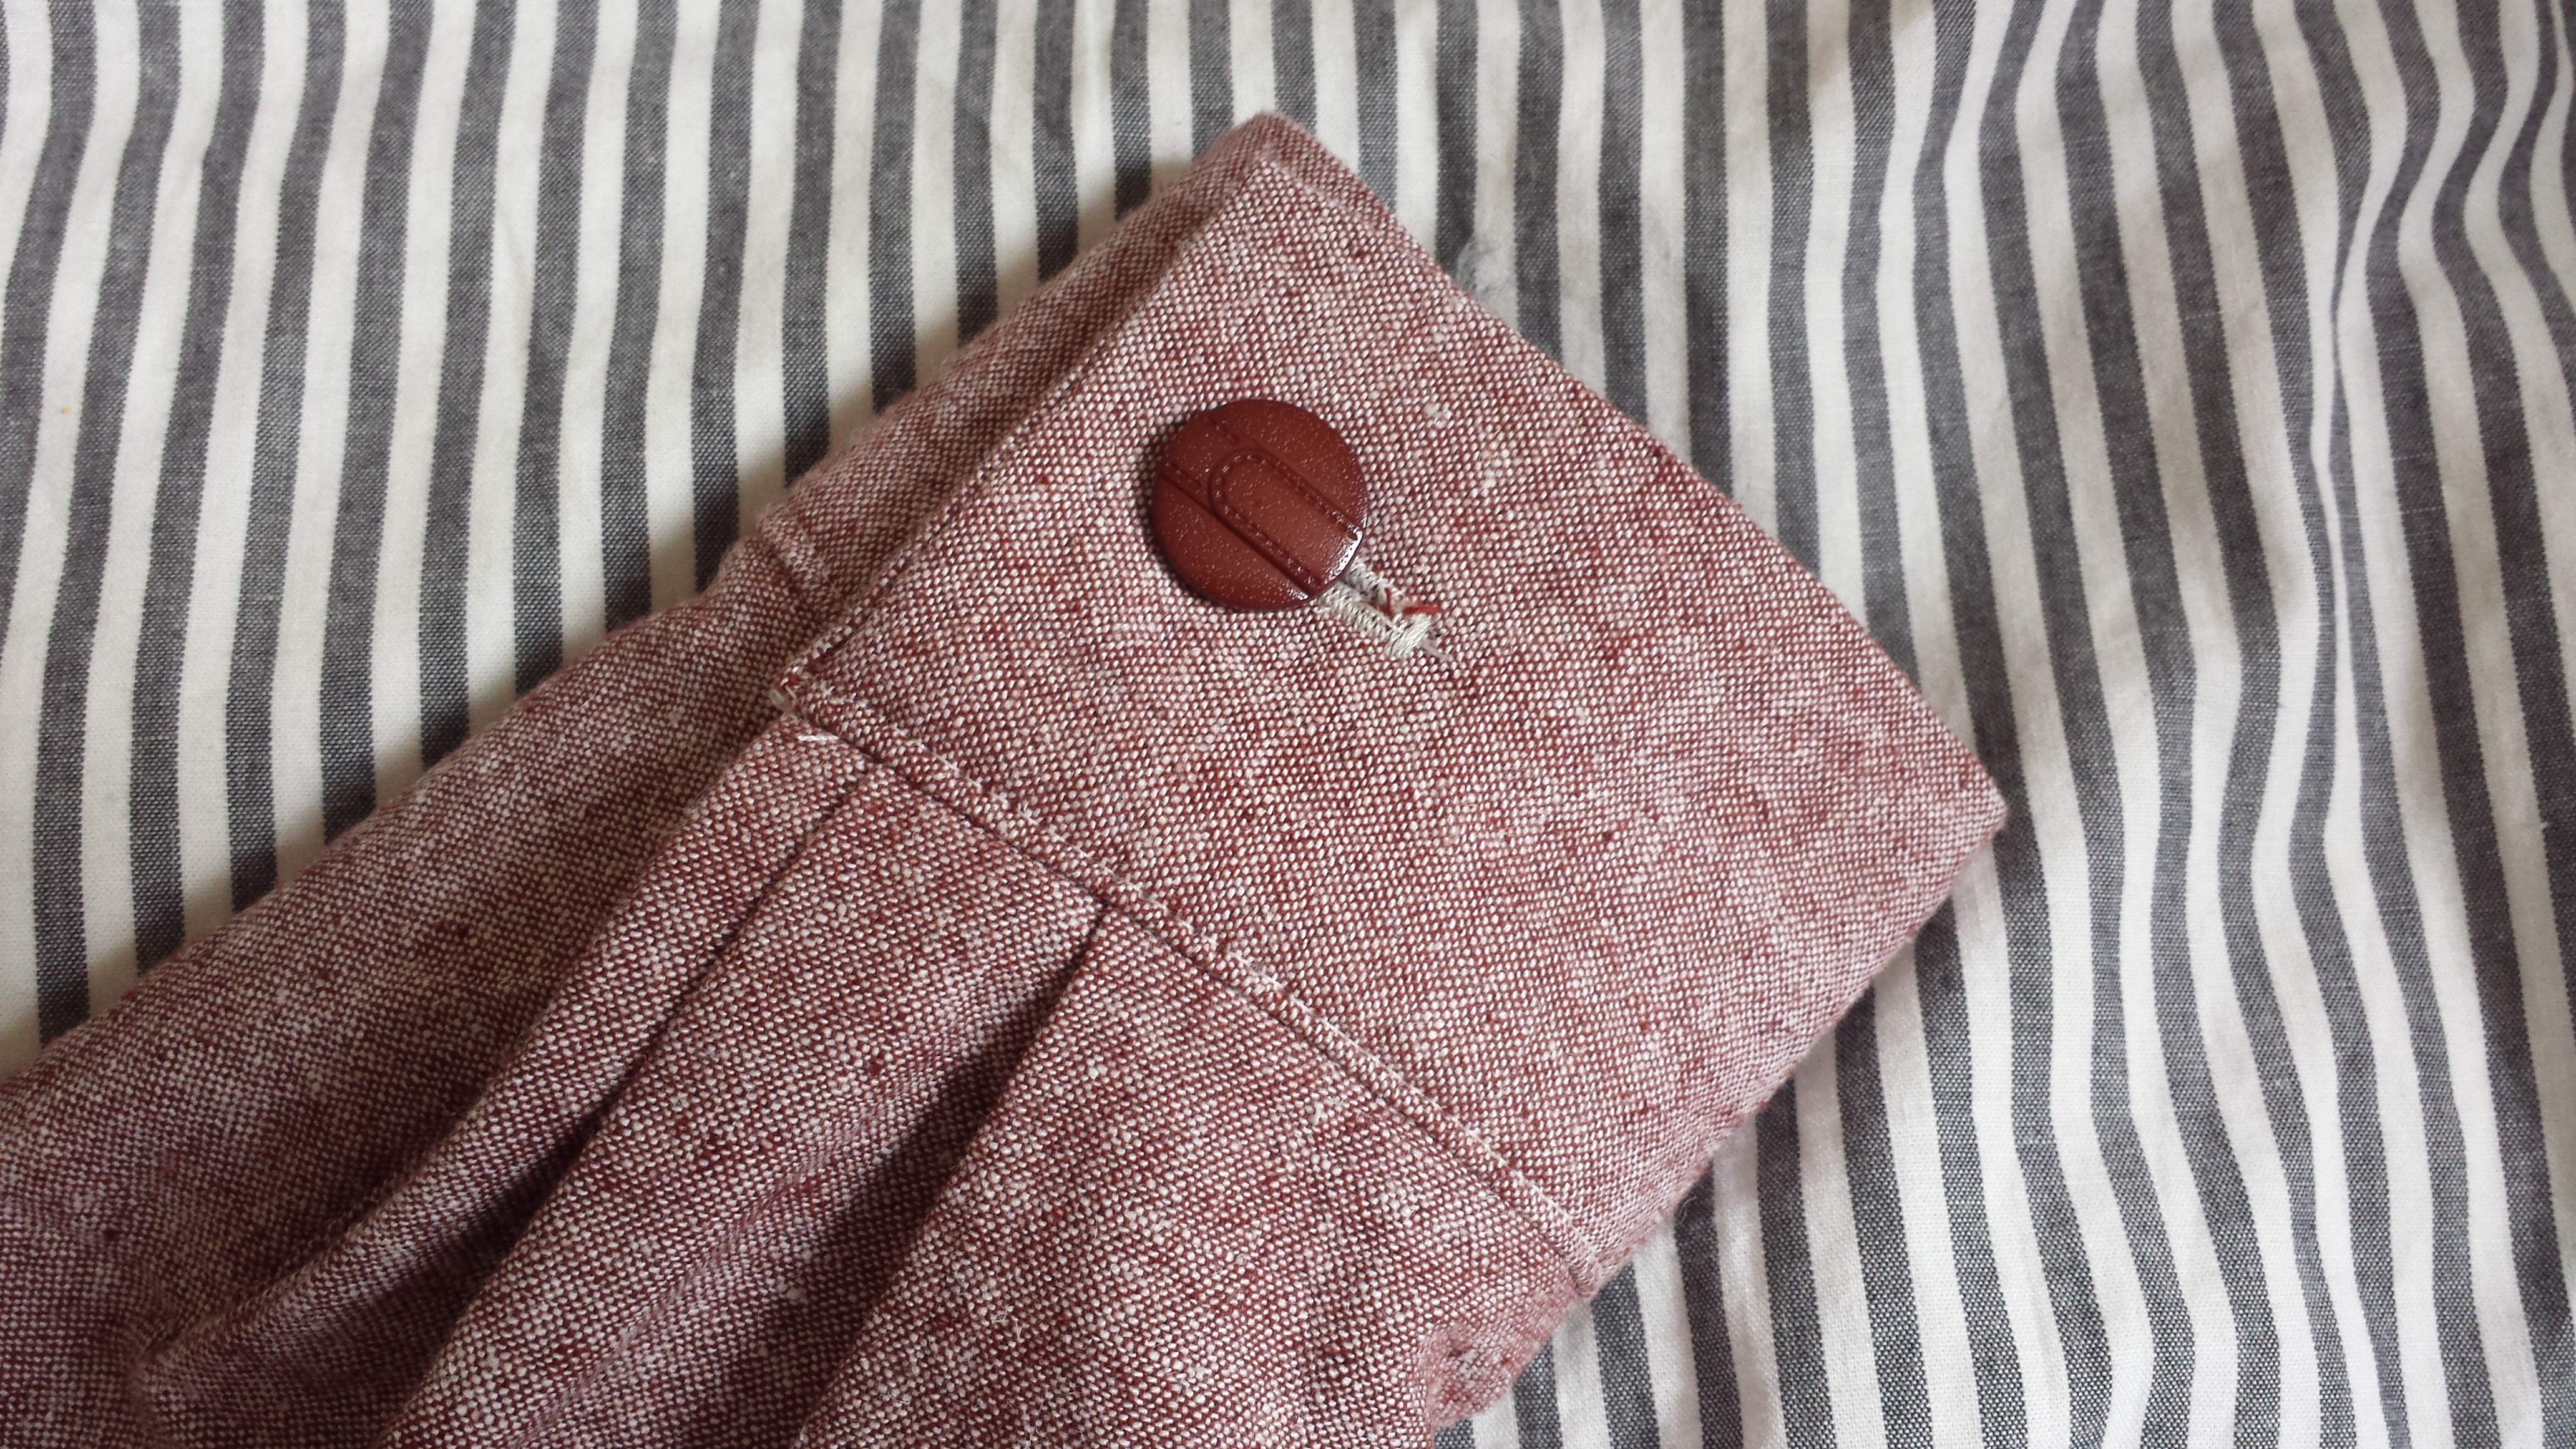
For some reason, I was super nervous about sewing the plackets and cuffs, but those went on without a hitch. And the buttons! Ohhh the buttons. I picked up these awesome, kooky shank-style buttons at Soutache in Chicago’s Bucktown neighborhood, and I’m pretty sure I ended up spending more on them than I did on the fabric… OOPSIES.

archer button up shirt grainline studio
represent, butt ruffles/duck tails of the world

Before hemming this bad boy, I sewed a row of basting stitches at 1/4″ all the way around, a curved-hem tip picked up from the ever-helpful By Hand London blog. That made it infinitely easier to press the seam allowance up and then fold it over again before stitching in place. I finished all the inside seams with a zig-zag stitch, but I wish I would’ve tried bound or flat-felled seams instead, since the chambray is ravelly and a little scratchy at the edges.

zig zag stitch finish

I’m considering adding some bias binding to the offending side and sleeve seams, but it might be tricky since I already topstitched that seam allowance to create the look of a flat-felled seam. I’d say there’s about 1/4″ of excess to work with, so I might give it a shot.

archer button up grainline studio
the relaxed, unbuttoned, 67º indoor temp look

I’m racking my brain for other pain points, but construction went more smoothly than I had hoped. The shirt also miraculously fit right out of the package (minus the length additions I made); normally my RTW button ups pull a bit at the chest since I have a broad back, but I haven’t seen any such issues yet. I’m already dreaming up a color-blocked version for the spring after seeing this little number on the Dusen Dusen blog:

Dusen Dusen shirt

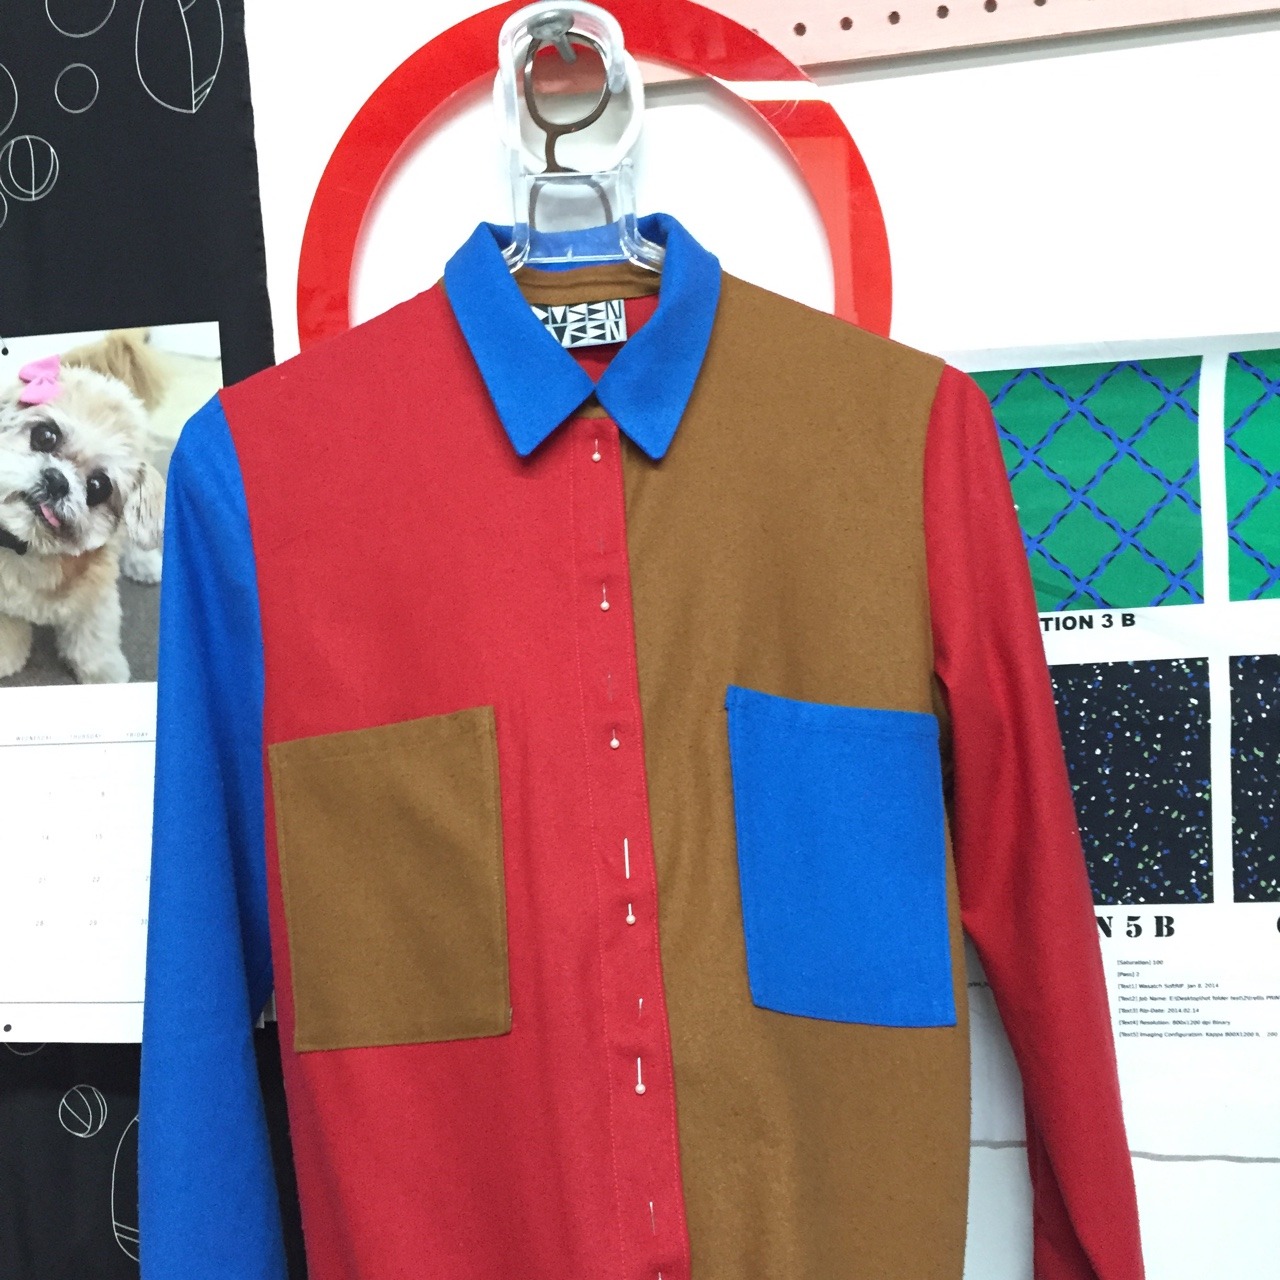
The wheels are turning! The possibilities seem endless with the Archer—it’s probably one of my favorite, most satisfying projects to date. Here’s hoping there’ll be a few more in my future!

Have you sewn your own Archer yet?

Linden Sweatshirt

linden sweatshirt

New Year, new garment—finally! But before I get into that, I’d like to wish you all a very Happy New Year, especially as we settle back into our desks at work and our single-digit weather here in Chicago. You’re not alone if you’re feeling a little blue, but luckily there are two simple solutions to combat your inner Debbie this winter:

1). Exercise. Seriously, get a sweat going for 30 minutes a few times a week and there is a 100% chance you will feel better and sleep like a baby.

2). Find a hobby (and stick with it.)

I rode the post-college emotional roller coaster pretty hard my first year after graduating, coming up just short of an existential crisis but with plenty of anxiety to go around. Learning how to sew was probably the number one factor in pulling me out of that funk. Any hobby will do, but sewing is great since you can tangibly mark your progress and actually get everyday use out of what you make.

So come this lazy, grim weekend, still feeling the after-effects of hosting a New Year’s Eve party, I turned once again to my sewing machine. I’d been neglecting it for the past several weeks, but with an afternoon free and Grainline Studio’s Linden Sweatshirt pattern at the ready, I got back to work.

linden sweatshirt

Like most reviews state, this top comes together very quickly, even without a serger. I sewed this up on my sewing machine (size 8 at the bust, graded down to a 6 at the hip) with a ballpoint needle and stretch stitch. The fabric is a sweatshirt fleece from Fabric.com. The one issue I had in construction was with the neckband: my initial band was way too short. This probably has to do with the lack of stretch in my material. I’m pretty sure the listing stated that my material has 40% mechanical stretch; the pattern calls for materials with at least 20% of stretch (or ribbing, which is typically very stretchy and pliable). I guess mechanical stretch and regular stretch are two totally different measurements? If you have insight into this topic, please let me know in the comments!

linden sweatshirt

I tried to eyeball a longer neckband, and then stupidly sewed that on without basting to test it first. Holy mother of god did that leave me with the most insane-looking funnel neck. I ended up cutting that off entirely while trying to preserve the original neckline as best I could. The finished neckband you see is some stretchy heather jersey leftover from my Hudson Pants, and I actually really like the look of the dark gray against the muted red. The neck doesn’t lie 100% flat, but it’s an immense improvement over my funnel monstrosity.

linden sweatshirt

I was a little worried about the cuffs and hem band also being too short, but those came together in a snap. I added about 1″ to the sleeves and body, but I think next time I’ll add 1.5″ to the sleeves and 2″ to the body for comfort. It probably turned out a little shorter than anticipated since my seam allowance was more like 5/8″ instead of the 1/4″ called for in the pattern. My machine was not liking that narrow seam allowance on fleece, and it angrily gnawed it up until I surrendered to a wider allowance.

So far, I love this pattern. I wore the sweatshirt out the first night I finished it, and Marc even said, “It looks like you bought that.” Yes! I’ll take that compliment when it comes to handmade basics. I already have plans to sew this up for a friend as a very belated Christmas gift, and I’ll probably sew another one up for myself soon. Have you tried this pattern yet? Any thoughts on fabric choice or finishing?

A Striped Hemlock Tee (and HaLLoWeEn Plans!)

grainline studio hemlock tee

I’m about a year late to the game with the Hemlock Tee, but I have to say, Grainline Studio hit it out the park with this *free* PDF pattern. At first I was a little freaked out by the one-size-fits-all cut, but since it’s designed for lightweight knits, this top’s really all about the boxy drape. And what a gloriously comfortable drape it is! It’d probably be even more flowy if I hadn’t accidentally cut off an extra 2″–3″ from the hem. Whoops. I made that mistake when trying to even out the bottom with a rotary cutter, not realizing that the stripes were ever so slightly offset. Long story short, this quickly turned into a cropped Hemlock, and I love it!

hemlock tee grainline studio free pattern

Most of my pants hit high enough that I don’t have to worry about flashing skin (it’s fall now, the time when us Chicagoans put away our bare skin until next spring). As far as construction, I used my walking foot and a lightning bolt stitch for the side seams. To finish the bottom and sleeves, I just did a simple turned hem with a slightly lengthened straight stitch. Next time, I’ll try a double-needle finish like the tutorial instructs.

hemlock tee grainline studio

I cut the neckline down a little lower than the pattern, which lead to some problems with the neckband binding. I thought I’d added enough length to compensate, but I had to rip out my first neckband and try again. Does anyone have a surefire formula for calculating neckband length? I know it probably differs depending on the level of stretch, but any tips are welcome!

hemlock tee grainline studio
V excited for BYOB sushi

I have high hopes to whip a few of these up for Christmas gifts, but for now, I’m focusing solely on HALLOWEEN. Halloween is kind of a big deal for me. Ever since I can remember, my mom’s always been a champ when it comes to whipping up creative costumes. As a toddler, I was a hand-sewn furry spider. In second grade, I was the R.M.S. Titanic. 

titanic Halloween costume 1998

There were many more, but that cardboard ship remains the costume to top. Bravo, Mom & Dad in 1998.

Last year marked the first time I sewed my own costume, a spring roll. It took forever, but it was gratifying to know I made the entire piece on my own. This year, I’ve decided to capitalize on my current haircut and go as Johnny Depp as Willy Wonka. And since my boyfriend is blond and light-eyed, naturally I suggested that he be Gene Wilder’s Willy Wonka. I’m planning on sewing the coats, possibly making the hats and canes, and then throwing together the rest of the outfit with items we already own.

M7003 costume pattern

I found this McCall’s pattern for $5 on Etsy and immediately snapped it up. It’s not exactly the style of the Wonka jackets, but I think it’s close enough to pass if we get the accessories right. (And the candy. We’re only allowed to hand out Wonka Candy, otherwise WHAT’S THE POINT?!) The pattern calls for a mid-weight wool or gabardine, but I’m hoping that it’ll work with these mid-weight corduroys I found at Textile Discount Outlet:

red and purple corduroy

At just $3.95/yard, they were way cheaper than anything I could find online, especially when you take into account shipping charges. By the way, Textile Discount Outlet is an old-school fabric labyrinth that definitely deserves a visit if you’re even in Chicago. It’s not glamorous, but it does have an insane number of fabrics, notions, and everything in between.

I just got my pattern in the mail today and can’t wait to get started on these goofy jackets. Do you have any Halloween projects in the works? Let me know in the comments!

Grainline Scout Tee: Knit Madewell Variation

madewell scout tee grainline studio sewing

This top was a no brainer. I had a little over a yard of black ponte knit fabric left after making this simple half-circle skirt, and I’ve been crushing on Jen’s Madewell Scout variation since she posted the pattern and sewing tutorials this spring.

madewell scout tee variation sewing

The tutorial was easy to follow and well photographed, making for a relatively quick project, albeit finished over a couple days because of weekday time constraints. Sidenote: Kudos to anyone with the patience to start and finish a project during the workweek. Try as I might, I always end up finishing on a Saturday or Sunday and then promptly celebrating with several cold beverages.

The Madewell variation calls for three changes to the original Scout pattern:

  1. Raised neckline with a split opening
  2. Slightly curved bottom hem
  3. Longer sleeves with a fold

I had every intention of incorporating each change, but I was just shy of having enough fabric for the lengthened sleeves so I sewed those up like normal. Since I used a knit, this knit Scout tutorial also came in handy when it came to cutting the fabric, hemming, and cutting neckband binding.

I’ve gotten lots of wear out of my first Scout tee, but I have noticed a tiny bit of tightness across my back from armpit to armpit. One of my goals this year is to achieve a more perfect fit with my garments, so I wanted to make sure that I addressed the tight-back issue on this Scout. A Google search turned up this gem from Threads, and it goes into lengthy detail about how to adjust a pattern piece if you have a broad back (or a narrow back, but I have no clue what that looks like since the breadth of my upper ribs rivals that of most NFL linebackers).

threads magazine adjust a pattern for a broad back

I slashed the pattern and added about a half inch between the mid-shoulder to hem, as the Threads image shows. After that adjustment, I simply altered the neckline and hemline per Jen’s instructions and got to work.

grainline studio scout knit madewell tee

Creating the split front was surprisingly easy, just make sure to leave enough binding on either side of the V (Grainline’s tutorial pic here). I left too small an amount on one side and struggled to get a clean finish on the wrong side of the garment. I also wasn’t entirely sure how to hem the curved edges where they met, so I just tapered the standard half inch hem at those spots. Other than that, this came together like a dream and is amazingly comfy. I’m glad to have some solid black staples in my wardrobe now, but my print-hungry brain is dying for an insanely bold pattern.

grainline studio madewell scout tee

The Hudson Pant is next up on my docket, so stay tuned for some possibly wacky-printed track pants. Let me know in the comments if you’ve sewn these up yet and have any tips!

Portside Travel Set Dopp Kit (and the Little Pouch)


sewing portside dopp kit by grainline studio

I must subconsciously wish I was left-handed. Of the many silly mistakes I made when crafting this dopp kit, I sewed on two zippers the “wrong” way. With the dopp kit, I cared enough to get my seam ripper out, but the pouch didn’t get such special treatment. That little guy will forever open the left-handed way, or the “right” way for 10% of the population and 71% of current and former presidents for the past 40 years.

sewing portside dopp kit by grainline studio

My right-handed self found sewing this dopp kit to be a little trickier than anticipated. That might be due to my accessory-sewing rustiness; I haven’t sewn anything but apparel since I made an easy button wallet more than a year ago. Or maybe I was so excited to work on this Grainline pattern that I went at it a little too hastily. The truth is, this pattern took two days of prep before I even sat down at the sewing machine.

Because the Portside Travel Set includes three pieces (a duffel bag, dopp kit, and pouch), the PDF pattern pieces took awhile to tape together and cut. I reserved the next evening for cutting everything out and applying the fusible interfacing. And on the third night, she collapsed in a pile of the sewing-room (aka office/closet) floor, her hand hanging limp in an empty Mexican take-out container. That’s partially true. But really, on the third day I got to work whipping up the dopp kit.

sewing portside dopp kit by grainline studio

Fabrics: Robert Kaufman red floral cotton for the self fabric, J. Crew gray linen-cotton blend for the contrast, and HeatnBond medium fusible interfacing

I love the Marimekko-like floral print, and it’s a decent enough weight for a bag. The gray contrasting fabric, however, is a little too lightweight for my liking, plus it wrinkles super easily. Next time I’ll use heavier duty fabric, or try interlining the bag with sew-in interfacing (like the pattern recommends if you’re looking for a heftier feel).

sewing portside dopp kit by grainline studio

I won’t go into supreme detail on every step of the sewing, but here is a list of things I’ll keep in mind for next time:

Transfer all of the pattern notches on the actual fabric. I somehow failed to do this for every piece, and when it came to sewing the rounded edges of the top and sides, it was a little hairy. I think that’s why my bag is slightly misshapen.

When sewing multiple layers, pin properly! I thought I was done when I noticed a raw edge peeking out on the front of the kit:

sewing portside dopp kit by grainline studio

Not a good feeling, especially when you’ve just finished hand-sewing the lining into place and have to rip out yet another set of stitches.

Don’t forget to topstitch the strap. In my late-night sewing delirium, I misplaced the strap I’d already sewn together and topstitched. After a fruitless 5-minute search, I sewed another strap. No big deal, except that when I attached it to the dopp kit, I forgot to topstitch the damned thing! This is what happened when I tried to machine topstitch when it was already sewn on the bag:

sewing portside dopp kit by grainline studio

Yeah… I immediately ripped those stitches out and now the strap is less structured than I’d like, but at least it’s not looking superjanky.

portside dopp kit

Double-check the cutting layout. I ended up short one piece when it came to Step 25, which calls for a “self front piece” when creating the pocket. I’m still not sure where the problem stems from. (Scratches head.)

And that’s the gist of it. My dopp kitt, though a little floppy, is already growing on me. Oh, and the pouch! Pretty straightforward zipper pouch, although it’s even floppier than my dopp kitt because it didn’t call for any interfacing or lining.

sewing portside pouch by grainline studio

It doesn’t really need it though, especially if you buy a heavier fabric and are planning on using it like me: to hold only crisp, new $2 bills. Just don’t forget to sew the zipper on the right way, y’alls!

And now for some gratuitous shots:

sewing portside dopp kit by grainline studio
Toiletries… and a mysterious sumo wrestler.
sewing portside dopp kit by grainline studio
Whip stitchin’
sewing portside dopp kit by grainline studio
looks friendly enough…
sewing portside dopp kit by grainline studio
… but there’s something devious about those eyes!

sewing portside dopp kit by grainline studio

sewing portside dopp kit by grainline studio
Thanks for modeling, thumb-wrestling sumo man. Now I know why you have a constant look of angered surprise on your face.

Next up: the Portside duffel bag?

Grainline Studio Scout Woven Tee

sewing project grainline studio scout tee

I think it’s safe to say that Grainline Studio’s Scout Woven Tee is the darling of the indie pattern world. I’ve read rave reviews from probably 15+ bloggers at this point, most commending the pattern for its sizing, breezy fit, and ease of construction. Not to mention that it makes it really easy to highlight a fantastic print.

But, being slightly cynical, I wasn’t quite sold by the blogosphere’s near-unanimous praise. A slouchy, loose-fitting T-shirt with no bust darts (no darts at all, actually), to be made with a nonstretch woven fabric. Uhhh, I’m all for embracing this summer’s boxy shirt trend, but I was a little afraid this would veer into the “looks like you’re wearing a tent” arena. Still, at only $6.50 ($7.50 total because of dumb Illinois tax), I had to give it a shot.

Scout calls for a lightweight woven fabric. Per usual, I hit up the Needle Shop in Chicago’s North Center, where I found a beautiful Leah Duncan hyacinth fabric (not in stock anymore).

It’s 100% cotton and super soft—really an awesome print for summer with its crisp off-white color and pops of navy. I washed and dried it, then got to work laying out my PDF pattern pieces and cutting out the fabric.

There are only four pattern pieces total—the front, back, sleeves, and bias neckline binding—making the cutting process a total breeze. The pattern includes seam allowances (my last PDF pattern did not), which is another huge plus in my book. So far, so good, Scout.

scout tee bias neckline sewing

After sewing the back and front pieces together, I used Grainline Studio’s tutorial, Getting Flat Bias Necklines, to finish the scoop neck. If you haven’t visited the Grainline Studio website, check it out. Jen Beeman, the brain behind Grainline, sells her PDF patterns there and also shares super helpful tutorials and tips that complement her designs. Plus, I read an interview that revealed she lives in Chicago and likes Black Dog Gelato, the best dessert in the city/state/world. OK, done fan-girling and pining for goat cheese cashew gelato. Back to the pattern!

I finished the bottom with a simple double-fold hem. Next were the sleeves, and the directions call for a double row of basting stitches in order to gather the sleeves when attaching them to the bodice. The sleeves went in without a hitch, and I finished each edge with another double-fold hem and gave the whole thing a quick press.

At this point, I was… done?! How could it be!? Surely this was too good to be true. I’d never sewn a (wearable) shirt in less than 90 minutes, so naturally I assumed it would look wonky when I tried it on.

To be honest, I wasn’t 100% sure about it when I first tried on the finished product. I usually wear more fitted tops or ones that are cinched at the waist. This tee is kind of the opposite of all that. The garment details aren’t lyin’ when they say that “this top falls into a loose shape below the bust.” But within 15 minutes of wearing Scout, I was converted. It’s loose, yet somehow manages to skim the body in a flattering way. It’s also insanely comfortable. I can see pairing this shirt with everything from linen shorts to skinny jeans or even tucked into a pencil skirt with a belt thrown on top. This is really a great, simple pattern and I can’t wait to sew up a few more. Maybe I’ll try Jen’s Madewell Scout variation next.

Grainline Studio Scout woven tee sewing

And that’s about it! PDF pattern #2 complete for my summer challenge. If they’re all as easy and awesome as Scout, I might need to up the ante and start sewing two or three per month! Any personal favorites?