I’m a creature of habit. When it comes to cooking dinner, it’s either chicken fajitas or eggs and TJ’s pumpkin waffles (#breakfast4dinner4life). It’s not that I’m not an adventurous eater (bring on the tendon soup and octopus carpaccio), it’s just that cooking old standbys is quick, simple, and satisfying. The same can be said for my recent wardrobe purchases, 90% of which have been gray or black. For better or worse, this tendency toward the familiar has trickled into my sewing life.
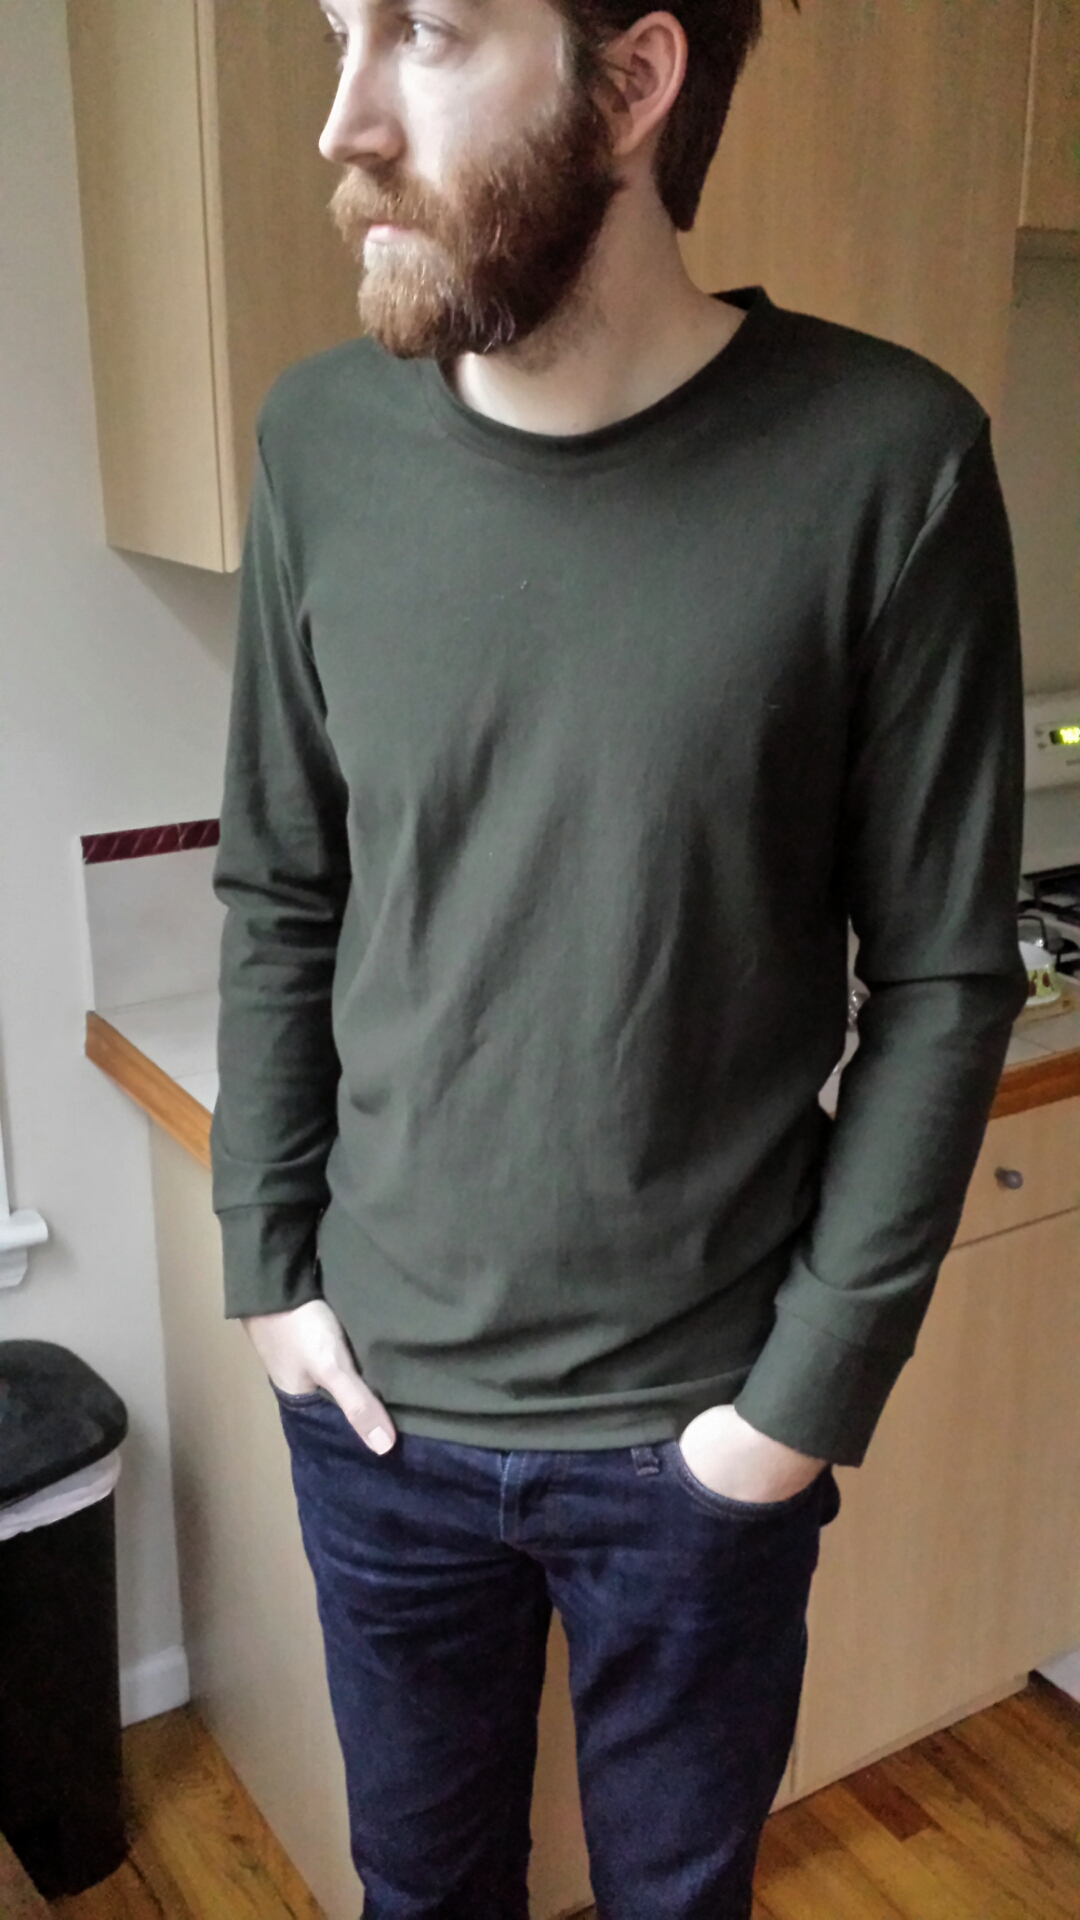
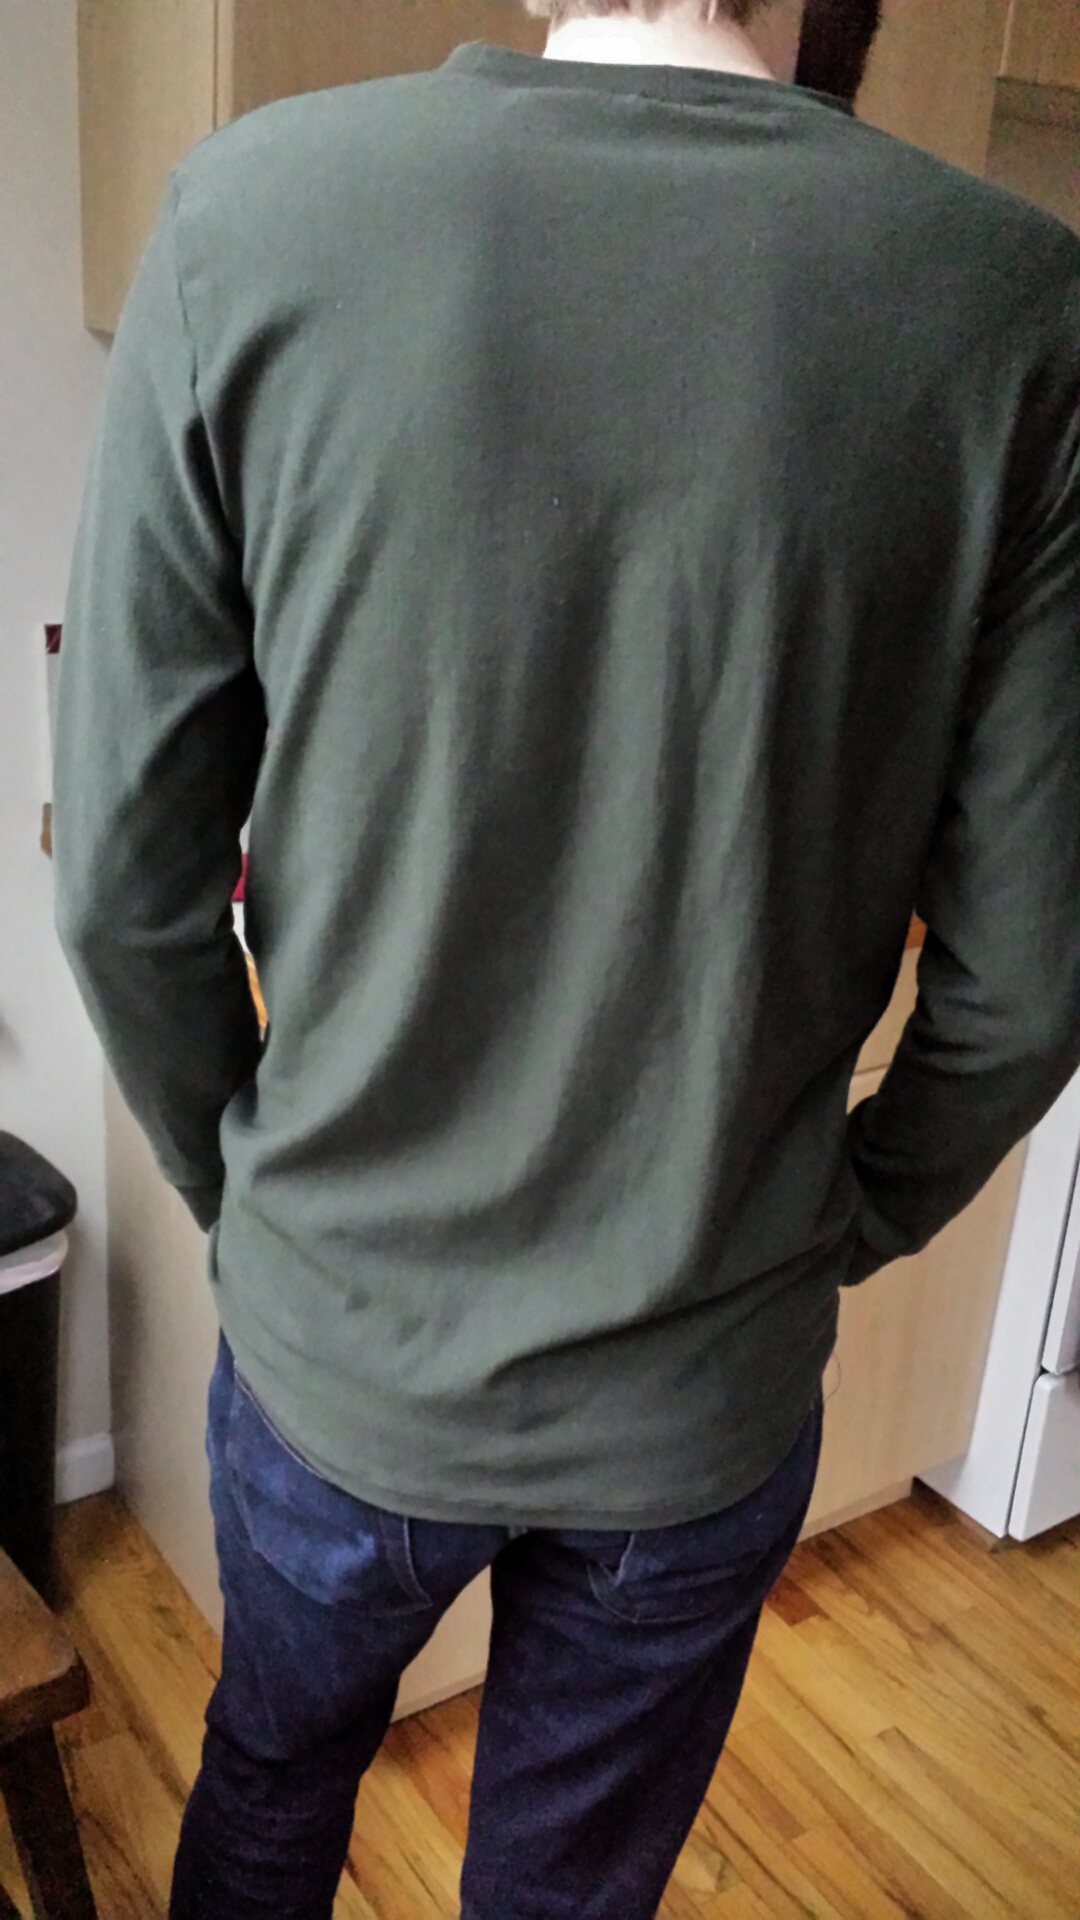
In keeping with my goal of sewing one item of clothing for another person each month, I bought Thread Theory’s Strathcona pattern to sew a shirt for Marc. In early November, I finally got around to buying the fabric: a french terry from Girl Charlee that’s a soft, stretchy cotton-modal-lycra blend in a deep forest green. I’d just finished cutting out the fabric to make the long-sleeve T-shirt variation when I spotted it: a long-sleeve crewneck thermal from the Gap in nearly an identical shade of forest green, taunting me from its spot in Marc’s clean clothes hamper. At that point, I thought about making the short-sleeve variation instead, but then I remembered I’d bought Marc a short-sleeve American Apparel tee last year in, you guessed it, a nice shade of dark olive. We’re defenseless against the power of the solid neutrals! So, a long-sleeve forest green Strathcona it would be.
Marc is 6’2″ and generally wears a slim-fit medium in shirts, so I cut a medium. The general consensus for this pattern is that it runs a bit long in the body and very long in the sleeves, so I kept the body as is and took a bit of length off the sleeves. As far as construction goes, the shirt came together pretty easily, although next time I’ll use my walking foot to keep things smoother. I think the walking foot would have been especially helpful when attaching the sleeves, since I ended up with some weird pockets on the shoulder seam and had to do somewhat of a hack job to get them to lie flatter. I could definitely use a bit more practice setting sleeves with a knit fabric. (Actually just setting sleeves in general!) Anyone have tips for that?
The pattern calls for the sleeves and bottom hem to be finished with self-fabric bands or a twin-needle hem, so I went with one of each: banded cuffs and a twin-needle bottom hem. This was my first experience with a twin needle, and I’m smitten! I also used it to topstitch the neckband. It so easily adds a more professional finish with barely any extra effort.
And that’s about it, folks! The important thing is that Marc thinks it’s comfy and likes the color (duh). Have you sewn any garments for the dudes in your life? I’m not very familiar with menswear patterns, so any suggestions are welcome! Next up on my docket is the Linden Sweatshirt from Grainline Studio. Stay tuned for that, or a possible pre-Christmas sewing meltdown. Only time will tell.
October 31 was a wet, blustery night in Chicago. After standing in vain at a freezing wind tunnel of a bus stop for 15 minutes, I gave up and set out walking toward my destination. Traffic’s always rough, but it seemed to be particularly awful that night. It turns out cars were gridlocked on north/south streets because Lake Michigan was throwing up 20-foot waves directly onto Lake Shore Drive, effectively shutting down that thoroughfare. Guess it’s not Halloween without some real-life terrors.
I realized too late that I’d created my own personal Halloween sewing nightmare. As I mentioned in my plans post, my intention was to make Gene Wilder and Johnny Depp Willy Wonka coats and hats for my boyfriend and myself, respectively. Don’t get me wrong, this shit all got done, but not without some moderate freakouts along the way. Somehow I thought that making two jackets and matching hats from scratch would be totally manageable if I chipped away at them each day. I failed to recognize that sewing items I’m not familiar with (jackets, nay, MENSWEAR jackets, and hats) would involve some practice and probably many, many mistakes along the way.
Even with a muslin, the first jacket I made (the bright purple one), was a bit of a doozy. I decided against lining the jackets since I wanted to minimize spending and “uneccessary” steps for coats that we’d probably only wear one or two nights. I finally wrapped my head around how to attach the collar and facing without a lining, but then came the sleeves. I didn’t adjust the ease enough the first time I basted them in, and they were a complete disaster. They kind of looked like this. I ripped those sucker out, adjusted the ease a bit more, and Frankensteined them into place. They’re still not perfect, but at least they didn’t make Marc and me immediately burst into laughter just looking at them.
Thankfully, the Gene Wilder jacket and hat came together before our first costume party, held the week before Halloween. I abandoned hope of getting my Wonka getup finished by then, but the makeshift Golden Ticket costume seemed to go over pretty well. Thank god for Blick Art Materials’ golden poster paper and stencils!
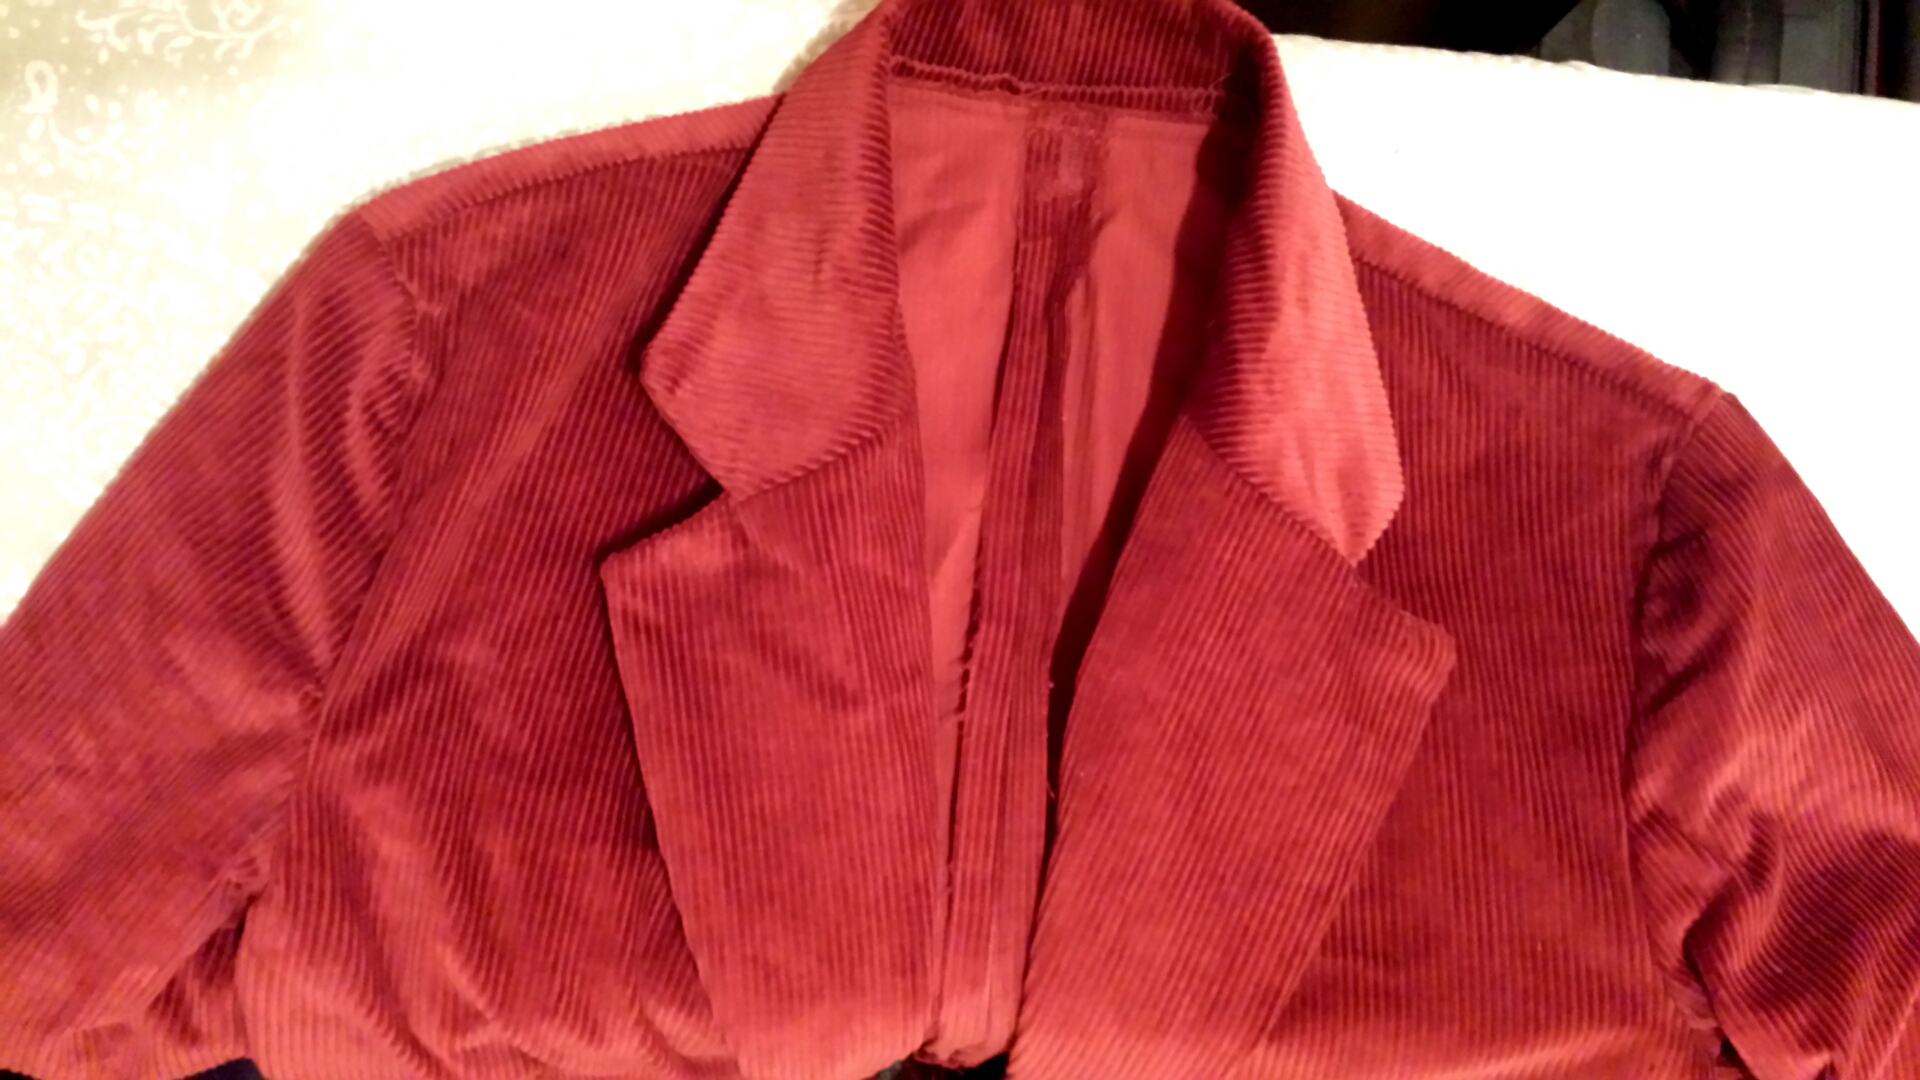
That next week, I focused on completing the red jacket. Since I’d already hashed out some issues with construction on the first jacket, this piece came together much more easily. The lapel and collar sit flatter, and the sleeves fit nicely after the first try. It was strange wearing a coat tailored for a man, but I cut out a small (instead of the medium I cut for Marc), and that seemed to balance out a little of the bulk. I didn’t have to worry about length for once—the sleeves and waist were pretty much spot on.
It’s got pockets, too! The flaps wouldn’t lie flat because I couldn’t iron them (hot irons+corduroy=burning plastic smell), but it was nice to have a place to stash candy, gloves, and cans of cider.
I could go on about these jackets, but I’m kind of sick of them at this point. McCall’s M7003 served its purpose, but I’ll be happy if I can avoid men’s outerwear or red or purple corduroy for the foreseeable future. Come to think of it, I’d like to add camel and black felt to that list, too.
These unfortunate “top hats” were nearly the death of me. Marc’s was way too small and ended up cutting off circulation to his head. My black hat fared a little better, but neither really looked like an actual top hat. And the camel one definitely looks like something an 8-year-old Indiana Jones might wear. As far as construction goes, I pulled from a medley of confusing WikiHow articles and online tutorials, opting to use sew-in interfacing for the brim and flue of the hat. I wish I’d had more time to make a prototype to figure out how to keep the top of the hat from collapsing into the flue. Millinery is tricky, y’alls! That said, the felt and ribbon came out to roughly $12 overall for both hats, and that’s way cheaper than most decent-looking hats I came across online.
We also made canes by attaching cabinet pulls to stained dowel rods. Thanks, Home Depot! And thanks especially for not giving us a breathalyzer before we used a saw to cut the dowels to our preferred size…
Despite the sewing hangups and imperfections, I’m happy with how our costumes turned out. I’m also happy that I discovered how fabulous dancing is with a cane. Try it! Now that Halloween’s over, it’s time to move on to the greener pastures of soft knits, patterned cottons, and trying to figure out what the hell I’m going to make for xmas gifts this year. Do you have any giftable sewing plans?
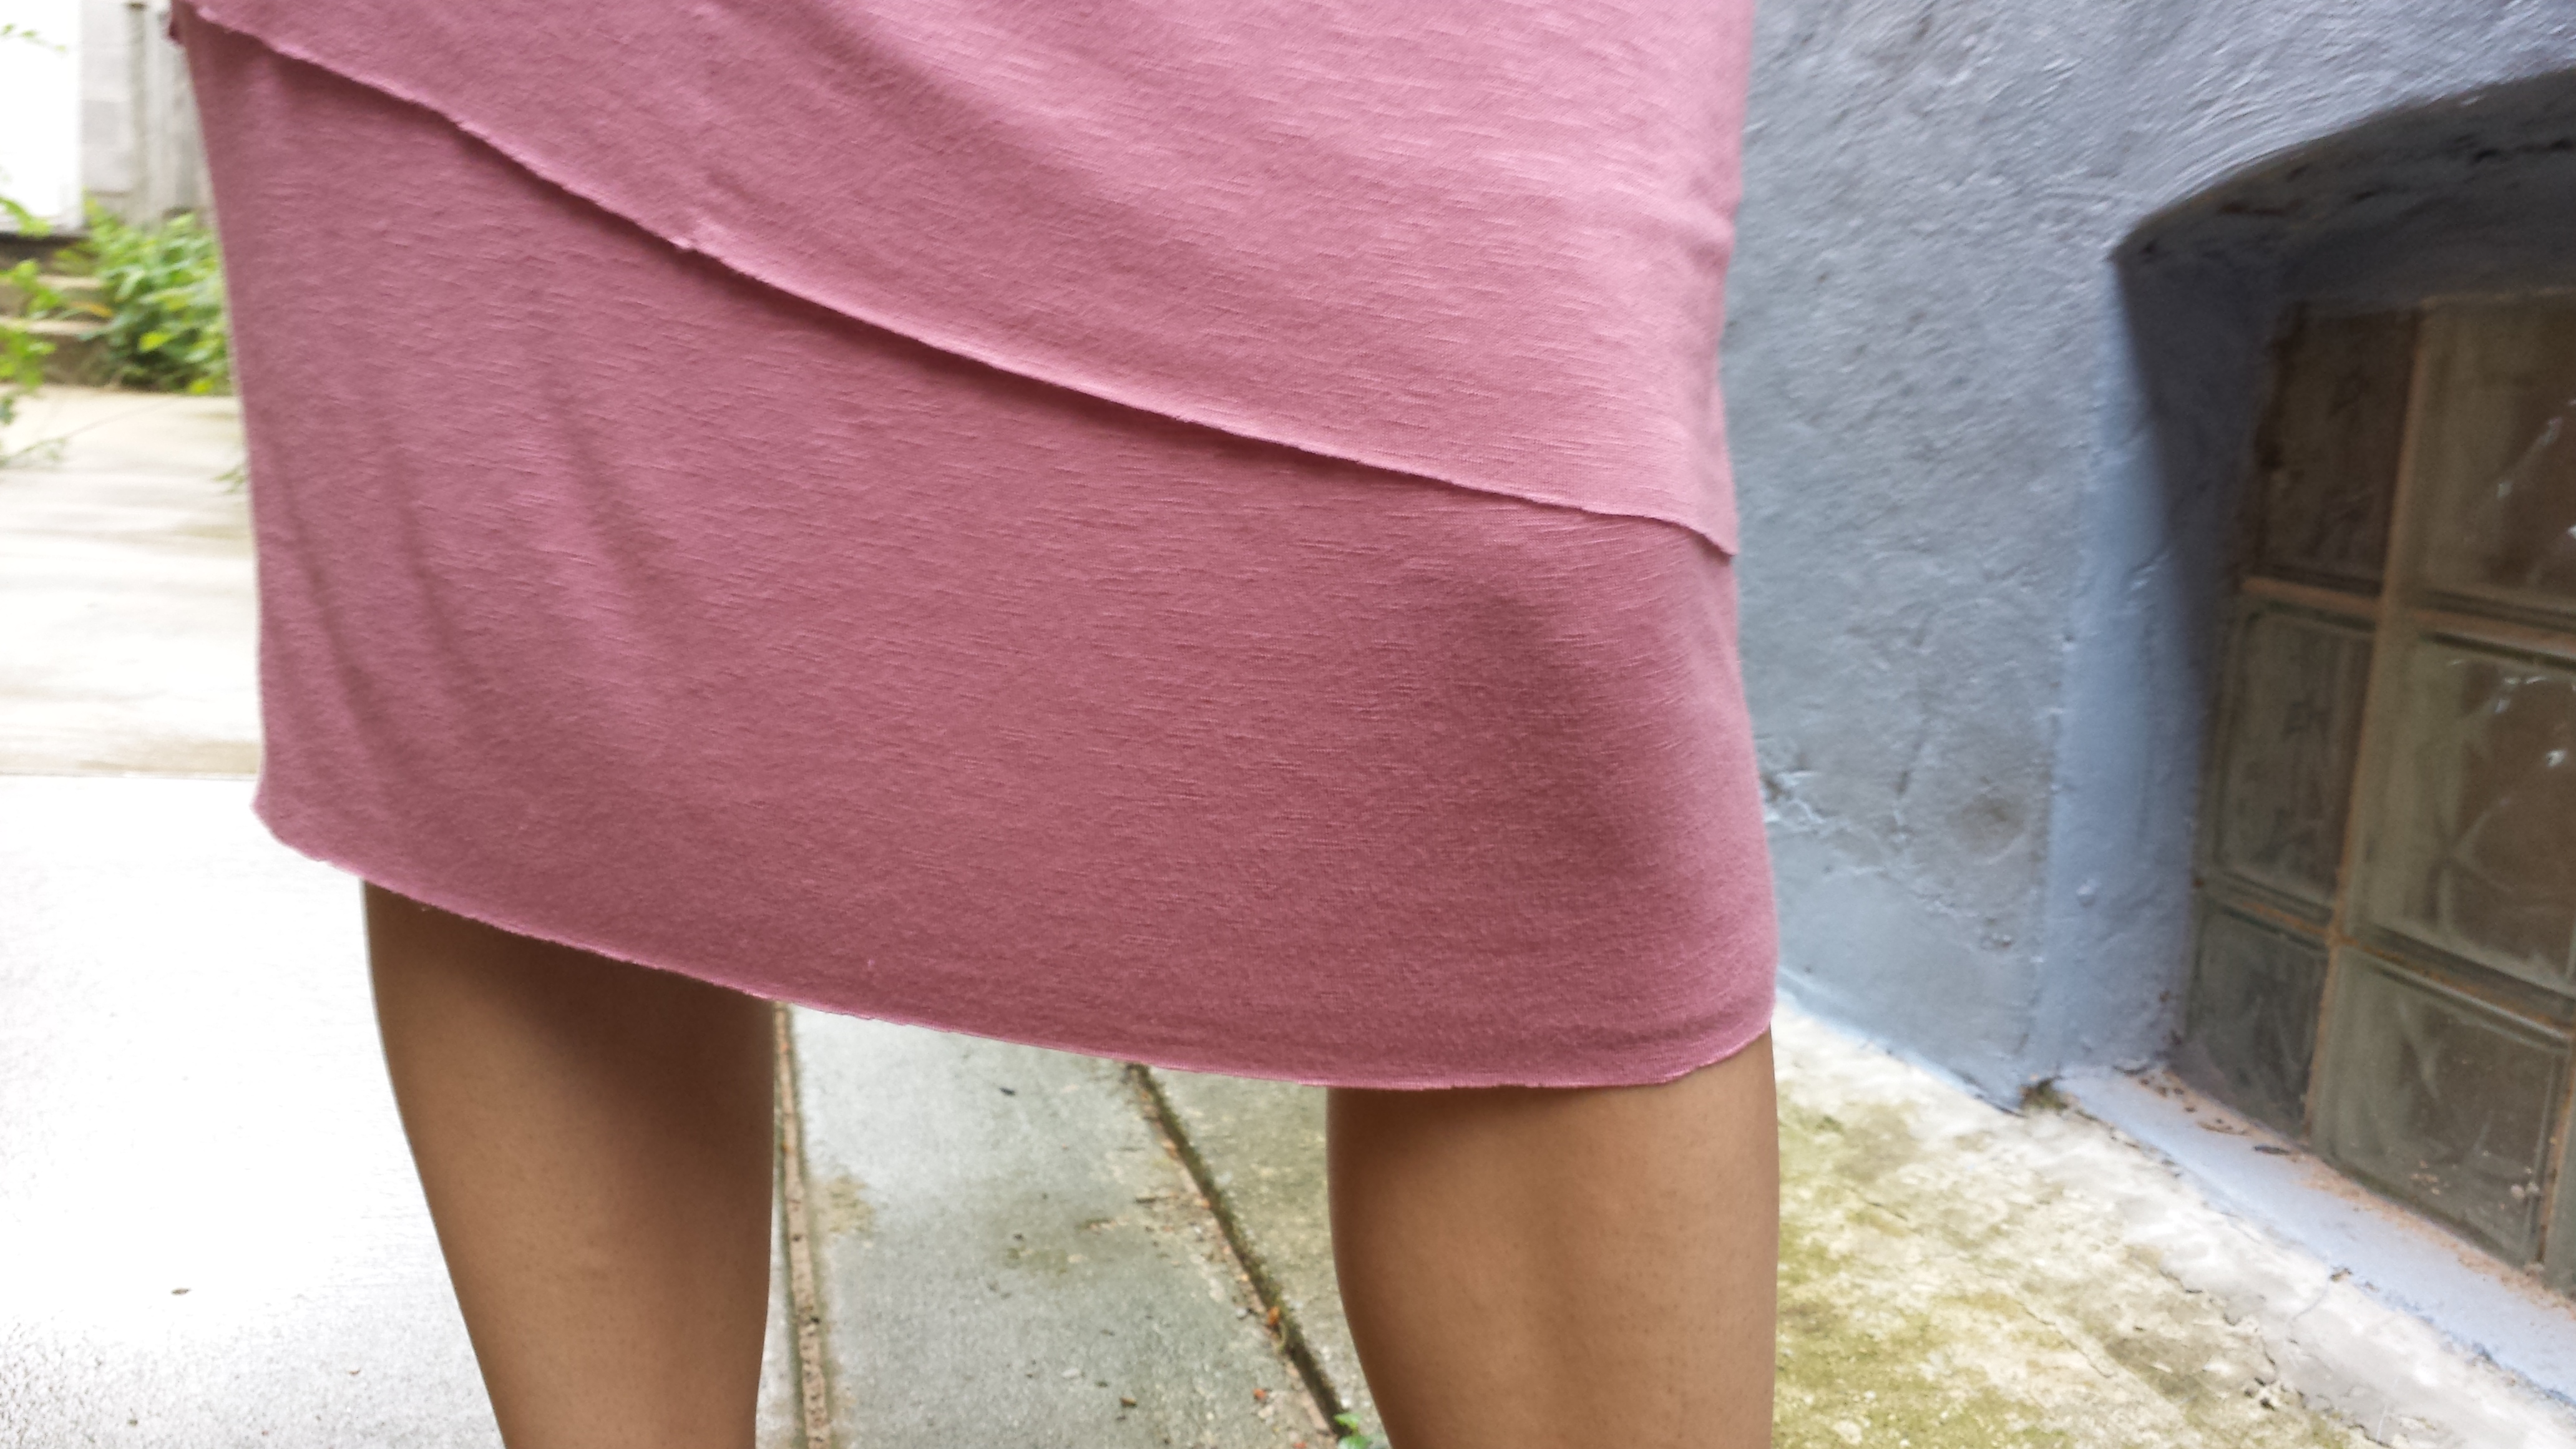
I’m about a year late to the game with the Hemlock Tee, but I have to say, Grainline Studio hit it out the park with this *free* PDF pattern. At first I was a little freaked out by the one-size-fits-all cut, but since it’s designed for lightweight knits, this top’s really all about the boxy drape. And what a gloriously comfortable drape it is! It’d probably be even more flowy if I hadn’t accidentally cut off an extra 2″–3″ from the hem. Whoops. I made that mistake when trying to even out the bottom with a rotary cutter, not realizing that the stripes were ever so slightly offset. Long story short, this quickly turned into a cropped Hemlock, and I love it!
Most of my pants hit high enough that I don’t have to worry about flashing skin (it’s fall now, the time when us Chicagoans put away our bare skin until next spring). As far as construction, I used my walking foot and a lightning bolt stitch for the side seams. To finish the bottom and sleeves, I just did a simple turned hem with a slightly lengthened straight stitch. Next time, I’ll try a double-needle finish like the tutorial instructs.
I cut the neckline down a little lower than the pattern, which lead to some problems with the neckband binding. I thought I’d added enough length to compensate, but I had to rip out my first neckband and try again. Does anyone have a surefire formula for calculating neckband length? I know it probably differs depending on the level of stretch, but any tips are welcome!
V excited for BYOB sushi
I have high hopes to whip a few of these up for Christmas gifts, but for now, I’m focusing solely on HALLOWEEN. Halloween is kind of a big deal for me. Ever since I can remember, my mom’s always been a champ when it comes to whipping up creative costumes. As a toddler, I was a hand-sewn furry spider. In second grade, I was the R.M.S. Titanic.
There were many more, but that cardboard ship remains the costume to top. Bravo, Mom & Dad in 1998.
Last year marked the first time I sewed my own costume, a spring roll. It took forever, but it was gratifying to know I made the entire piece on my own. This year, I’ve decided to capitalize on my current haircut and go as Johnny Depp as Willy Wonka. And since my boyfriend is blond and light-eyed, naturally I suggested that he be Gene Wilder’s Willy Wonka. I’m planning on sewing the coats, possibly making the hats and canes, and then throwing together the rest of the outfit with items we already own.
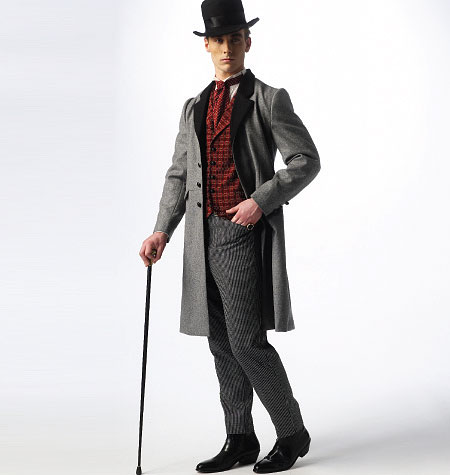
I found this McCall’s pattern for $5 on Etsy and immediately snapped it up. It’s not exactly the style of the Wonka jackets, but I think it’s close enough to pass if we get the accessories right. (And the candy. We’re only allowed to hand out Wonka Candy, otherwise WHAT’S THE POINT?!) The pattern calls for a mid-weight wool or gabardine, but I’m hoping that it’ll work with these mid-weight corduroys I found at Textile Discount Outlet:
At just $3.95/yard, they were way cheaper than anything I could find online, especially when you take into account shipping charges. By the way, Textile Discount Outlet is an old-school fabric labyrinth that definitely deserves a visit if you’re even in Chicago. It’s not glamorous, but it does have an insane number of fabrics, notions, and everything in between.
I just got my pattern in the mail today and can’t wait to get started on these goofy jackets. Do you have any Halloween projects in the works? Let me know in the comments!
I’ve never been much of a goal setter. That’s not to say I lack ambition, I just find it depressing to write down a list of goals, promptly forget about said list, and then stumble upon it months later to find that I’ve accomplished maaaybe one of them. Cynical, I know. But that’s where the blog comes in: If I state a goal in an online forum, I’m forced to hold myself accountable for its success or failure. Plus, you can’t lose the Internet like you might a list of goals written illegibly on a coffee-stained post-it.
So this summer, with this little blog as my witness, I made a tangible goal: sew at least one PDF pattern from an independent designer each month. Easy enough, right? I’m happy and slightly shocked to say that I exceeded that goal. I strayed from PDF patterns on a couple of occasions, but the majority of my summer sewing has come straight from the printer. Here’s the rundown:
Number of patterns used: 5 Items sewn: 9 Total money spent on patterns: $40.81
The Patterns
(Overall ratings are out of 5 bobbins)
Scout Tee by Grainline Studio
Price: $12 (up from $7.50 when I bought it) Skill level: beginner Number of pages: 24 Sewn garments: woven Scout; split-front knit Scout Relevant tutorials used: Madewell variation Cons: might be a little loose/shapeless if you like tighter fitting garments Pros: highly customizable—Grainline’s blog offers a handful of step-by-step variations; very comfortable Sew it again?: yes! Overall rating: 5 bobbins
Sorbetto by Colette Patterns
Price: Free Skill level: beginner Number of pages: 25 Sewn garments: chambray Sorbetto; crop top Sorbetto Relevant tutorials used: continuous bias tape Cons: short in the body; tight armholes Pros: exposed bias binding allows for cool contrast fabric; cute front pleat; good pattern directions Sew it again?: possibly, if I find a great print for a tank next summer Overall rating: 3.5 bobbins
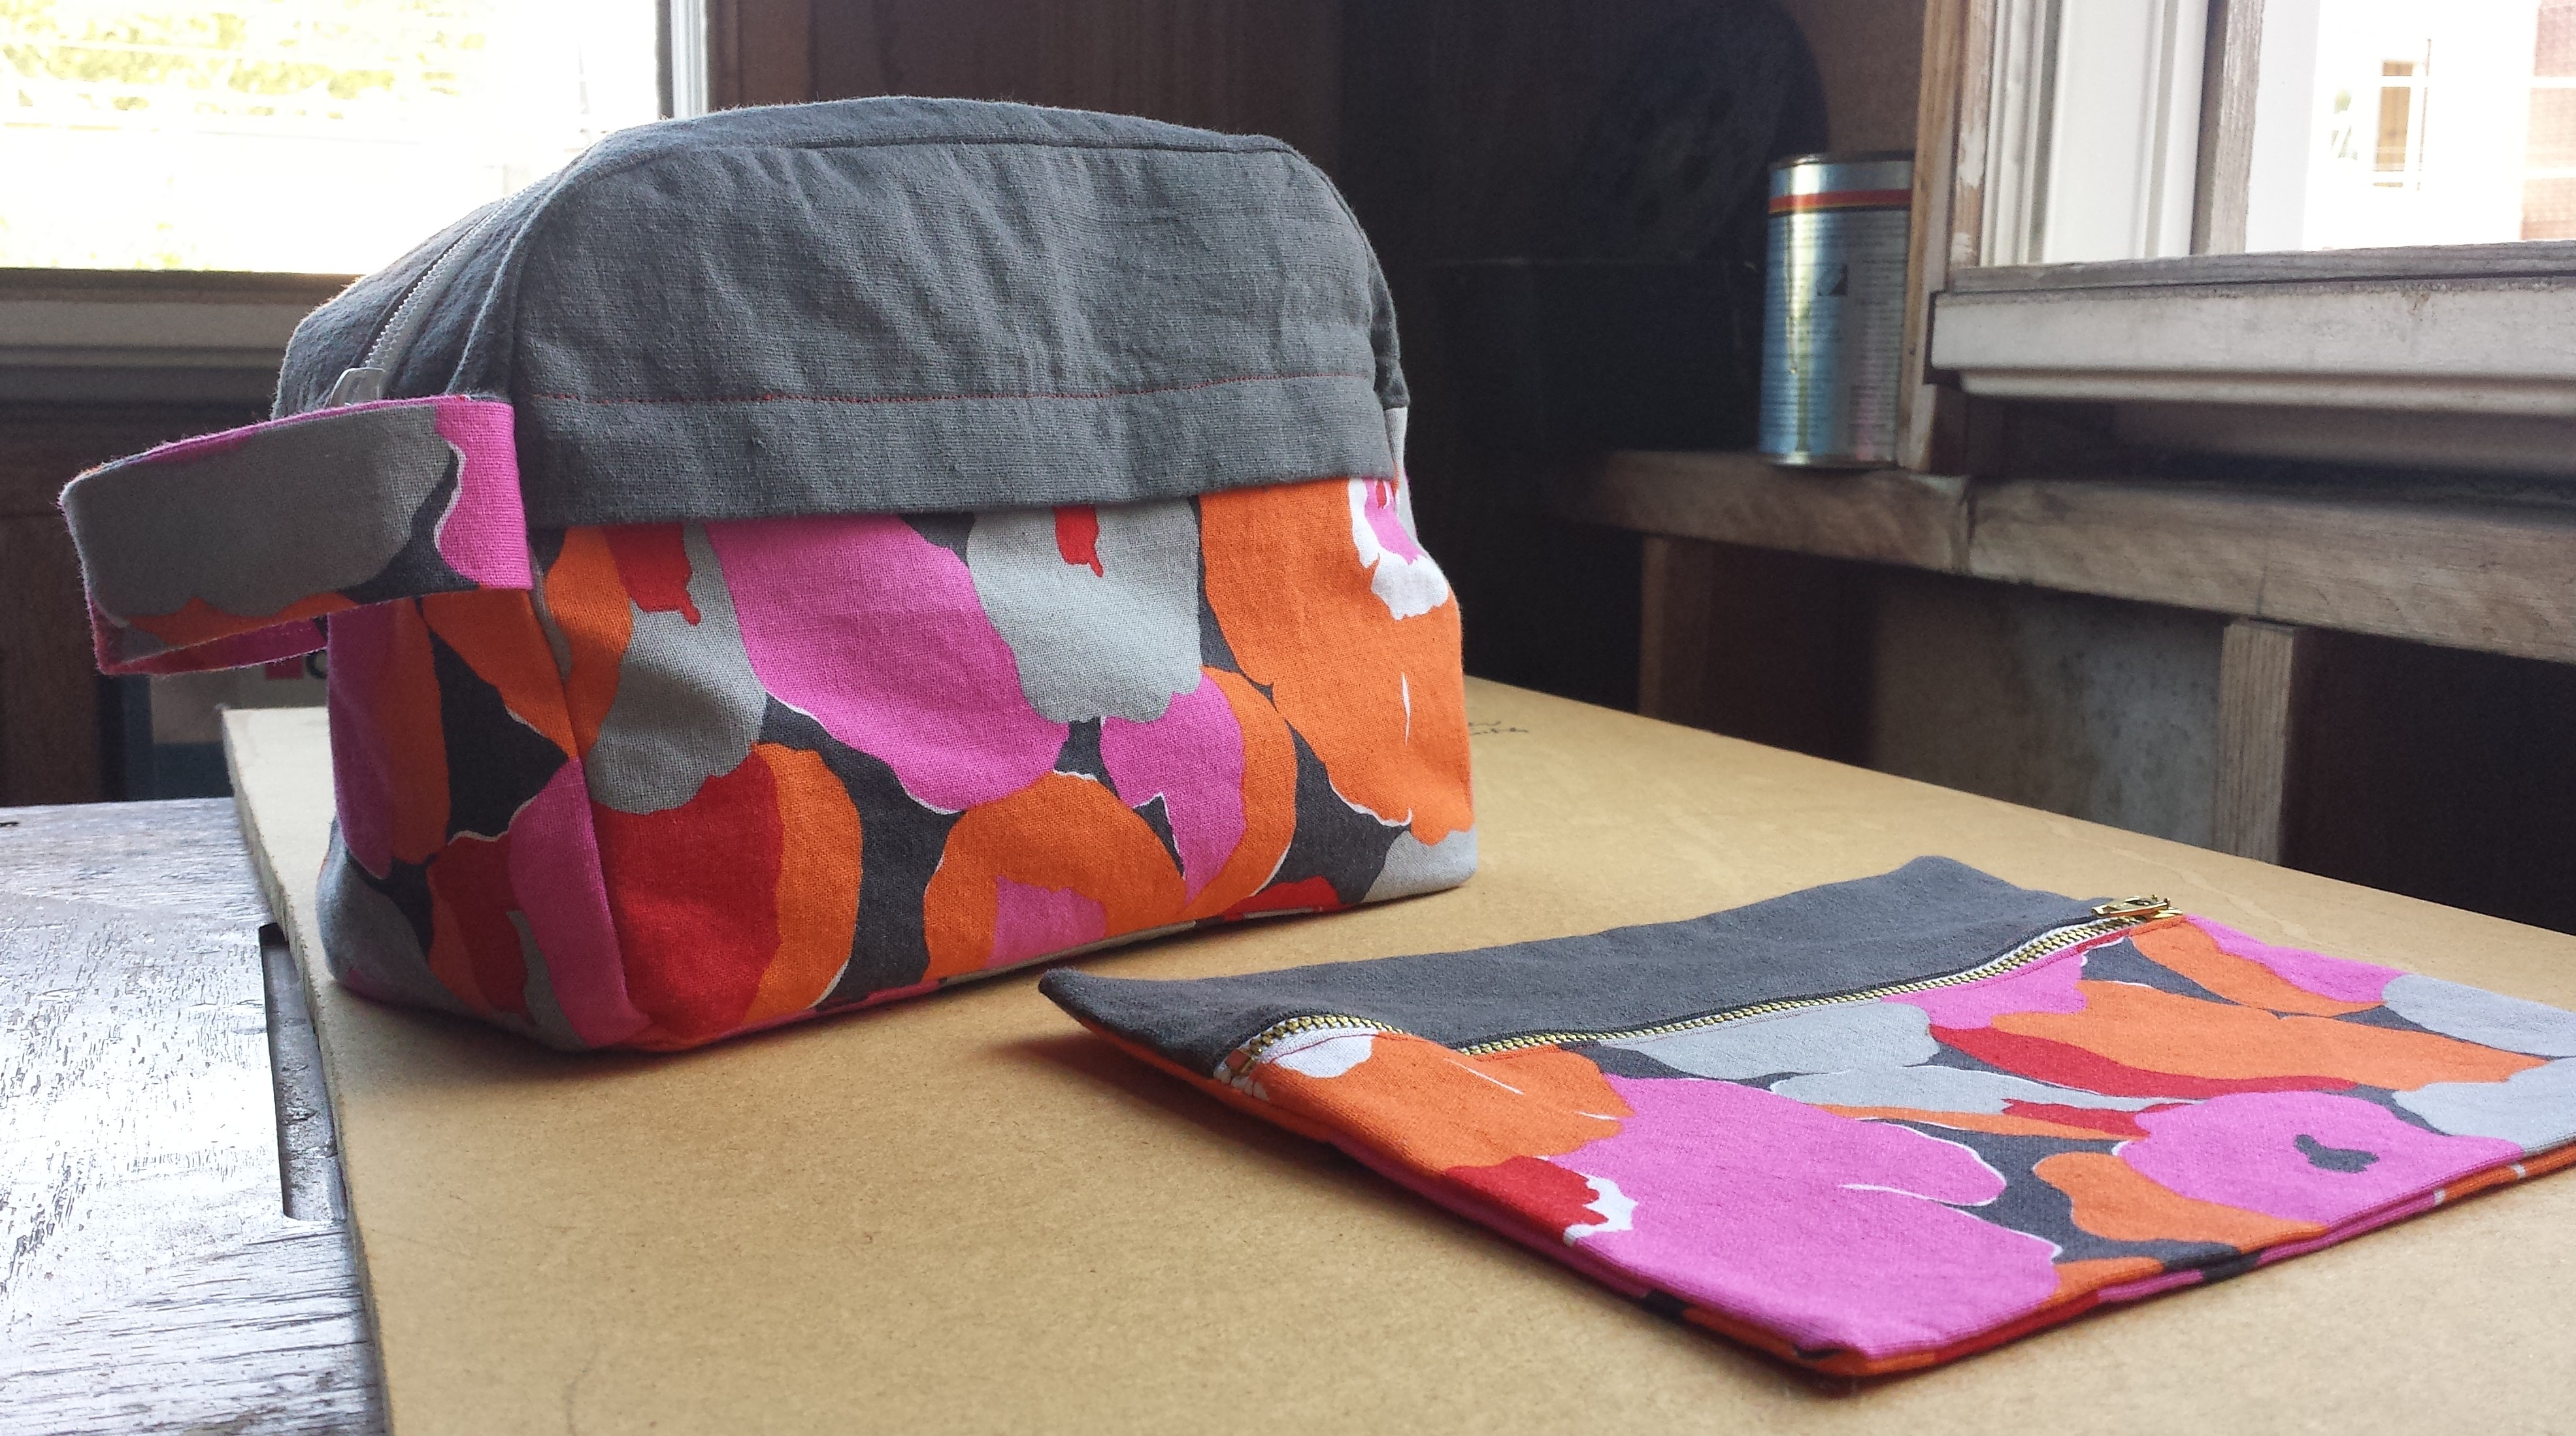
Portside Travel Set by Grainline Studio
Price: $14 Skill level: advanced beginner Number of pages: 58 Sewn items: dopp kit; small pouch Cons: so many pages=tons of time taping and cutting Pros: three patterns for one price; the dopp kit is a great size for a toiletry bag Sew it again?: yes, to make the duffel bag or another dopp kit for a gift Overall rating: 4 bobbins
Buttonless Shirt Dress by Salme Patterns
Price: $8 Skill level: beginner/intermediate Number of pages: 21 Sewn items: floral linen shirt dress Cons: no seam allowance included on the pattern; shapeless until you belt it Pros: you can showcase a cool print Sew it again?: no Overall rating: 2.5 bobbins
Hudson Pant by True Bias
Price: $10 Number of pages: 35 Skill level: advanced beginner Sewn items: blue pants; abstract print pants Relevant tutorials used: Hudson Pant sewalong Cons: crotch doesn’t fit perfectly Pros: option for contrasting cuffs and waistband; pockets; great pattern directions; easy-to-follow online sewalong Sew it again?: yes Overall rating: 4.5 bobbins
And the winner is… Grainline’s Scout Tee! True Bias’s Hudson Pant comes in at a close second. Both of these patterns feature great directions and, most importantly, a modern cut. Scout is great for a sewist of any skill level, whereas the Hudson Pants are good if you’ve already got several projects under your belt and some adeptness with knits.
I’m always looking for great patterns from independent labels, so let me know if you have any favorites! They don’t have to be strictly PDF patterns either. After printing, taping, and cutting so many pages, I might start mixing up my PDF downloads with printed patterns shipped to me in a neat little package.
And since I’m a glutton for stress, here’s my goal for fall: sew at least one garment/item for another person each month.
Fin.
(Do you end a goal like you do a black-and-white movie? I’m new to this. Please halp.)
I’m not the best at Pinterest. In fact, I stayed away from it entirely for awhile. Why is that inspirational fitness quote next to three pictures of buttery, gooey mac & cheese?! Is this some kind of SICK JOKE?! Even after jumping on the bandwagon last year, I’m still more likely to be checking out the latest Pinterest fails than pinning and liking a bunch of pictures. That said, Pinterest does have its practical uses, one of them being my Sewing Pattern Crushes board. It’s only eight pins deep thus far, but it’s already served as inspiration and a reminder about cool patterns that may have slipped my mind.
The Hudson Pant is one such pin. Kelli of True Bias released this pattern in June, and I’ve been crushing on it ever since. I was drawn toward the modern tapered cut, contrasting details, and the possibility that I could, hopefully, make a pair of sweatpants that aren’t floods! I bought the PDF pattern ($10), printed it out, taped it together, and got to work. First up: a straightforward pair of bright blue pants with gray details.
I added 4.5″ to the length of the pattern at the adjustment lines, since the directions state that these pants are designed for a 5’5″ woman with a 28″ inseam. As you can see above, the pants are a little droopy above the calf band, so I made a note to add less length for the next pair.
Now to talk about something that all women deal with at some point in their lives: camel toe. Sorry to be blunt, but this is a common problem for folks with a longer-than-average rise. It’s not super obvious in the pictures (for modesty’s sake), but when my pants ride up onto my hips, which is an issue I have with every pair of elastic-waisted anything, the crotch definitely pulls a bit.
To try and remedy this issue for my next pair of pants, I utilized the lengthening technique described by Threads magazine to add 1″ total to the torso of each pant leg, but I’ll get to that patterned pair in a minute. All-in-all, my first go at the Hudson Pant turned out to be precisely what I needed: a super comfortable pair of lounging pants. I’ve been wearing them around the apartment every day since I finished them, so I’d say they’re a success! Even in spite of the slightly wonky crotch.
And speaking of a slightly wonky crotch, you can see that my abstract patterned pair didn’t fare 100% better, even with the 1″ crotch-length adjustment. I’m wondering if the Threads tutorial, which is designed for fitting jeans, just doesn’t translate to a knit fabric? Either way, round two of the Hudson Pant, in a pink and purple abstract knit from the Needle Shop, fits better than the first pair.
Instead of 4.5″ of length I added 3″, and I’m thrilled. They’re still plenty long enough without being overly slouchy. Throw in a cute pair of shoes and they go from casual to dressy-casual in a matter of seconds.
The seat of these pants fits well, a pleasant surprise since most sweat-style pants give you immediate frump-butt unless you have the Ass of Beyoncé.
And there you have it! One pattern, two very different-looking pairs of knit pants. They’re both ridiculously comfy and are an easy sew if you have a long afternoon to kill.
This will most likely be the last piece I post about before summer officially ends, so stay tuned for a wrap-up of the Summer of PDF Sewing Patterns. How did your summer sewing shape up?
A lot of important decisions I make are determined by two distinct, opinionated voices in my head. I’d like to think of them as Ambitious-Bordering-on-Irrational Dani, and Calculated-Bordering-on-Boring Dani. This past week, their conversation involved sewing.
ABOI: Should I make a dress to wear to Bianca and Jon’s wedding?
CBOB: Absolutely not.
ABOI: But I never make formalwear—it’ll be fun!
CBOB: The wedding is five days away, dummy, and you haven’t even bought a pattern yet.
ABOI: It’s fiiiine. I’ll go to JoAnn and get a nice Vogue pattern and some fabric. Kill two birds with one stone.
CBOB: But what if it doesn’t turn out? You know you have dramatic tendencies when sewing under pressure.
ABOI: I’ll pick an “easy” pattern. I’m not worried about it.
CBOB: I’m worried about it. This is a bad idea.
ABOI: [Frolics off to catch the bus to JoAnn.]
CBOB: [Yelling:] Don’t expect me to calm you down when your needle breaks and gets lost in your sewing machine at midnight on Thursday!
ABOI: Can’t hear you! Too busy flipping through pages of designer dress patterns!
CBOB: [Still yelling:] Or when you realize that the pretty dusty-rose fabric you’re about to buy is a rayon-lycra blend that will make you consider throwing your sewing machine off the roof of your building!
ABOI: Oh stop being such a grouch. It’ll be a learning experience! Plus, I have other dresses to wear if this turns out to be a total disaster.
CBOB: I guess that’s true. Fine. Do it. But I’m not buying the Spanx.
ABOI: I already did.
And so, Ambitious-Bordering-on-Irrational won that round. While it’s important to self-edit when it comes to project ideas, especially when precious $$$z are involved, it’s also pretty liberating to follow your gut. I’m happy to say that this particular gamble turned out well enough that I didn’t have to outfit repeat. (Not that there’s anything wrong with outfit repeating.)
Here’s what I ended up with after sifting through three giant pattern books and the limited selection of knits at JoAnn:
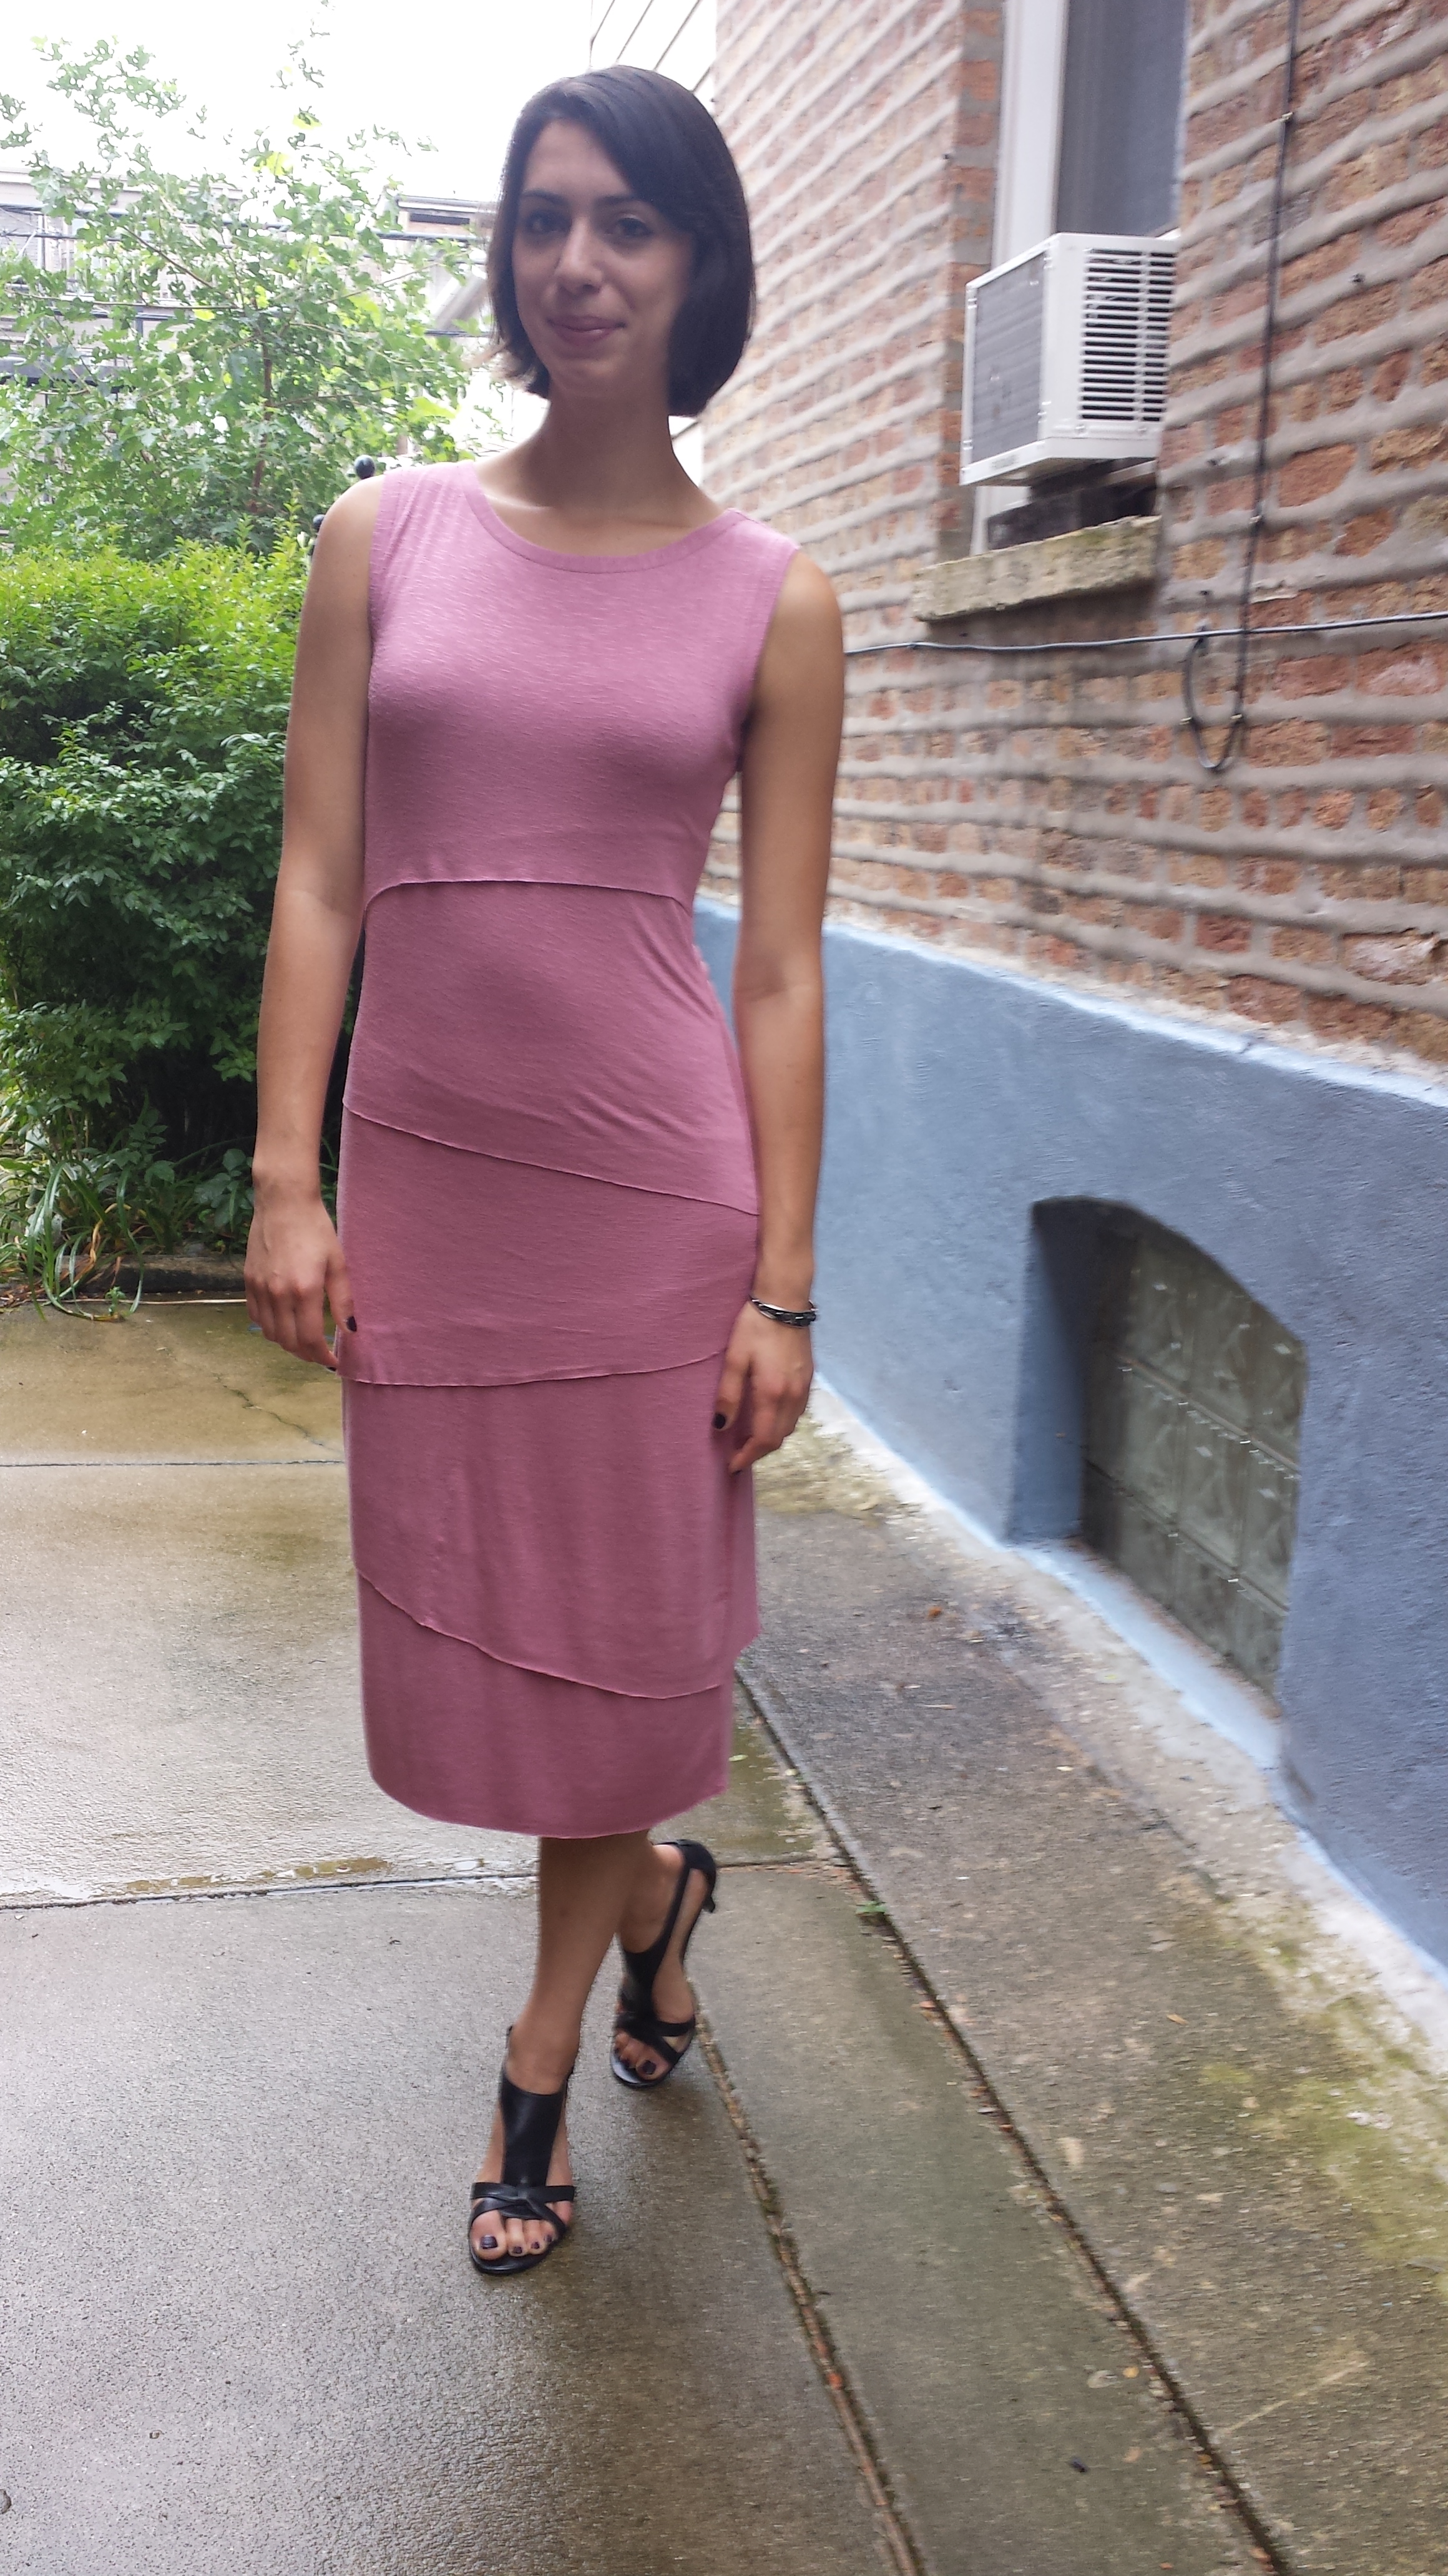
Cost: $16.50 (at 40% off, but you can get it for $4.99 online grrr >:-o)
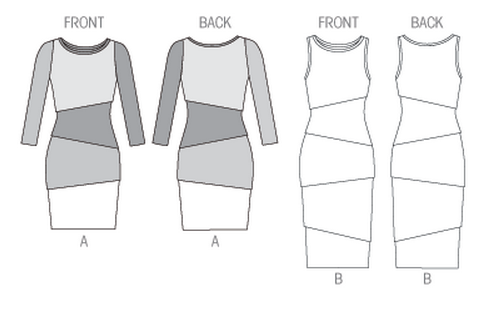
I normally avoid buying Vogue patterns when they’re not on sale for $5, but, being desperate, I made an exception for Vogue 8904. Several other bloggers who’ve made this dress have commented on its striking similarity to a layered column dress from Anthropologie. Years ago, I tried on a near-identical version of that column dress and fell madly in love. It was one of the most flattering, comfortable piece I’d ever worn, but I couldn’t justify the roughly $150 price tag. Sadly, I left it on the rack that day. Enter Vogue 8904, which not only fills the void of that layered column dress, but also offers a shorter option with sleeves for the fall/winter! I’ll definitely be trying view A (and maybe making one for a friend… eek!) at some point in the next few months.
The Fabric
Dusty rose rayon-lycra blend with slub texturing
Difficulty to work with: !!@#$%^&*!!!!!
Cost: $17 (after using a 60% off coupon)
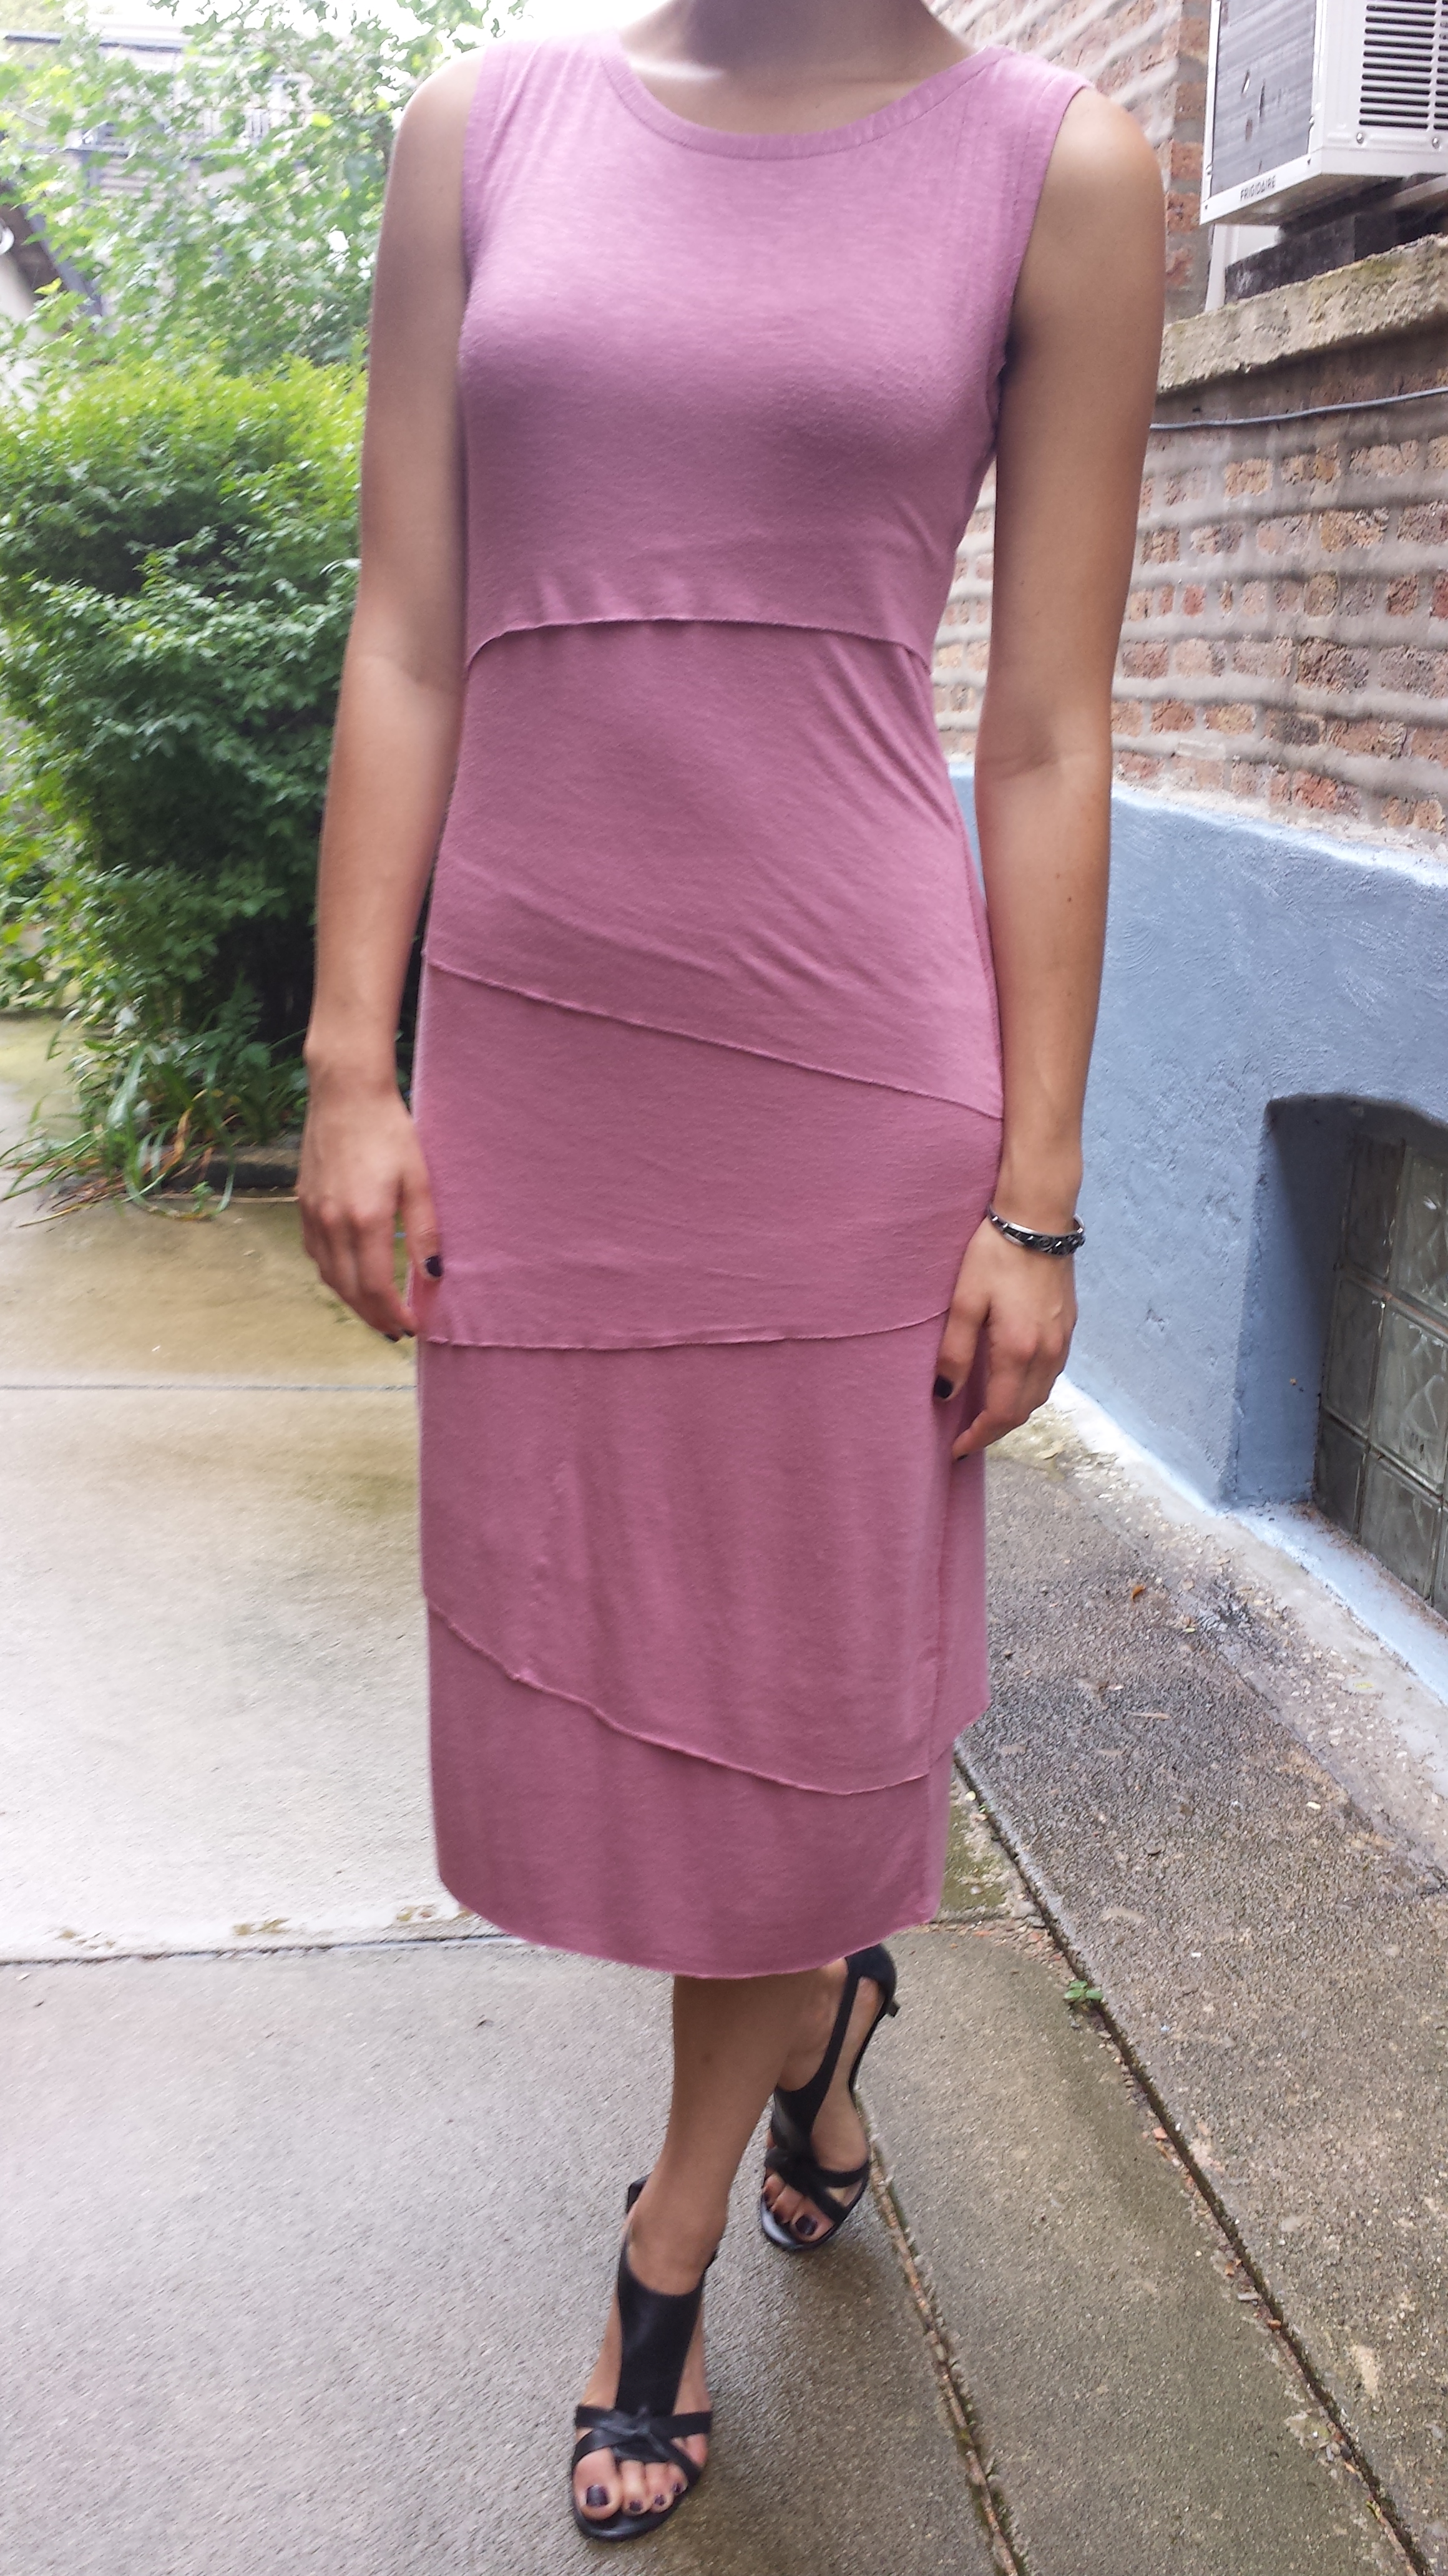
Ohhh, where to start with this one. I really should know better than to rely on the selection of knits at JoAnn, but I just didn’t have time to order anything online. I settled for a very pretty, very slippery rayon knit that turned out to be quite a doozy to lay out and cut. Using a rotary cutter helped, and that’s what I made sure to use to carefully cut the raw edge portion of the floating panels (“shingles”) that are sewn on top of the base layer. The base layer doesn’t have to be the same fabric as the shingles (mine was), but I assume it makes life easier if you use the same fabric or one with a very similar stretch/drape.
All I can say about sewing this material is thank god for my walking foot. Having the top and bottom layers feed through evenly was key to this material not ending up a puckered mess.
The pattern deserves its “easy” difficulty, but it’s not a project that you can whip up in an afternoon. Marcy Tilton, the pattern’s designer, wrote an informative blog post that I highly recommend reading if you plan on trying this pattern out. It’s full of great tips and in-progress pictures.
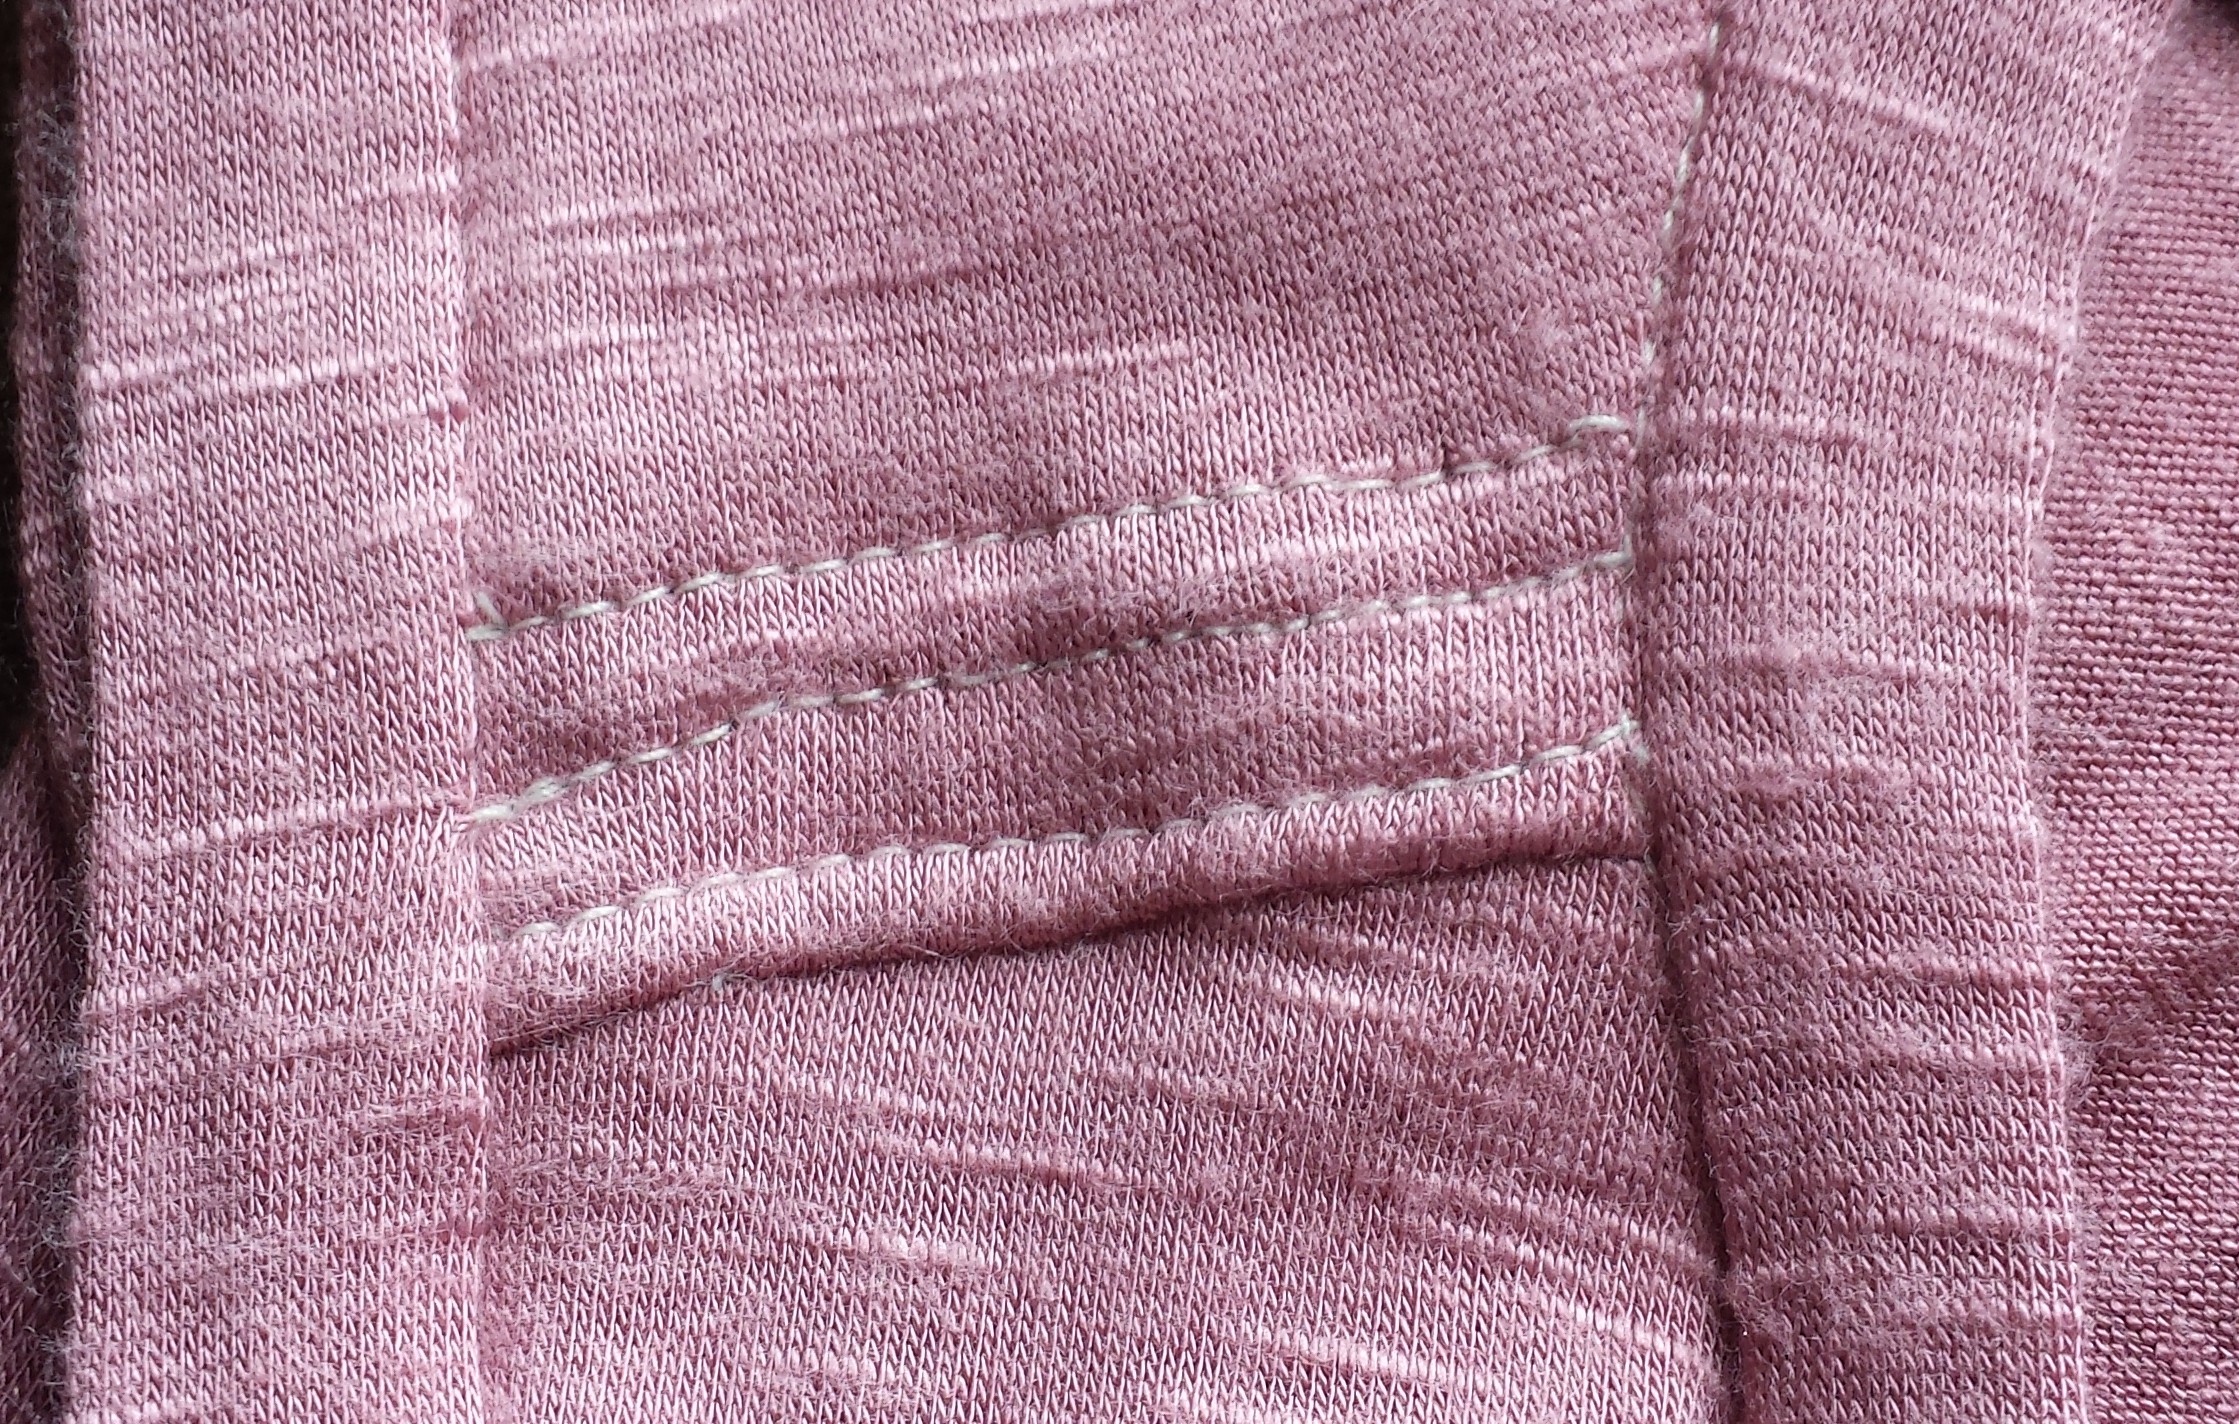
The main pain points I had during construction were with the neckline and armhole binding. I’ve never bound a knit before, let alone a super-stretchy one, and the finished neckline and armholes ended up a little droopy where I didn’t stretch enough when attaching, and a little puckered where I stretched too much. I also decided to add some self-material stabilization since the dress was getting heavy. I folded a small strip of fabric attached it with two layers of topstitching, parallel to the already existing topstitching at the shoulder. Not sure if it was necessary, but I think it made the dress feel more stable.
Oh, and in case you noticed the strange imperfection in the second-from-the-bottom front layer, that’s from where I ran out of fabric and had to piece two scraps together. (That’s what I get for buying the last of the fabric bolt and hoping that I wouldn’t need those extra two inches.)
I was pretty worried about the clinginess of the material, but the double-layer construction (and some microfiber shorts) helped to reduce most of the cling. That said, this dress is definitely cut to hug the figure. Marcy points out that you can sew it a size bigger if you want to reduce the bootylicious factor (in so many words).
Per usual, I lengthened the pattern at the waist by about 1″ to accommodate my long torso, and I think that was the correct amount, although I’m wondering if that added length is what made the middle back panel a little droopier than the rest.
Wrinkles = the sign of a fun evening
A raw-edge hem allowed for total freedom of movement.
I’m happy to say that this dress held up pretty well during an amazing day that included a pre-wedding cocktail hour, ceremony, dinner, and reception full of sweaty dancing. The raw edges did start to run a little bit, and the material is already pilling under the armpits, but it pretty much felt like I was wearing fancy pajamas all evening. That’s really all a girl can ask for when it comes to formalwear. But a handsome date doesn’t hurt either.
my date and the sexiest groomsman I know
Congratulations Mr. and Mrs. Mecoli! The outpouring of love shown at your wedding is a true testament to both of your characters. It was a beautiful day (not to mention a total blast) and made me proud to call myself your friend. Can’t wait to start sewing y’alls some baby clothes!!! 😉
This top was a no brainer. I had a little over a yard of black ponte knit fabric left after making this simple half-circle skirt, and I’ve been crushing on Jen’s Madewell Scout variation since she posted the pattern and sewing tutorials this spring.
The tutorial was easy to follow and well photographed, making for a relatively quick project, albeit finished over a couple days because of weekday time constraints. Sidenote: Kudos to anyone with the patience to start and finish a project during the workweek. Try as I might, I always end up finishing on a Saturday or Sunday and then promptly celebrating with several cold beverages.
The Madewell variation calls for three changes to the original Scout pattern:
Raised neckline with a split opening
Slightly curved bottom hem
Longer sleeves with a fold
I had every intention of incorporating each change, but I was just shy of having enough fabric for the lengthened sleeves so I sewed those up like normal. Since I used a knit, this knit Scout tutorial also came in handy when it came to cutting the fabric, hemming, and cutting neckband binding.
I’ve gotten lots of wear out of my first Scout tee, but I have noticed a tiny bit of tightness across my back from armpit to armpit. One of my goals this year is to achieve a more perfect fit with my garments, so I wanted to make sure that I addressed the tight-back issue on this Scout. A Google search turned up this gem from Threads, and it goes into lengthy detail about how to adjust a pattern piece if you have a broad back (or a narrow back, but I have no clue what that looks like since the breadth of my upper ribs rivals that of most NFL linebackers).
I slashed the pattern and added about a half inch between the mid-shoulder to hem, as the Threads image shows. After that adjustment, I simply altered the neckline and hemline per Jen’s instructions and got to work.
Creating the split front was surprisingly easy, just make sure to leave enough binding on either side of the V (Grainline’s tutorial pic here). I left too small an amount on one side and struggled to get a clean finish on the wrong side of the garment. I also wasn’t entirely sure how to hem the curved edges where they met, so I just tapered the standard half inch hem at those spots. Other than that, this came together like a dream and is amazingly comfy. I’m glad to have some solid black staples in my wardrobe now, but my print-hungry brain is dying for an insanely bold pattern.
The Hudson Pant is next up on my docket, so stay tuned for some possibly wacky-printed track pants. Let me know in the comments if you’ve sewn these up yet and have any tips!
I tend to gravitate toward prints. There’s something about sewing with a colorful floral, geometric print, or even an ugly-sweater knit that makes me feel happy. Plus, if I’m going to invest planning, labor, and money into an article of clothing, I want it to be more vibrant than something I can buy off the rack. The one-of-a-kind factor is part of what makes this hobby so gratifying.
Unfortunately, this obsession with bold prints means that I haven’t sewed many everyday wardrobe staples. I’m a creature of habit, and this summer the habit has been wearing the same store-bought chambray skirt roughly twice a week. It’s comfy, it goes with nearly everything in my wardrobe, and it’s weighty enough to stand up against the ridiculous Chicago wind. But I’ve put the poor thing through the ringer, so I figured it was high time to add another versatile skirt to my wardrobe.
I’ve already gone the bold-print quarter-circle skirt route, so this time I went for a half-circle in a black ponte knit from JoAnn. I used the trusty By Hand London app again for the waist radius and length measurements, but since I was working with a knit I also heeded iCandy’s tips about subtracting 2″ from the waist measurement before plugging it into the app. Keep in mind that the app adds in 5/8″ seam allowances.
By Band London app screen shot
I used a homemade twine compass to trace the waist radius and length, although that part was tricky since my tracing pencil kept dragging the knit fabric along with it. I ended up marking a series of dashes that I followed with my rotary cutter. Note to self: buy marking chalk! That’d probably be more friendly on a knit, right?
For the waistband, I followed iCandy’s suggested dimensions:
Length: waist measurement minus 2″ plus 1.25″ for seam allowance
Height: double your desired waistband height plus 1.25″ for seam allowance
The step-by-step construction of this skirt is amazingly easy. I don’t have a serger, so I attached my machine’s walking foot, inserted a ballpoint needle, and used a zigzag stitch for the seams. After stitching the back seam, I attached the waistband per the directions of the straightforward iCandy tutorial. After clipping the excess seam allowance and ironing the waistband, I hemmed the bottom of the skirt with a roughly 1″ hem. This isn’t technically required since it’s a knit and won’t fray, but I like a clean finish.
And that’s about it! It’s really a sewing 101 project, and an especially good one if you’re looking to break into the world of knits. I didn’t add a zipper since the material is stretchy enough to get on and off (gently) over my head, but I might try another version with a short zipper and see which is more comfortable. I’m a little afraid this material will stretch out over time, but it wouldn’t be the end of the world since that would just mean the skirt would sit a little lower.
It’s not an earth-shattering make, but it’s comfy, it fits great, and it cost under $7 total. Not too shabby for a new wardrobe staple. I’ve already paired it with my Colette Sorbetto crop top (pictured) and a tucked-in tee, and both are comfy.
What’s your most versatile piece of self-made clothing?


 I added 4.5″ to the length of the pattern at the adjustment lines, since the directions state that these pants are designed for a 5’5″ woman with a 28″ inseam. As you can see above, the pants are a little droopy above the calf band, so I made a note to add less length for the next pair.