A Classic Clare Coat

2016-02-21-17.55.54.jpg.jpeg

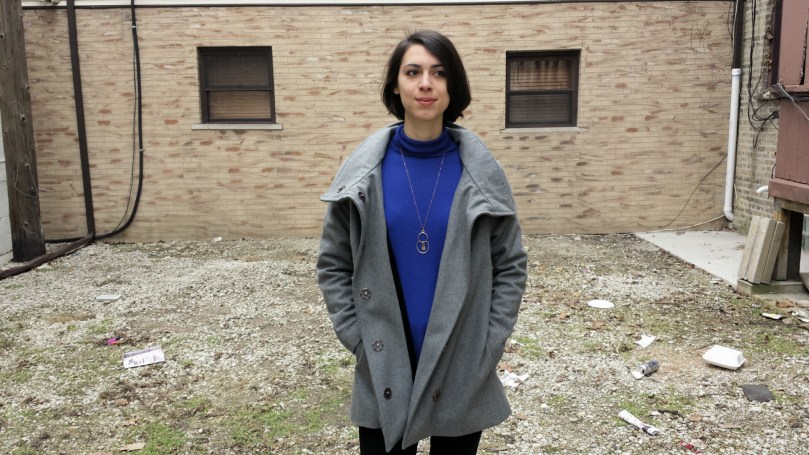
It’s not perfect, and I love it.

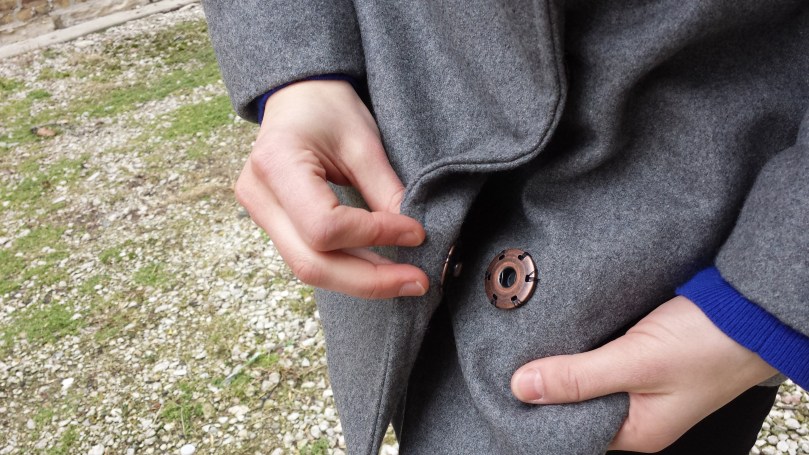
And that will be the last apology, or ablogogy, of this post. I’m not going to point out all the imperfections on this coat, because GUESS WHAT it’s wearable and it’s warm and it’s wooly and I made it with my two bare hands! Which were sometimes ragged and bloody from hand-sewing those adorable snaps on for the umpteenth time.

2016-02-21-18.12.47.jpg.jpeg

Exact snap placement is kind of hard, y’all.

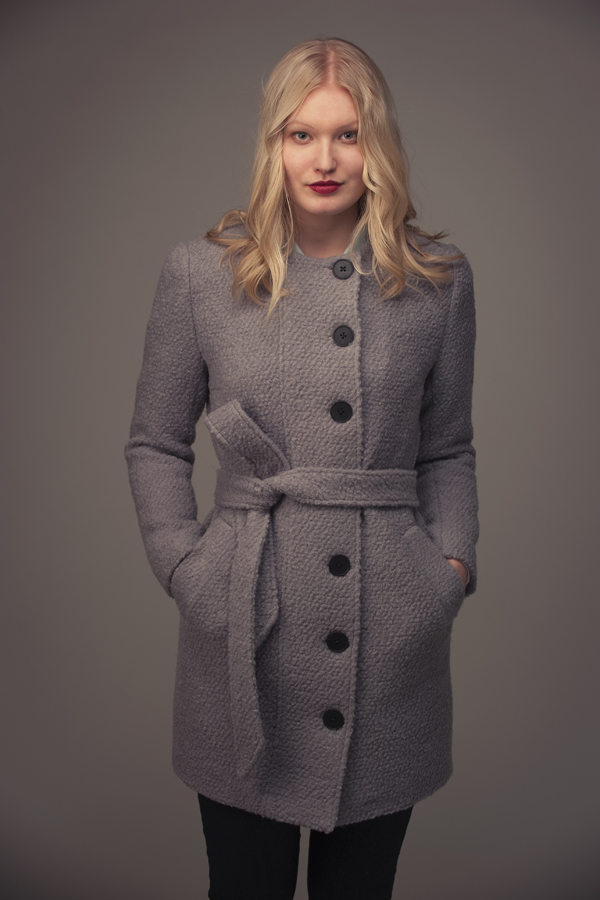
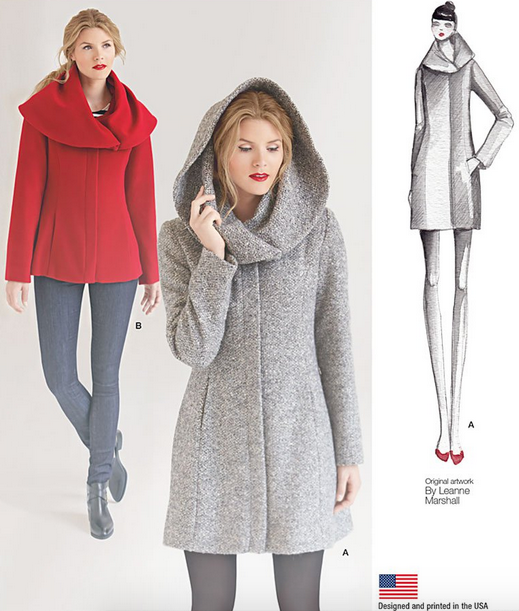
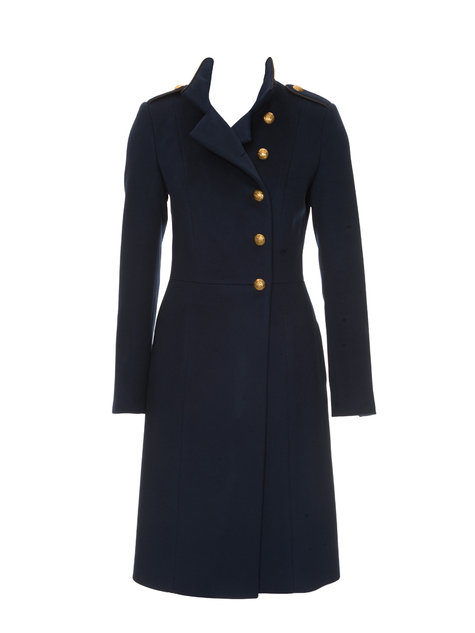
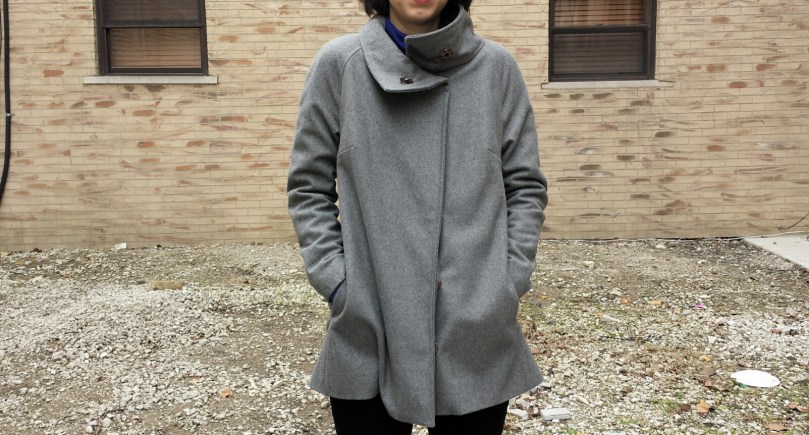
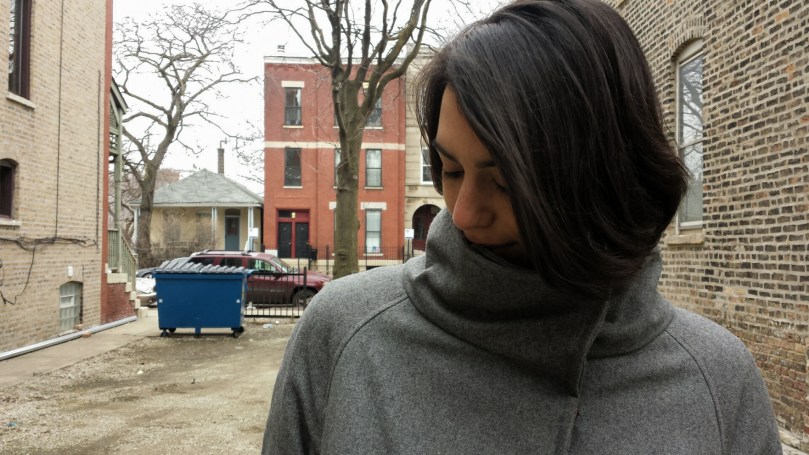
I had mighty ambitions to tackle a Burda military coat when Heather over at Closet Case Files released Clare. Clean, simple, classic Clare with a fun twist in the form of a big ol’ collar. I knew I wanted to sew this up in a solid-color wool, so I ordered charcoal, light gray, and red wool-blend swatches from Fabric.com.

20160221_140019.jpg

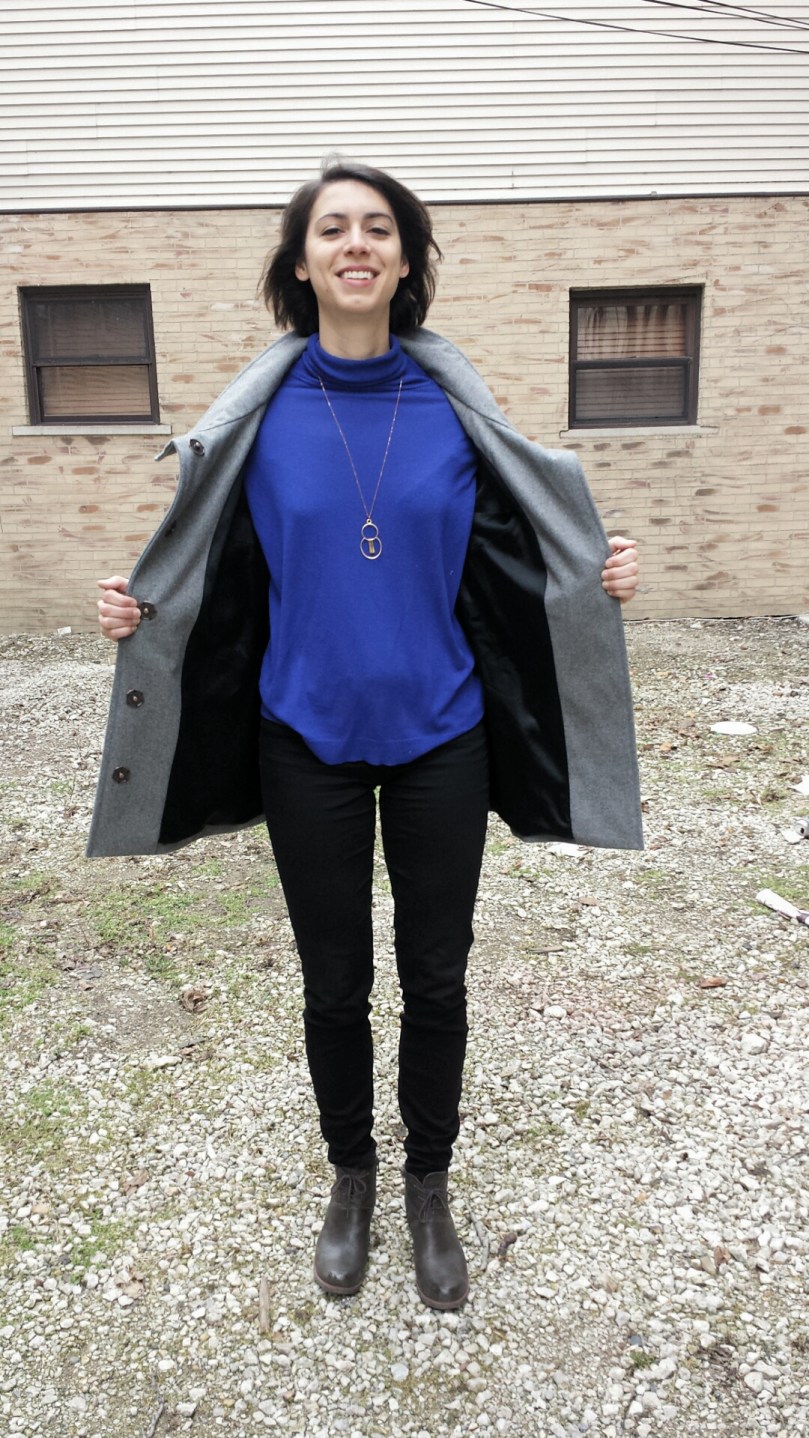
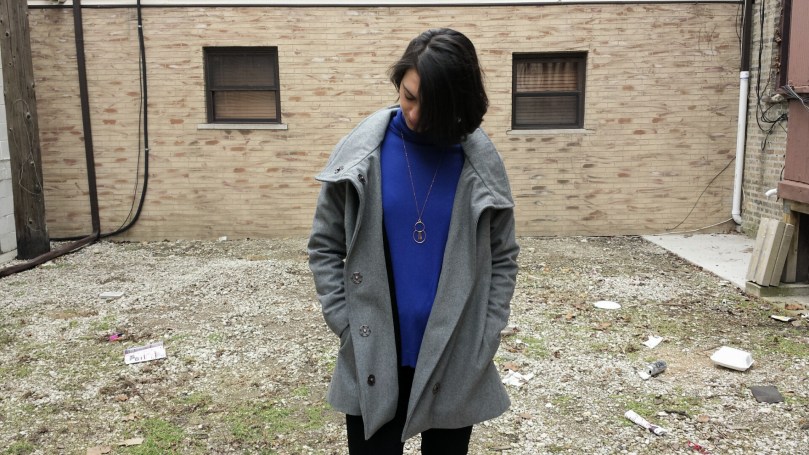
The light gray wool melton blend won out for wearability and lint resistance. It’s not quite as soft as I’d like, but it’s by no means scratchy. Perfectly fine for a first attempt at a wool coat. Plus, the kasha lining is primarily what lies against my skin, and ohhhh is it creamy. Kasha is smooth-as-silk satin with a flannel backing. I picked this black kasha up from Vogue Fabrics in Evanston.

2016-02-21-18.24.32.jpg.jpeg

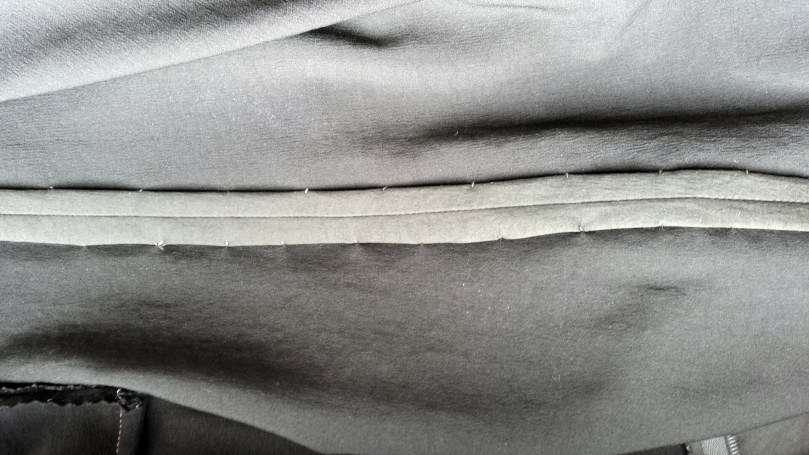
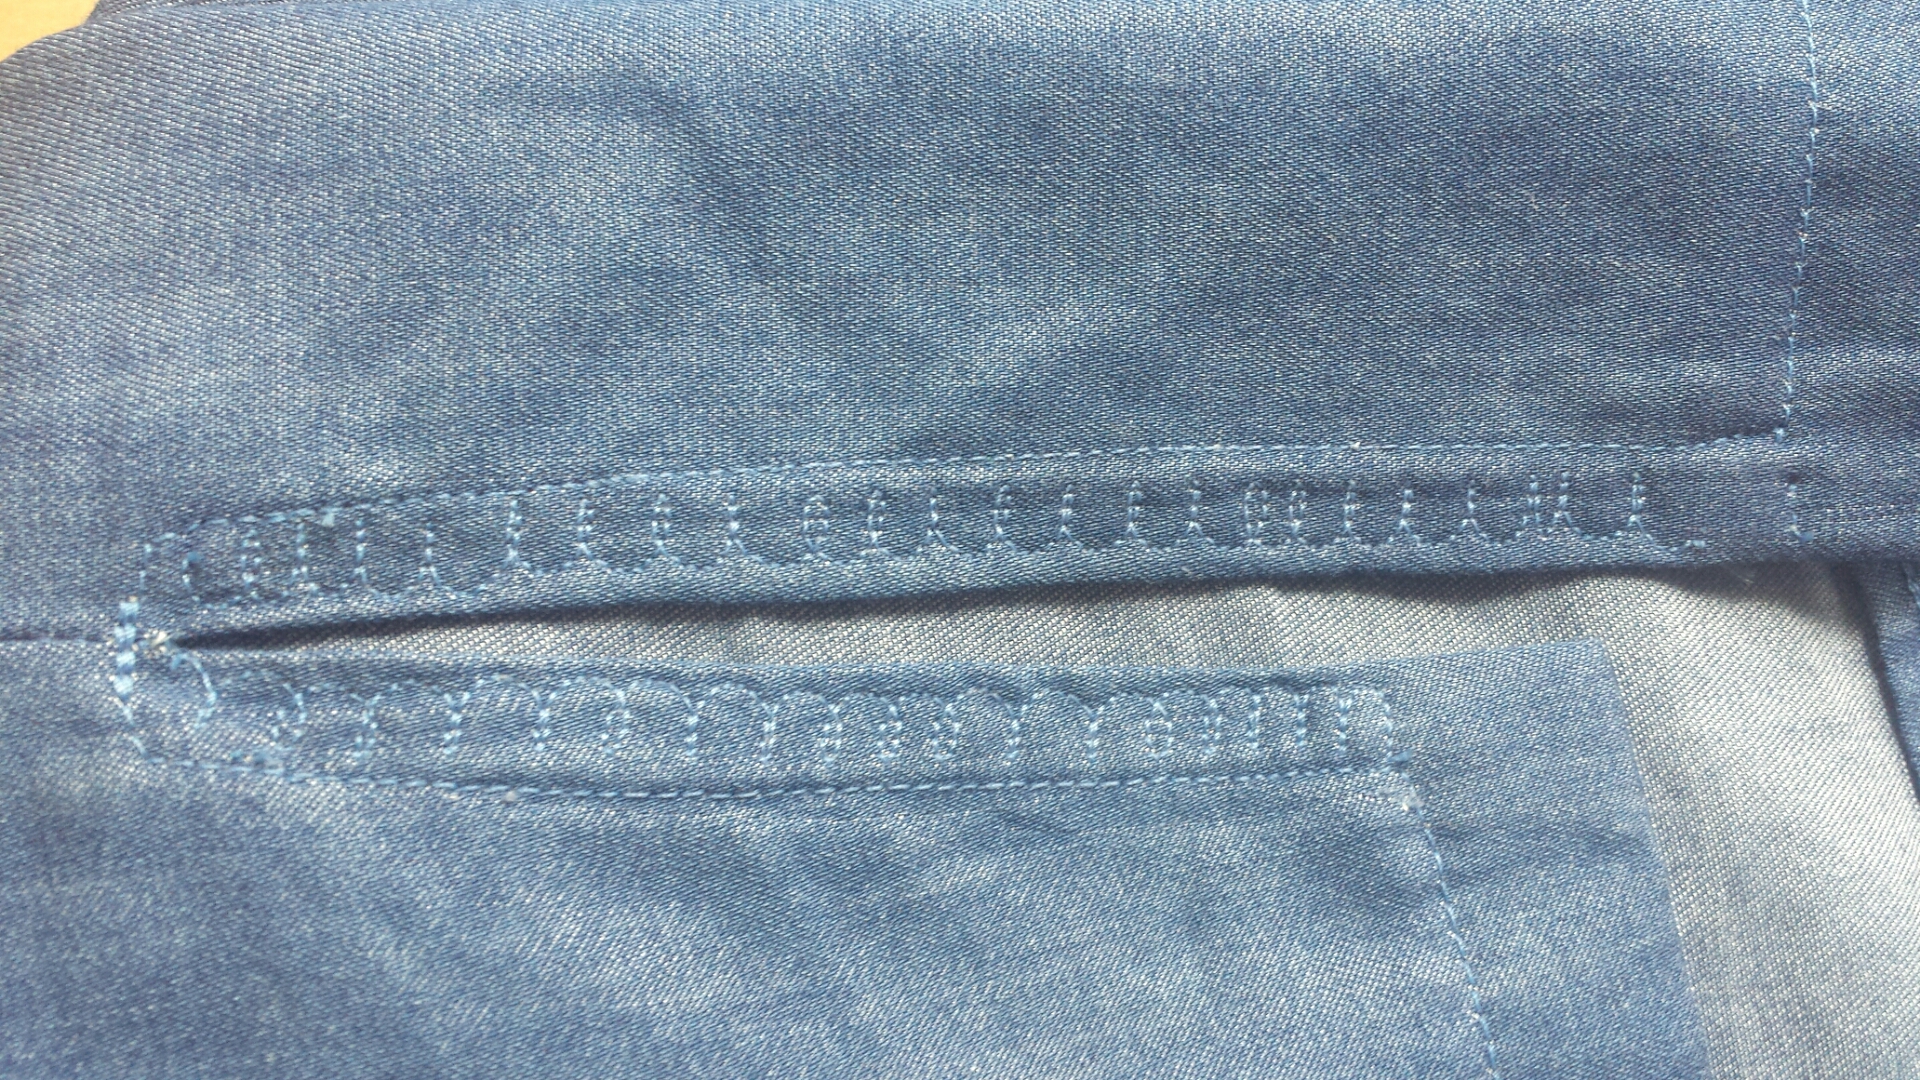
I know: gray coating and black lining is venturing into the boring realm. That’s why I obviously had to go a little CrAzY with the bar tacks, hanging loop, and Pantone-inspired topstitching.

20160222_081715.jpg

2016-02-23-21.39.46.jpg.jpeg

20160222_081944.jpg
let’s just call it rose quartz and serenity, OK?!!

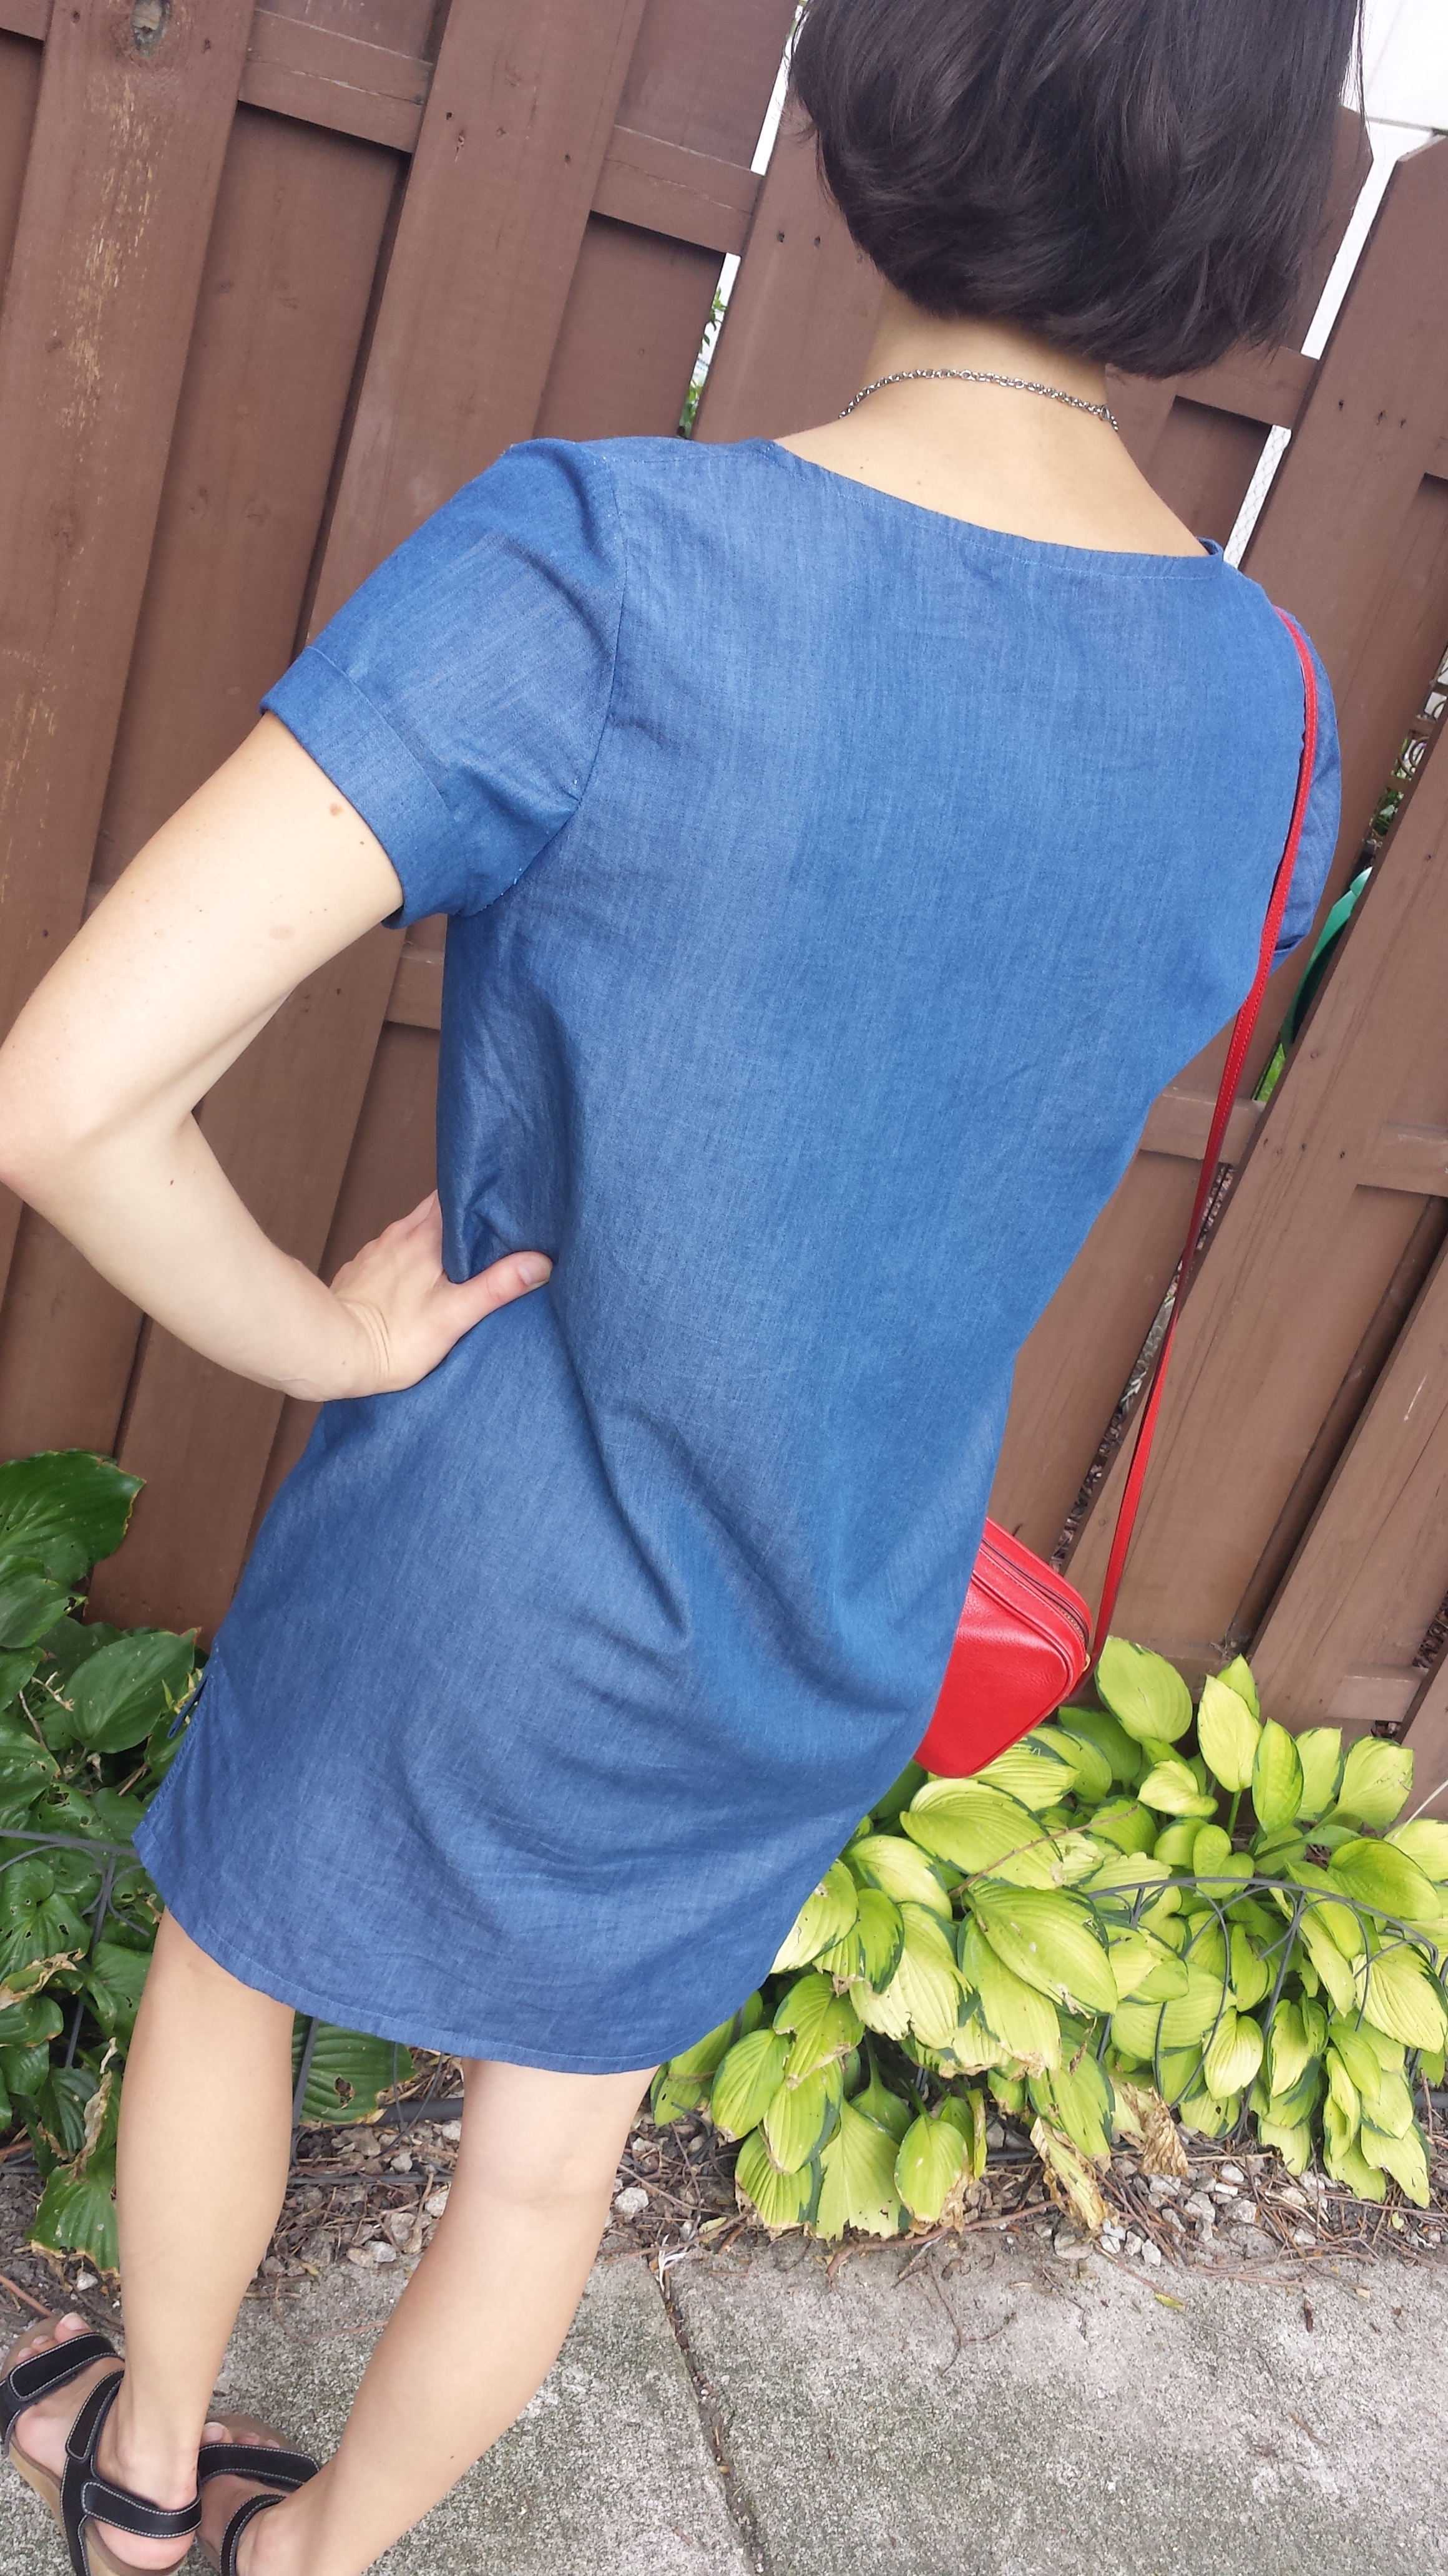
I made a muslin with fleece, which I now realize was probably not the best choice as it’s pretty forgiving. I cut out my coat fabric in a straight size 10, adding length to the body and arms—the usual for me. I followed along with pattern directions and the Clare Coat sew along, which was especially helpful when it came to bagging the lining.

2016-02-21-18.01.14.jpg.jpeg

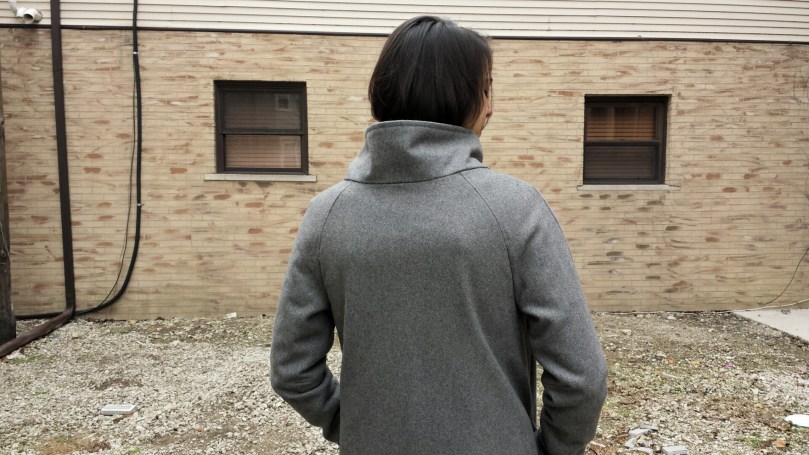
I have a pretty broad back, so I added width to the back sleeve and center back per the suggestions in the fitting post in the sew along. That meant adding width to the collar and neckline. The collar turned out pretty large in circumference because I also let out the raglan sleeve seams when I realized that the sleeves were a little too tight.

The sleeves fit fine now, but I think they’re drafted pretty slim. I personally like the streamlined look, but you might want to add inches if you want to wear a bulky sweater underneath.

2016-02-21-17.59.09.jpg.jpeg

Taking out the sleeves meant adding yet more width to the collar. Blah, blah, blah—not perfect, but still cute!

2016-02-21-18.10.41.jpg.jpeg

I took my time with Clare. She was quite the journey, from choosing fabric to using a clapper to press wool for the first time to sewing on those daggone snaps. And FYI if you’re a Northerner like me, the combination of wool and warm kasha is suitable for mid 30ºs F and above.

2016-02-21-18.20.32.jpg.jpeg

To me, Clare personified is a wizened old Irish woman, darning socks next to a fire as she downs pint after pint of Guinness. I like her.

2016-02-21-18.26.01.jpg.jpeg

Do you personify your outerwear, too?


Hudson Pants

Hudson Pants: The Perfect Athleisure Wear

You can sew knits without a serger. There are countless blog tutorials and YouTube videos detailing exactly how to do so. But OH MY GOD is it faster, easier, and so much more satisfying on a serger.

Brother Designio DZ1234 Serger
fresh outta the box

I’ve sewn so many knits over the past year that I knew it was time to bite the bullet and get a serger. And then Christmas rolled around, and my very generous parents gifted me this Brother Designio DZ1234 Serger (and this awesome The Complete Serger Handbook by Chris James!). I almost started crying. Thanks Mom and Dad!

brother Designio serger
sergin’ some scraps

I didn’t even open the box until well after holiday break, since I figured the thing might consume me. I was correct. It came prethreaded, so I pretty much started serging bits and bobs of scraps at will. So fast! So neat! So professional-looking! Full disclosure: I just flipped the machine on and started using the default stitch. I know there are plenty of stitches to explore, but I’m not kidding when I say that I went at this with reckless abandon. It seems intuitive enough, right? Hehe, hehe (*nervously looks around for whistleblowers*).

The Hudson Pants from True Bias seemed like a logical choice for my inaugural serged garment. I’ve made them twice already and absolutely love each pair. Kelli came out with this pattern well before I ever heard the term athleisure (thanks, Aria!), but I think it’s safe to say that the Hudson Pants fall squarely into this category. If you’re not familiar with the word athleisure, you’ve at least seen the trend out in the world. Think leggings as pants, cropped sweatshirts over tanks, floaty “yoga tops” that no one actually does yoga in but will gladly wear after yoga class. Preferably at bottomless mimosa brunch.

athleisure lululemon
athleisure in its natural habitat: Lululemon (photo: http://bit.ly/1JcxV2z)

Hate it or love it, athleisure isn’t going away. (Just ask Forbes.) I’ve decided to embrace it, even if only at home on the weekends or after a workout.

True Bias Hudson Pants

Here are the details for these Hudson Pants:

  • Fabric: stretch bamboo rayon jersey and an Art Gallery cotton jersey knit for the contrast
  • Same fit modifications as my printed Hudsons: 1). slashed and spread to add 1″ to the front and back crotch 2). added 3″ of length
  • Added a seam at the upper thigh because of fabric constraints
  • Smaller waistband because of fabric constraints
  • Omitted the buttonholes/drawstring

Hudson Pants

So… the color. I know. Kind of, very nude-looking. I didn’t buy this fabric (which is incredibly soft and comfy BTW) with the intention of sewing Hudson Pants. It was destined for a Christmas gift, but the color was just wrong for the Hemlock I wanted to make.

Hudson Pants

Enter these slightly obscene Hudson Pants. I’m going to spare you a butt shot for the sake of my own dignity. Strange fabric color aside, I love these pants and can’t recommend this pattern enough if you’re looking for some comfortable loungewear. Excuse me, ATHLEISURE WEAR.

Do you have any favorite athleisure patterns? My serger is looking for more work.


All Dressed Up in Anna with Nowhere to Go… Yet.

Purely. Gratuitous. Sewing. That’s what I did when I had the apartment to myself for a couple days over holiday break, and it felt amazing. Did I need to make this By Hand London Anna dress? Not quite.

by hand london anna dress

Sure, I’m considering using this pattern to sew a bridesmaid dress for a wedding in the fall, but that’s more than 10 months away. I did, however, really want a break from sewing Christmas gifts and practical clothes, and Anna turned out to be just what I needed to get my sewjo back. (Sorry not sorry for using that frankenword.)

by hand london anna dress

Construction was simple but time-consuming, since I opted to hand sew a lot of the finishes. Here’s how I finished the guts:

  • Blind slipstitched the armholes and leg slit
  • Catch stitched the hem
  • Pinked the facing and waist seam
  • French seamed the skirt panels and shoulder seams
by hand london anna dress finishing techniques
blind slipstitch on the leg slit
by hand london anna dress finishing techniques
catch-stitched hem and french seam on a skirt panel
by hand london anna dress finishing techniques
three-for-one: pinked! frenched! slipstitched!

Frenching the seams and hand-sewing the hems took quite a bit of patience, but I’m really pleased with the outcome. Plus it was nice to have something to do with my hands while binge-watching Making a Murderer.

anna dress bodice

As for fit, the bodice is pretty snug. I’m not sure if I lost some inches with lackadaisical french seaming, or if I could stand to go up a size. I cut a straight size 10 (I’m a 36 bust with broad shoulders), and I’ll probably go with that size when I sew this up for a for-real bridesmaid dress. Edit: I should note that this material has a bit of stretch, which definitely helps. I think it’s a poly charmeuse?… I honestly can’t remember, I picked it up for $5/yard from Vogue fabrics in Evanston.

by hand london anna dress back

I’ll generously call this a wearable muslin, although I’m not sure where I’ll wear it. I finished Anna in time to bring her to the Wisconsin Dells for New Year’s Eve, but my rational side won out and I left her at home. She might have been JUST SLIGHTLY out-of-place at the steak house we went to for NYE dinner.

It pains me to say it, since the floor length makes this dress pretty glam, but I might shorten her to wear in the spring and summer. I’m sure I’ll make up for the drama with the bridesmaid dress in the fall.

Have any of you made a bridesmaid or wedding dress? Tell me your secrets!

Flannel Archer Button Up

flannel archer button up grainline studio

It’s time for me to get back in the blog saddle. I recently started a new job, and I gave myself a little break for a few weeks to adjust. The gig’s been great thus far, but I’m still getting used to dressing like a real person (business casual, y’all!) and coming into the office five days in a row without feeling like a zombie.

My previous job offered Work from Home Wednesdays. I hadn’t realized how much of an impact that had on my energy levels. Doing work braless, in my pajamas once a week really did wonders for my well-being. But alas, that life is no more. I’m finally used my new schedule and workload, and that means more energy for blogging. 😀

cruella
image: Veronz

I know Halloween has come and gone, but daggumit I worked hard on my costume and I want to share it. Here’s the outfit breakdown:

  • Fleece and faux fur coat: Vogue Very Easy pattern V 8930
  • Dress: single layer of V 8904, sewn twice before
  • Red gloves, cigarette holder, and wig: Amazon.com
  • Red pumps (not pictured): DSW
  • Earrings and necklace: sourced from my late grandma’s fantastic costume jewelry stash
  • Emerald ring: panic attack central AKA Forever 21

The gloves were slippery, the wig was a little itchy, and the coat was hot as hell at the indoor party I attended. But I’ll be damned if I didn’t feel like a badass the entire night. Being a glamorous Disney villain has its perks.

flannel archer button up

When it came time for a practical sewing project, I turned to the Archer Button Up from Grainline Studio. Last year, I sewed view B in a red chambray. This shirt is view A, a classic boyfriend-style button up, in a super-soft Robert Kaufman flannel from The Needle Shop in Chicago. I was very, very hungover when I took these pictures (like, “oh god why did I do this to myself never again” stupid hungover), so I apologize for my glazed-over eyes and general derpness.

flannel archer button up grainline studio

The sewing process was so much less intimidating this time around with one Archer under my belt. I don’t have a ton to say about construction, but I did fudge the collar a little bit. Instead of using Andrea’s collar tutorial like I did last time, I followed along with the pattern directions and referred to Jen’s sew along. Her video on how to attach the collar is helpful, but my collar stand ended up jutting out past the button band a little bit on one side. It’s not enough to be bothersome, so it’s staying as-is.

archer button up in flannel

I’m not sure if it’s good or bad that I’m coming to accept little imperfections in my handmade work. Part of me wonders if I notice the mistakes more because I’m gaining experience. But, I could just be getting lazier. Either way, I have a wearable shirt at the end of the day. Right now, that’s good enough for me.

archer button up grainline studio
And this is why we press our hems

In case you’re interested in the boring details:

  • Size: Straight 8. My measurements are 36″-29″-38″ and I’m 6’0″ tall.
  • Alterations: Added 1.5″ to the sleeves and body (could’ve gone with just 1″ on the sleeves); used Jen’s alternate Archer pocket tutorial again.
  • Finishing: Used my machine’s overcast foot for a faux-serged look (this foot is AMAZING by the way); sewed faux flat-felled seams throughout.

It feels good to be back! Before I leave, did you all see Heather’s latest release over at Closet Case Files?

Clare-coat-sewing-pattern-funnel-collar
photo: closetcasefiles.com

The Clare Coat just pounced to the top of my queue. I know, I know, I did a whole post about which coat pattern I wanted to make and actually bought one from Burda. But this pattern just speaks to me. Now to source some wool and super-warm lining…

Have any patterns cut the line in your sewing queue?

Three Grainline Studio Lark Tees (and Halloween Costume Progress)

three grainline studio lark tees

It’s been churn and burn in my sewing world lately. I usually try to write a post fairly quickly after sewing something, but life’s been busy. Plus, lots of output means less time for blogging. But I’m here to remedy that today. Please forgive the garment and photo overload in this post! First up: the costume. Halloween is looming, and for once I’m not procrastinating. This year I’ll be dressing up as the most fabulous harpy to come out of the Disney empire:

disney style cruella de vil
Image from blogs.disney.com

Cruella de Vil. No, it’s not the most creative costume, but I’ve been itching to be Cruella for a few years now. I used Very Easy Vogue coat pattern V8930 to make the yellowish-cream “fur” coat. As in, I used banana-colored fleece for the body and faux fur for the facing/collar piece.

cruella de vil costume
I think I’m attempting “haughty” here. Also plz excuse the mess and graininess.

And, of course, the coat is lined in vivid red. I made a simple black dress using the base layer of V8904 (also sewn here and here), except I sewed a V-neckline. The shoes are Anne Klein pumps from DSW. I’ve gathered most of the other accessories (red gloves, cigarette holder, green earrings), and now I’ve just got to settle on a wig, maybe make a purse, and find a real or fake dalmatian puppy for my pocket. Are any of you attempting a DIY Halloween costume this year? Spill!

I’ve kept my sewing machine pretty warm with Halloween stuff lately, but I’ve also made some non-costume-related garments. When Grainline Studio launched the Lark Tee sewing pattern, I bought it immediately and planned a trip to Vogue Fabrics to get my hands on some knits. I didn’t hesitate to buy Lark because A). I don’t own a T-shirt pattern, B). Grainline’s drafting is generally spot on, and C). it’s infinitely customizable, with four neckline options (crew, scoop, V, and boat) and four sleeve options (long, 3/4, short, and cap).

For construction, I used a ballpoint needle, walking foot, and the lightning bolt stitch on my sewing machine. Each is a size 8. Here are the rest of the dirty details about my three Larks (and counting):

Long Sleeve with V-Neck

grainline studio lark tee olive

cuffs grainline studio lark tee

I didn’t have a twin needle handy when I finished the hem and sleeves of this shirt, and I kind of botched the sleeve hems with a regular zigzag stitch. Since I didn’t stabilize them with anything, they turned out wavy enough to be bothersome. Luckily, cutting the hems off and adding cuffs turned out to be a really simple fix. I’m a fan of cuffs on long sleeves, and I think I might treat all of my LS Larks this way!

lark tee long sleeves

v-neck lark tee grainline studio

I looooove the color of this fabric—a sturdy ponte knit from The Needle Shop in Chicago—but unfortunately it’s pilling like crazy after just three washes. I think I might start air-drying this bad boy to avoid any more damage. (It might also help if I stopped wearing jewelry with it :-P). As for the neckline, this was my first attempt at a V-neck. It’s not horrible, but it’s a little more rounded underneath the point than it should be. I fixed that with my second V-neck after reading Jen’s tutorial for the Lark sew along. Speaking of my second V-neck…

3/4 Sleeve with V-Neck

v-neck lark tee grainline studio

lark tee 3/4 sleeves grainline studio

I know it’s kind of hard to see the V-neck detailing on black, but the point of the V is much prettier on this version. I folded the neckband strip carefully to get a thin line of white at the edge, and I like how that turned out. The neckline is anchored down with a twin needle stitch (finally replaced my broken one!). I also used the twin needle to hem the sleeves and bottom.

lark tee 3/4 sleeves grainline studio

This fabric is probably the best knit I’ve ever bought. Its a bamboo-lycra blend from Vogue Fabrics in Evanston. At $16/yard it’s pretty pricey, and I hesitated to purchase it at first. But I’m glad I went with my gut, since it’s washed and worn beautifully thus far and remains buttery soft to the touch.

Short Sleeve with Scoop Neck

short sleeve lark tee grainline studio

short sleeve lark tee grainline studio

This particular Lark Tee is a testament to how differently patterns can behave depending on the type of fabric you use. I can’t remember the exact content of this cotton-spandex blend from Vogue Fabrics, but it’s definitely more structured than the bamboo knit. I think I could’ve easily cut a size down for this, and I might go back and take in the sides if the fit starts to bother me. Again, I used a twin needle to anchor the neckline and finish the hems.

lark tee short sleeve grainline studio

The Verdict

This is a great basic T-shirt pattern to build your layering wardrobe. It seems like it runs a bit big, so definitely make a test version and go from there. I have pretty broad shoulders and a 36″ bust, and the 8 fits great around the chest. It falls into a looser shape around the hips, but that’s part of the design. I should also note that this thing is pretty long. I’m 6’0″ with a long torso, and I normally have to lengthen my shirt patterns (including other Grainline Studio patterns) by at least 1″. I didn’t lengthen these shirts at all, and they’re plenty long.

Have you made any Larks yet? What’s your verdict?

Pattern Crushes: Fall/Winter Coats Edition

I’m torn about planning a seasonal wardrobe. I tried it for the first time this past March, when I posted what I considered to be a reasonable spring/summer sewing plan. “I can finish this in a few months, easy!” Not so easy it turns out, especially when you live in Chicago, a city that kicks any other city’s ass during the summer. Those sweet, sweet months between May and August begot more frequent late nights, beach volleyball, and patio drinkin’—and quite a bit less sewing.

My seasonal sewing plan wasn’t a complete bust, though. Here’s how I fared:

spring and summer sewing plans skitched

Sleeveless Button Up: I finally blew out the elbow on my favorite pink Levi’s shirt, so I lopped off the sleeves, took in the sides a bit to compensate for the deeper armhole, and bound the raw armscye with self-made bias tape. Cheating? Possibly. But I’m all for upcycling, so this one’s still a win in my book.

Solid Knit Tee: I made a knit Scout with some super-stretchy blue knit from my stash, but the ribbing I used for the neck band turned out a little gapey. I still wear this T-shirt, but it will probably be replaced by the arsenal of Lark Tees I’m planning on making. One down, at least five to go.

Floral Shift Dress: Colette’s Laurel in a floral cotton did the trick.

Printed Shorts: Nope. Next year: Maritime shorts. I hope.

Full Skirt: How did I not make this one happen?! A daggum SKIRT???!! I’m embarrassed, y’alls.

Woven Straight-Leg Pants: You can’t say I didn’t try. Try, and fail somewhat miserably.

The overall outcome could’ve been worse, but I still don’t feel great about failing to meet my goal. This season, I’ve decided to play it by ear, but that doesn’t mean I haven’t been ruminating. Let’s get real: people who sew also love to plan. I already bought some deep-red herringbone flannel for another Archer (view A this time), and I’m trying to drum up the courage to finally sew some Ginger Jeans.

But the number-one-must-absolutely-try-to-attempt item on my list is a winter coat. I know it’s early, but if I don’t get started soon it simply won’t get done. I’m not trying to make a coat to withstand the 0º F days of a Chicago winter; those days are for my Michelin-man Eddie Bauer down parka. I would, however, love to sew a heavyweight coat that’s not only warm enough to get me through most of the winter unscathed, but also cute enough that I’m not embarrassed to wear it in public.

I’ve been scouring the web for intermediate-level patterns (sometimes in vain), since the only coats I’ve sewn thus far are the Willy Wonka corduroy monstrosities that I made for Halloween last year. I’ve narrowed it down to the following patterns:

cascade duffel coat

Cascade Duffel Coat, Grainline Studio

Difficulty: advanced

Design details: slightly A-line toggle coat with optional hood

Pros: Made up in a nice wool, this would be insanely warm. And it’s got a hood!

Cons: It’s pretty sporty, and I find myself drawn to more feminine coats lately. I also already own a coat with toggles, albeit in a much lighter fabric.

018-Andy-etu

Andy Coat, Named Patterns

Difficulty: advanced

Design details: collarless belted coat with welt pockets and asymmetrical button stand

Pros: Who doesn’t love a good waist-cinching belt? And no collar means all the scarves.

Cons: No collar also means it runs the risk of looking homespun?

leanne marshall 1254

Simplicty 1254 by Leanne Marshall

Difficulty: easy (I’m skeptical)

Design details: fitted coat with an oversize collar that doubles as a hood

Pros: I love the look of the concealed zipper band and in-seam pockets.

Cons: That collar looks like it might swallow my head. Reviews note that the instructions are lacking, which might be a problem for me.

burda paneled coat

Paneled Coat #126, Burda

Difficulty: intermediate

Design details: fitted coat with panels, hidden pockets, and a lapel-free collar

Pros: The lines on this look modern and incredibly flattering. And, maybe it’s just the styling, but d-d-dayum this thing looks sexy for a winter coat.

Cons: While the neckline screams for a scarf, it might be a little too open to be practical for cold weather.

long wool coat burda

Long Wool Coat #104, Burda

Difficulty: intermediate

Design details: Long, semifitted coat with passants (shoulder straps) and one asymmetrical row of military-style buttons.

Pros: According to Burda, this coat is “the ideal accompaniment for a quiet walk.” Burda, go home, you’re drunk. But for reals, this coat looks polished and timeless.

Cons: I haven’t gone the military-style route before, and I’m a little afraid this will look too preppy on me.

There are several more jackets on my Sewing Pattern Crushes Pinterest board, but I find myself consistently navigating back to these five coats. Please comment if you’ve tried one of the patterns before!

I’m still pretty intimidated by the thought of making a heavy-duty garment like this, but I’m determined to give it a go. Have you ever sewn your own winter coat?

inari tee dress in tencel denim

Inari Tee Dress in Tencel Denim

After last week’s unfortunate pants episode, I’m happy to say that I love this dress. It’s my second version of the Inari Tee Dress from Named Patterns. instead of a knit, this time I sewed it up in a soft, lightweight tencel-denim blend. Have you ever felt tencel? I first laid hands on a tencel shirt in my one of my favorite Chicago boutiques, Study Hall. (If that shirt wasn’t a gnarly shade of Barney purple, I’d probably be wearing it right now.) It was incredibly soft and had such a pretty, fluid drape. Bonus points that tencel turns out to be biodegradable and sustainable! Sweet.

inari tee dress in tencel denim front

This fabric was so easy to work with—aside from the fierce fraying—that I’m letting it dictate my next make. Fabric.com is out of yardage in this color, but I’m planning on picking up some similar tencel chambray in a darker color to make another Archer. (Maybe with cuffs and a pocket made from remnants of the lighter fabric?! The wheels are a turnin’!)

inari tee dress

As I said, the innards were fraying like a beast after finishing them with a zigzag stitch, so I experimented with some binding for the side seams. Plus, the vented hem just cries out for a little extra something on the inside.

inari tee dress bias bound seam

inari tee dress hong kong seam

Experimenting is the key word here. I made some double-fold bias tape from leftover floral cotton and used it to create bias-bound side seams on one side (top image) and a Hong Kong bound seam on the other (bottom image). Honestly, I can’t remember my thought process or the steps I took when it came to the finish at the vent, but it necessitated a different treatment than the side seam. As you can see, things got a little wonky at both vent openings, especially on the Honk Kong side. I zigzagged any raw edges to prevent any further unraveling. Any tips for finishing a vented hem? I’m wondering if a simple zigzag finish (or overlocked edge if you have a serger) is the best option.

inari tee dress decorative stitching

As if some janky floral bias tape wasn’t enough, I also added decorative stitches at the vent. I seriously felt like a kid discovering Doritos for the first time when I started playing around with the decorative stitches on my machine. I settled on these loops, which are inconspicuous because of the near-matching thread. It’s all about those little details, amirite?!

inari tee dress in tencel denim vent

The Nitty Gritty

  • Fit: Again, I sewed a US size 8. Since my knit garment was so large at first (like, large even for a fabric with lots of stretch), I sewed the side seams at a 5/8″ seam allowance. I should’ve stuck with the pattern’s recommended 3/8″ SA, though, since I could use a teensy bit more room at the upper thigh. I thought about letting it out, but the dress was still comfy after two full days of wear. Just no sumo squats in this!

inari tee dress bias facing neckline

  • Neckline: I forwent the facing pieces and finished the neckline with a self bias facing. As always, I used the method outlined in this Grainline tutorial to get that sucker lying flat.

inari tee dress sleeves

  • Sleeves: I did a shoddy job setting the sleeves the first time around (I guess I’m rusty sewing them in the round?!), so I unpicked them and took my time pinning and easing. Unfortunately, the stitches from the previous seam are visible. Any tips for fixing that? I have enough fabric to sew new sleeves, but the marks don’t bother me too much right now.

inari tee dress sleeve detail

  • Sleeve detail: Again with the decorative stitches—I can’t stop myself! Instead of sewing the sleeve detail to the sleeve by hand, I used this pointed-oval stitch. It turned into a fish since I didn’t stop quickly enough. Kinda cute?

This dress is seriously so fun to wear. I’d say that after sewing two Inaris within a month, I should give the pattern a rest for awhile, but I can see making this up in a slightly heavier weight wool jersey to pair with tights this fall.

That gets me thinking: Are you geared up for fall sewing? I’m going to go with the flow this season and work on things as inspiration (or a new pattern!) comes along. And then there’s Halloween! But that holiday deserves its own post. Soon enough, my costume-loving friends, soon enough. 😀