
I am no longer afraid of making pants. Am I itching to whip up another pair of jeans? Absolutely not. It takes for-ev-er. The denim you buy has got to be perfect. Topstitching is tedious. But I can honestly say that I enjoyed the experience of sewing my first pair of jeans. And they actually fit!


Instead of using a jeans pattern, I decided to rip apart a beloved old pair of Levi’s that finally bit the dust. A couple years ago, Ingrid from We the Sewing wrote about copying ready-to-wear jeans. She totally inspired me (even if it took awhile for me to get around to the sewing part). She wasn’t kidding about how long it takes to rip out a bunch of industrial-strength stitching. I broke a seam ripper and jabbed myself in the fingers many, many times in the process.
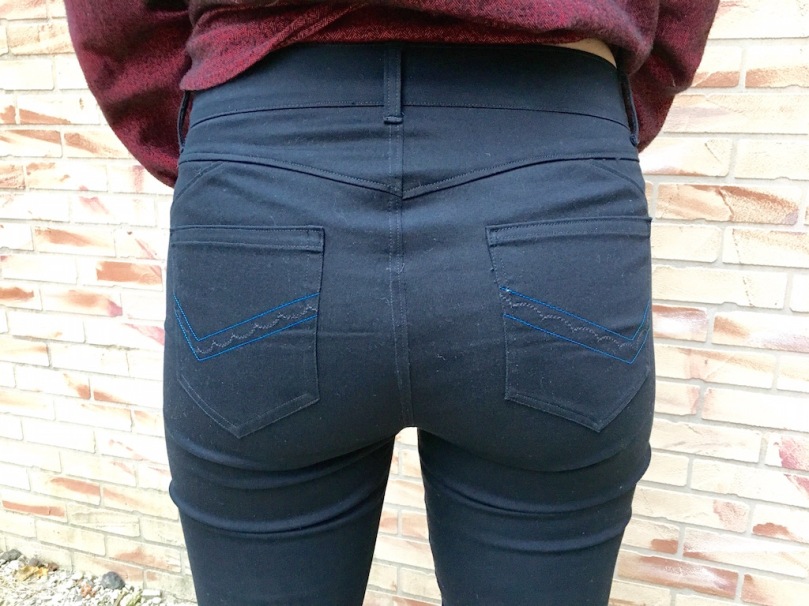
After ripping the old pair apart piece by piece, I traced a pattern. I love the seaming details on the front pocket and back yoke, so I did my best to preserve the original design.


Throughout the sewing process, I referred to a couple of very detailed tutorials:
- Closet Case Patterns Ginger Jeans Sewalong, which was handy when sewing the pocket stay and waistband.
- Grainline Studio Maritime Shorts Sewing Tutorial. I would’ve been lost on the fly front without these descriptions and pictures.


Excuse the lint—that’s the price you pay with stretchy black denim. The lining is an amazing Leah Duncan voile. Here are the construction details:
- Used my regular sewing machine for the seams.
- Serged raw edges.
- Used marching regular thread for everything, including topstitching and decorative back pocket stitching. I wanted to conceal any glaring mistakes my first time around!
Here’s what I would do differently next time:
- Buy a quality jeans button. Newsflash: The ones at JoAnn are subpar. (No offense JoAnn—your black stretch denim is pretty good.) That’s why you see this placeholder braided-leather shank button. Pretty? Yes. Sturdy? Hell naw.
- Interface the waistband. The jeans stay up just fine, but it’d be nice to have a little more structure.
- Research common fitting issues. This pair bunches a bit under the butt and at the knees. It’s not too bothersome, but I think I could eliminate some of the excess fabric with precise fitting adjustments.
After a project like this, I think it’s time to reward myself with some easy Mandy Boat Tees. Do you have any go-to palate cleanser patterns?

Closet case has lots of info about jeans fitting – I just made an adjustment on jeans to fix the same problem just by shaving of some of the bag leg inside leg seam. Love the seam details on this pair!
LikeLike
Awesome, thanks for the tip!!
LikeLike
Fab effort! Love how you’ve copied your favourite bits. At least you only need minor tweaks and copying your rtw meant you could skip the muslin. I’m tempted to rip apart an old pair I have….will stock up on stitch rippers first!
LikeLike
Thank you! It’s pretty fun to copy a pair of jeans–you should do it!! 😊
LikeLiked by 1 person
I really should!!
LikeLike
They look great on you! Must have been tough to rip old favourites apart, even if they were worn out!
LikeLike
These look great! Those yoke details are super cool! I think the fit is pretty amazing – my guess is those tiny wrinkles are a sign that your black denim doesn’t quite have the same give as the Levi’s denim – I’ve been reading the Pants for Real people book lately and they suggest with every pants pattern add extra SA to the in and outseams as fitting ‘insurance’… might be all you need to worry about with future pairs!
LikeLike
These look fab. I am making an ogden cami as palate cleanser before i tackle jeans, myself (got the denim kit from closet case patterns. The best stuff always comes from tracing off favorite garments, though! Nice job on these!
LikeLiked by 1 person
They look awesome! And love that pocket lining. Breaking a seam ripper is pretty serious stuff, but I can totally see how that happens 🙂 Those seams are unbelievably hardcore. Well done for sticking with it. I almost gave up a few times….
LikeLike
Thank you! Yeah, I’m glad I took the time to rip an old pair apart once, because I may never do it again. 😅 Thanks for the inspiration!
LikeLiked by 1 person
[…] impressive copy of some favourite RTW jeans from Sewing and […]
LikeLike
[…] part. I had something of a meltdown when I tried multiple times to attach a jeans button to my me-made jeans. I should have known better than to buy cheapy-looking buttons from JoAnn, but I was desperate. […]
LikeLike